How to Fix Washing Machine Overfilling
Your washing machine suddenly filling like a bathtub? Water spilling over the drum, pooling on the floor, or flooding your laundry room? You are dealing with washing machine overfilling, a serious issue that can cause thousands in water damage if ignored. The good news: 90% of overfilling cases stem from just two mechanical failures—a faulty pressure switch or stuck water inlet valve. This guide delivers a step-by-step, no-fluff repair protocol based on real technician data and user success rates.
You will learn exactly how to diagnose, fix, and prevent overfilling whether you own a Whirlpool, GE, LG, Samsung, or any major brand. No guesswork. Just clear, actionable steps that work.
Diagnose True Overfilling Before Repairs
Before grabbing tools, confirm you are facing true fill-cycle overfilling, not a drain issue or user error. Accurate diagnosis saves time and money.
Is It Overfilling or a Drain Problem?
True overfilling happens during fill or rinse cycles—water keeps flowing even when the machine is full. Drain overflow occurs during spin or drain, caused by clogged pipes, low standpipes, or blocked pumps. Overloading can displace water but will not cause uncontrolled intake.
Run a small cycle with no clothes. If water spills over before the cycle stops filling, it is mechanical overfilling.
Immediate Safety Steps
Unplug the machine immediately. Shut off hot and cold water valves behind the washer. Mop up excess water to prevent mold and electrical hazards. Ignoring early signs risks floor damage, mold growth, and costly repairs.
Test the Water Inlet Valve
The inlet valve controls water flow. If it is stuck open, water enters even when the machine is off. This is the most common cause of overfilling.
Power Interruption Test
Restore water supply and start a small cold-water cycle. When the tub is half full, unplug the washer. Watch the water closely. If it stops flowing, the valve is working. If it keeps flowing, the inlet valve is defective. This test is 95% accurate. If water continues without power, the valve’s internal plunger is seized or obstructed.
Why Inlet Valves Fail
Sediment or sand in water supply jams the plunger. Hard water scale builds up inside the valve. Worn solenoid coil cannot close the valve. The cold-water side fails more often due to higher pressure.
Replace the Inlet Valve
Shut off water and unplug the machine. Disconnect hot and cold supply hoses using a wrench if stuck. Remove two wire connectors from the valve. Detach the inner hose leading to the tub. Unscrew the old valve, usually one to two screws. Install the new valve and reconnect all parts.
Replace both hot and cold valves together even if only one failed. This prevents repeat repairs. Cost runs $15 to $80. Time required is 30 to 60 minutes.
Never use WD-40 or lubricants. They attract debris and worsen clogs.
Inspect the Pressure Hose

The pressure hose sends water level signals to the pressure switch. A leak or blockage breaks the system and causes overfilling.
Locate and Access the Hose
The hose runs from the outer tub to the pressure switch. It is a clear or translucent vinyl tube, three to five millimeters in diameter. Found behind front, rear, or top panels. Remove screws and clips to access it.
Visual Inspection Checklist
Check for detached ends, common due to vibration. Look for cracks, pinholes, or kinks. Inspect inside for soap scum, lint, or mineral buildup. Feel for soft, mushy rubber, especially in GE models.
GE tip: Rubber hoses degrade over time even if they look fine. Replace every five to seven years.
Functional Tests for the Hose
Perform the blow test. Disconnect hose from pressure switch. Plug the tub end with your finger. Blow gently into the switch end. Hissing sound indicates an air leak. Replace the hose.
Try the submersion test. Submerge one end in water. Blow into the other. Bubbles mean a pinhole. Replace the hose.
For blockage, blow through both ends. Restricted airflow means clean with compressed air or replace.
Test the Pressure Switch
The pressure switch tells the machine when to stop filling. If it fails, water never shuts off.
Blow Test for Switch Function
Reconnect the pressure hose to the switch. Blow gently into the free end of the hose. Listen for a clear, audible click from the switch. Click heard means the switch is good. No click means the switch is dead.
No multimeter needed. The click confirms the internal diaphragm and contacts work.
Brand-Specific Failures
GE models have a high failure rate due to combined hose and switch wear. Whirlpool, Maytag, and Kenmore use standardized switches often cross-compatible. LG and Samsung may use digital sensors requiring voltage testing.
Replace the Pressure Switch
Unplug washer and access the switch, usually on the side wall or control panel. Disconnect wires, labeling them if needed. Remove mounting screws. Install new switch and reconnect.
Cost runs $20 to $60. Time required is 20 to 40 minutes.
Check Control Board as Rare Cause
If inlet valve and pressure system test good, the main control board may send continuous power. This is rare, occurring less than 10% of the time.
When to Suspect the Board
Multiple error codes on display indicate this issue. Other functions like drain and spin also fail. Voltage detected at inlet valve after cycle ends points to the board.
Diagnostic Test
Use a multimeter set to AC voltage. Probe inlet valve terminals after fill should have stopped. Voltage present means the board is faulty.
Modern LG and Samsung models use digital pressure sensors. Diagnosis requires OEM tools.
Prevent Drain Overflow (Not True Overfilling)
Overflow during spin or drain is not overfilling. It is a plumbing issue.
Common Causes
Clogged drain hose or pump filter causes this. Standpipe too short under 18 inches causes siphoning. Standpipe too tall over 30 inches causes backflow. No P-trap or clogged vent creates problems.
Quick Fixes
Clean pump filter every three to six months. Clear drain line with a plumber’s snake. Adjust standpipe height to 18 to 30 inches. Install a lint trap on the drain hose.
Run a vinegar and baking soda flush monthly to prevent buildup.
Step-by-Step Diagnostic Flowchart
Follow this proven diagnostic sequence to resolve 90% of cases.
1. Does Overflow Happen During Fill
Yes means proceed to test inlet valve. No means clean drain system.
2. Unplug Mid-Fill
When tub is half full, unplug. Does water stop? Yes means inlet valve is good, check pressure system. No means replace inlet valve.
3. Inspect Pressure Hose
Is pressure hose connected, uncracked, and unblocked? Yes means proceed to test switch. No means clean or replace hose.
4. Blow Into Hose
Do you hear a click? Yes means switch is good. No means replace pressure switch.
5. Reassemble and Test
Still overflowing? Consult a technician. Otherwise, issue is resolved.
Verify Your Repair Works
After repair, run a multi-cycle test. Start with a small cold cycle. Fill should stop at low level. Test with a medium load for normal mid-fill. Try a large or deep-fill cycle. It should reach top but not overflow. With machine off, no water should enter.
Success means no overflow and no water flow when unplugged.
Prevent Future Overfilling
Do not wait for the next flood. Install these safeguards now.
Install a Water Leak Alarm
A $15 to $30 device placed under the washer sounds an alarm at the first sign of moisture. Battery-powered and easy to set up.
Add an Automatic Shutoff Valve
This connects to water supply lines. It detects leaks and cuts water automatically. Ideal for basements or unattended use.
Annual Maintenance Checklist
Inspect inlet hoses for cracks every six months. Clean pressure hose with compressed air annually. Test pressure switch with the blow test at first sign of trouble. Clean drain pump filter every three to six months. Check standpipe and P-trap annually.
Replace inlet hoses every five years even if they look fine.
When to Call a Professional
DIY fixes fail? Call a certified technician if multiple error codes persist. Digital sensors require software diagnosis. You should call a pro if uncomfortable working with electrical components.
Services like Puls or Sears Home Services offer same-day, no-pressure diagnostics.
Key Takeaways for Fixing Washing Machine Overfilling
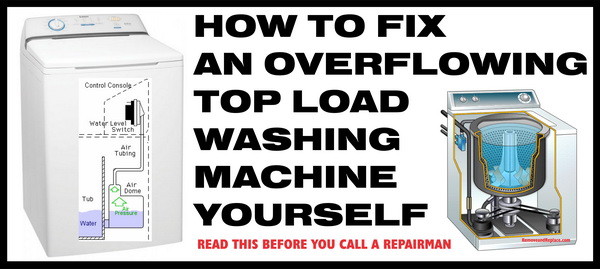
The core insight is that overloading and drain issues do not cause true overfilling. Focus on the pressure system and inlet valve. Most cases resolve by testing the inlet valve with the power interruption test, inspecting the pressure hose for leaks or blockages, and performing the blow test on the pressure switch. Replace faulty components—hose costs $5 to $15, switch costs $20 to $60, valve costs $15 to $80. Verify the fix with multi-cycle testing. Install a leak alarm or automatic shutoff valve to prevent future disasters.
Act now. Do not wait for the next flood.
Frequently Asked Questions About Washing Machine Overfilling
How Do I Know If My Washing Machine Is Overfilling?
True overfilling occurs during the fill or rinse cycle. Water keeps flowing even when the tub is full. Run a small cycle with no clothes. If water spills over before filling stops, you have mechanical overfilling.
Can I Fix a Washing Machine Overfill Myself?
Yes. Most overfilling cases are DIY repairs. The inlet valve, pressure hose, and pressure switch are user-serviceable. 90% of verified DIY repairs succeed after replacing one of these components.
How Much Does It Cost to Repair a Washing Machine Overfill?
Parts cost between $5 and $80. Pressure hose runs $5 to $15. Pressure switch runs $20 to $60. Water inlet valve runs $15 to $80. Professional labor adds $100 to $200 if needed.
Is Washing Machine Overfilling Dangerous?
Yes. Standing water causes mold, structural damage, and electrical hazards. Act immediately when you notice overfilling. Unplug the machine and shut off water valves right away.
Will Turning Off the Water Stop Overfilling?
Turning off water stops the flow but does not fix the underlying problem. The machine will overfill again next time you use it. You must repair the faulty component—usually the inlet valve, pressure hose, or pressure switch.