How to Fix Craftsman Pressure Washer Issues
Is your Craftsman pressure washer refusing to start, delivering no water, or stalling the moment you release the trigger? You’re not alone. Thousands of homeowners face these frustrating issues, especially after seasonal storage. The good news is that most problems are fixable with basic tools and a clear plan. In fact, the majority of starting issues stem from just one culprit: stale fuel clogging the carburetor.
This guide cuts through the noise, giving you step-by-step fixes for the most common Craftsman pressure washer problems. Whether you’re dealing with a silent engine, a dry pump, or a motor that dies mid-spray, you’ll learn how to diagnose and resolve it without needing a mechanic.
Why Your Craftsman Pressure Washer Won’t Start
When your Craftsman pressure washer won’t turn over, the issue is almost always fuel-related rather than mechanical. Ethanol-laced gasoline breaks down in as little as 30 days, forming gum and varnish that clog the carburetor’s tiny passages. If the engine sits unused for months, the main jet, which is only 0.65 mm wide, can become completely blocked, starving the engine of fuel.
Before tearing into the carburetor, confirm the problem isn’t ignition or compression. A simple test can save you hours of unnecessary work.
Confirm Fuel Delivery Failure
Use the starting fluid test to isolate the issue quickly:
- Remove the air cleaner and spray a 2-second burst of starting fluid into the carburetor throat
- Pull the starter cord
- If the engine fires briefly and then dies, you’ve confirmed spark is good, compression is present, and timing is correct
- The only missing element is fuel flow, pointing directly to the carburetor or fuel system
An alternative test involves squirting fresh, non-ethanol fuel directly into the intake. If the engine runs briefly, the problem is fuel delivery, not ignition.
Clean the Carburetor Properly

A clogged carburetor is the number one reason Craftsman pressure washers fail to start. Follow this 9-step cleaning procedure to restore fuel flow and get your machine running again.
Disconnect Fuel Line Safely
- Turn the fuel valve to O, which indicates Stop
- Disconnect the fuel line from the carburetor
- Clamp the line with vice grips to prevent spills
Remove the Carburetor
- Take off the air cleaner assembly
- Disconnect the throttle and choke linkages
- Remove mounting bolts, typically three 8 mm bolts on top or two 8 mm and one 7 mm bolt securing the base
- Lift the carburetor off carefully, as it mounts into soft plastic and you should avoid over-tightening during reassembly
Drain the Fuel Bowl
- Locate the 10 mm drain plug on the bottom of the bowl
- Remove it and let old, gummy fuel drain out
- Wipe the bowl clean with a rag
- Spray carburetor cleaner inside and let it sit for 1 to 2 minutes
Remove Main Jet and Emulsion Tube
- Use a small flathead screwdriver to gently pry out the brass main jet and emulsion tube
- Handle with care, as these are delicate and easily damaged
- Inspect the emulsion tube’s side holes, since clogs here prevent proper fuel-air mixing
Clear the Main Jet
- The main jet’s passage is only 0.65 mm in diameter, smaller than a pinhead
- Use carburetor cleaner spray and a thin metal tool like a guitar string, stranded copper wire, or small torch tip
- Gently twist the tool through the hole without forcing it, as you may damage the brass
- Blow out debris with compressed air
Clean the Emulsion Tube
- Spray cleaner through the tube and scrub the outside with a small brush
- Push your cleaning tool through all side holes to ensure full clearance
- Check the idle jet, which may be slightly dirty but rarely fully blocked
Reassemble the Carburetor
- Reinstall the emulsion tube and main jet
- Tighten the main jet snugly but not tight, since brass strips easily
- Replace the O-ring and collar on the backside
- Reattach the governor spring and auto choke linkage
- Route the idle spring correctly, as misalignment causes erratic idling
Reinstall the Carburetor
- Align the carburetor’s mounting nub with the engine hole
- Reconnect the fuel line, throttle linkage, and air cleaner
- Reattach the breather tube, which is often overlooked but critical for engine function
- Reinstall the fuel tank and airbox, ensuring all hoses are secure
Test the Engine
- Turn the fuel valve to the vertical line position, which indicates Run
- Check for fuel leaks
- Take the unit outside, connect the water hose, and pull the starter cord
- The success sign is the engine starting on its own with no starting fluid needed
Avoid Common Cleaning Mistakes
- Never soak the carburetor in chemical cleaner, as this damages O-rings and rubber seals
- Don’t use a wire brush or drill bit on brass components, since scratches can cause leaks
- Use compressed air to blow out all passages, blocking one hole at a time to force pressure through clogged routes
Restore Water Flow to the Pump
No water coming out of your pressure washer even though the hose is connected and the faucet is on? This isn’t always a pump failure. Often, the issue is simpler: air locks, clogged filters, or stuck valves.
Purge Air from the System
Trapped air prevents the pump from priming. Fix it in seconds:
- Disconnect the garden hose from the pressure washer inlet
- Turn on the water supply and let it run for 10 to 15 seconds to flush air
- Reconnect the hose and try starting the pump
Clean the Inlet Filter
Every Craftsman pressure washer has a small filter at the water inlet, often hidden under a fitting. Remove the filter using pliers or a wrench, rinse it under running water to clear sand, rust, or debris, then reinstall and test flow.
Inspect Pump Valves
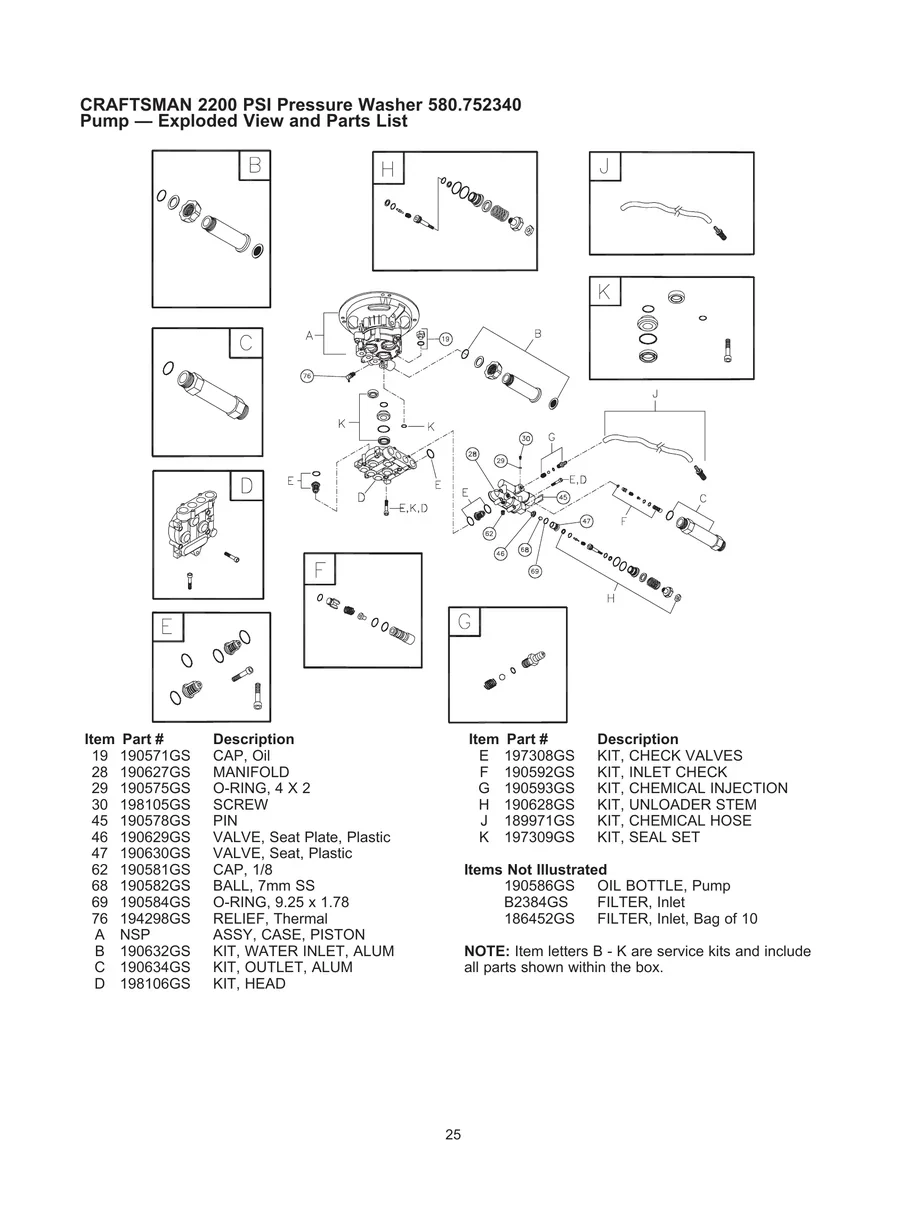
The pump relies on several internal valves to move water. If any are stuck, flow stops completely.
| Valve | Function | Failure Sign |
|---|---|---|
| Intake and discharge valves | Control water in and out of pump | Stuck closed means no flow |
| Unloader valve | Recirculates water when trigger is off | Malfunction blocks priming |
| Thermal relief valve | Releases hot water if pump overheats | If stuck open, leaks or blocks flow |
If you’re comfortable disassembling, remove and clean these valves. Otherwise, proceed to re-priming.
Re-prime the Pump
If the pump is dry, disconnect the high-pressure hose from the pump outlet and pour a cup of water directly into the outlet. Reconnect the hose, start the engine, and pull the trigger briefly. Water should flow within seconds.
Stop Motor from Stalling on Trigger Release
Does your engine die the second you let go of the spray gun? This is not an engine problem. It’s an unloader valve issue. The unloader isn’t releasing pressure correctly, causing the motor to stall.
Tighten and Adjust the Unloader
- Snug the unloader valve body, since looseness prevents proper function
- Back out the adjustment screw one full turn if it’s fully screwed in, as pressure can’t release
- Test by starting the engine and releasing the trigger
- The success sign is the engine continuing to run with only a minor RPM dip
Use a Pressure Gauge for Accuracy
Guessing unloader settings leads to poor performance. Use a gauge to set it right:
- Connect the gauge to the high-pressure outlet
- Pull the trigger with a 25-degree nozzle
- Measure the trigger open reading, which should be 2,600 to 2,800 psi
- The trigger closed reading may rise to 3,200 psi
- Adjust the unloader screw until stalling stops and pressure is stable
Note that advertised PSI, such as 3,300, is theoretical. A reading of 2,600 to 2,800 psi is normal for homeowner models.
Fix Leaking Thermal Relief Valve
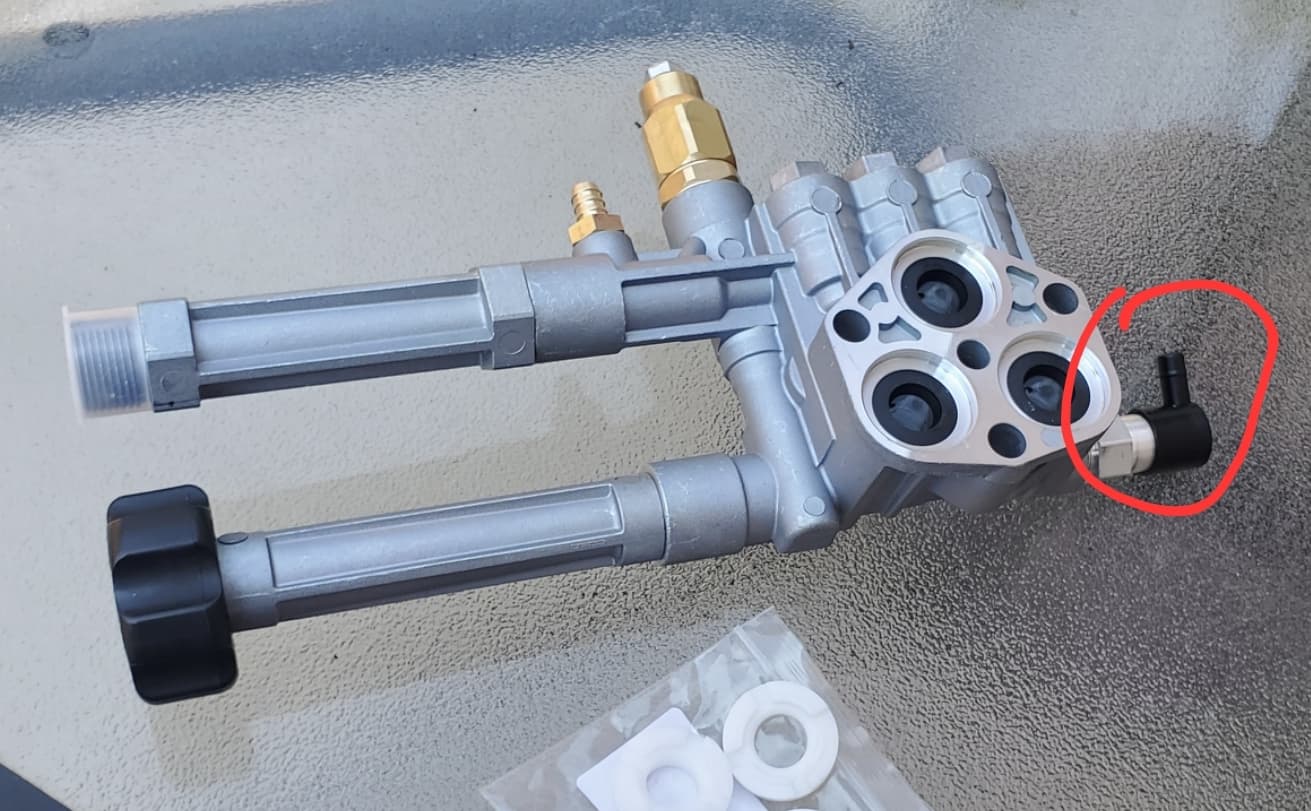
A drip from the black valve on the pump indicates the thermal relief valve is opening. This safety feature opens if the pump overheats and should stay closed during normal use.
Tighten the Valve First
Use a wrench to snug the thermal relief valve. In many cases, a loose valve is the only issue. Retest by running the pressure washer for 2 to 3 minutes. If the leak stops, the fix is complete.
Replace If Still Leaking
If dripping continues after tightening, replace the valve. Aftermarket valves are inexpensive and widely available. Match the thread size and pressure rating to your specific model.
Prevent Future Problems with Proper Maintenance
Most Craftsman pressure washer failures are preventable. Follow these steps to keep yours running year after year.
Use Fresh, Non-Ethanol Fuel
Ethanol breaks down in 30 days, forming gum that clogs the carburetor. Always use fresh fuel that’s less than 30 days old. When possible, use non-ethanol gasoline from a marina or auto store.
Add Fuel Stabilizer Before Storage
If storing for more than 30 days, fill the tank with fresh fuel and add fuel stabilizer like STA-BIL. Run the engine for 2 to 3 minutes to circulate treated fuel, then turn off the fuel valve and let the engine run dry.
Drain Fuel for Long-Term Storage
For winter or extended storage, drain the fuel tank and carburetor bowl. This prevents varnish buildup and corrosion. Store with the fuel valve off and the tank empty.
Clean Carburetor Annually
Even if the engine starts fine, clean the carburetor once per year. This prevents gradual clogs that lead to hard starts. The process takes less than 30 minutes with basic tools.
Check Inlet Filter Before Each Use
A clogged filter reduces water flow and can damage the pump. Remove and rinse it every time you use the washer. This takes 30 seconds and saves hours of troubleshooting later.
When to Seek Professional Help
Most issues are DIY-friendly, but some signs mean it’s time for a pro:
- Pump makes loud knocking or grinding noises, indicating internal damage
- Oil leaking from the pump, which suggests failed seals or crankshaft
- No improvement after cleaning carburetor and checking fuel, pointing to possible ignition or compression failure
- Unloader adjustment doesn’t stop stalling, which may indicate internal pump or valve damage
Aftermarket pumps like the RMW2.2G24 may need extra tuning. Tighten all connections and recheck unloader settings after installation.
Frequently Asked Questions About Craftsman Pressure Washer Troubleshooting
Why won’t my Craftsman pressure washer start after sitting all winter?
Stale fuel is almost always the culprit. Ethanol-based gasoline breaks down within 30 days, forming gum and varnish that clog the carburetor’s main jet. Clean the carburetor following the 9-step procedure and use fresh, non-ethanol fuel.
How do I know if my pressure washer pump is bad?
Signs of pump failure include loud knocking or grinding noises, oil leaking from the pump, and no water flow even after purging air and cleaning the inlet filter. If the pump won’t prime after re-priming attempts, it may need professional service or replacement.
What PSI should my Craftsman pressure washer produce?
Homeowner-grade machines typically operate at 2,600 to 2,800 psi. The advertised maximum PSI, such as 3,300, is theoretical pump capacity, not normal operating pressure. A reading of 2,600 psi with the trigger open is typical and acceptable.
Why does my pressure washer motor die when I release the trigger?
This is an unloader valve issue, not an engine problem. The unloader isn’t releasing pressure correctly. Snug the unloader valve body and back out the adjustment screw one full turn. Use a pressure gauge for precise adjustment.
Can I use regular gasoline in my Craftsman pressure washer?
You can use regular gasoline, but non-ethanol fuel is strongly recommended. Ethanol breaks down quickly and causes carburetor clogs. If you must use ethanol fuel, add a fuel stabilizer and never store the machine with untreated fuel.
How often should I clean the carburetor on my pressure washer?
Clean the carburetor annually as preventive maintenance, or whenever the engine won’t start after storage. Regular cleaning prevents gradual clogs that lead to hard starts and extends the life of your machine.
Key Takeaways for Fixing Your Craftsman Pressure Washer
A Craftsman pressure washer that won’t start or deliver water is usually suffering from stale fuel, air locks, or improper adjustments rather than major failure. With fresh fuel, a cleaned carburetor, and proper unloader setup, most units fire right up and perform like new.
Remember these essential points:
- Stale ethanol fuel is the primary cause of carburetor clogs and starting failures
- The starting fluid test quickly confirms whether you have a fuel delivery issue
- Proper unloader adjustment prevents motor stalling on trigger release
- Homeowner-grade machines typically operate at 2,600 to 2,800 psi
Stick to a simple maintenance routine: use non-ethanol fuel, add stabilizer, clean the inlet filter, and drain fuel before storage. These small steps prevent most common issues and extend your machine’s life for years.
Start with the simplest fix first. Check your fuel, clean the inlet filter, and test the unloader before diving into major repairs. Most problems take less than 30 minutes to resolve with basic tools.