Dexter Washing Machine Repair Guide
Dexter washing machines are built for heavy-duty commercial use, but even the most rugged equipment can develop problems under constant operation. Whether you manage a laundromat, hotel, or multi-family property, dexter washing machine repair is essential to avoid downtime and lost revenue. From coin mechanism failures to control board malfunctions, understanding how to diagnose and fix common issues keeps your machines running efficiently.
This guide delivers actionable repair steps based directly on verified technical data. You’ll learn how to safely access internal components, troubleshoot coin acceptors, replace faulty control boards, and source genuine parts. We’ll also cover best practices for maintenance and when to call in professional technicians. By following these proven procedures, you can restore function quickly and extend the life of your Dexter units.
Access the Control Panel Safely
Before diagnosing electrical or mechanical faults, you must gain secure access to the machine’s internal systems. Dexter washers use a service key system to prevent unauthorized tampering with high-voltage components.
Remove Soap Dispenser Screws First
Never attempt to remove the control panel cover without first removing the screws from the soap dispenser. These screws physically block full detachment of the panel lid. Skipping this step can damage the housing or wiring behind the panel.
Once the screws are removed, insert the service key into the lock mechanism. Unlock and gently lift off the control panel cover. Store all fasteners in a safe place to avoid loss.
Reattach with Temporary Screw for Testing
When conducting diagnostics or functional tests during partial reassembly, reinstall the control panel using at least one temporary screw. This maintains electrical continuity and ensures safety interlocks function properly. Leaving the panel loose or unsecured risks short circuits, shock hazards, or failed diagnostics.
Always disconnect power before opening the machine and verify no live voltage is present.
Diagnose Coin Mechanism Wiring Faults
One of the most frequent service calls involves coin insertion without credit registration. Despite smooth mechanical operation and no visible jams, the machine fails to count coins. The root cause is usually electrical, not mechanical.
Check for Loose Yellow and Brown Wires
Inspect the wiring near the yellow terminal block and rear panel of the control housing. Two yellow wires are commonly found disconnected. One brown wire may also be loose but is often non-critical.
In multiple repaired units, reconnecting the yellow wires restored full coin counting functionality. Compare with a working unit to confirm correct routing and connections.
Brown Wires: Legacy or Unused
The brown wires often remain connected but show no electrical activity. These may be obsolete circuits from older board designs. If properly insulated and not causing interference, they can remain disconnected. No adverse effect on operation has been observed.
However, always verify system behavior after isolating unused lines.
Test Coin Function After Repair
After fixing wiring issues, verify success with a live cycle test.
Run a Hot Water Cycle Test
Set the machine to a hot water cycle, which typically prompts for $4 in credit. Then insert a test coin. Confirm the display updates from $4 to $7. Allow the machine to begin its cycle.
Both repaired and reference units completed cycles after delays of 22 minutes and one hour, respectively. A faster start time on the repaired unit indicates full restoration of function.
Key Verification Steps
Ensure the coin hopper resets after each cycle. Watch for double-counting or rejection errors. Use standardized coins for consistent testing.
Adjust Coin Guides for Loonies
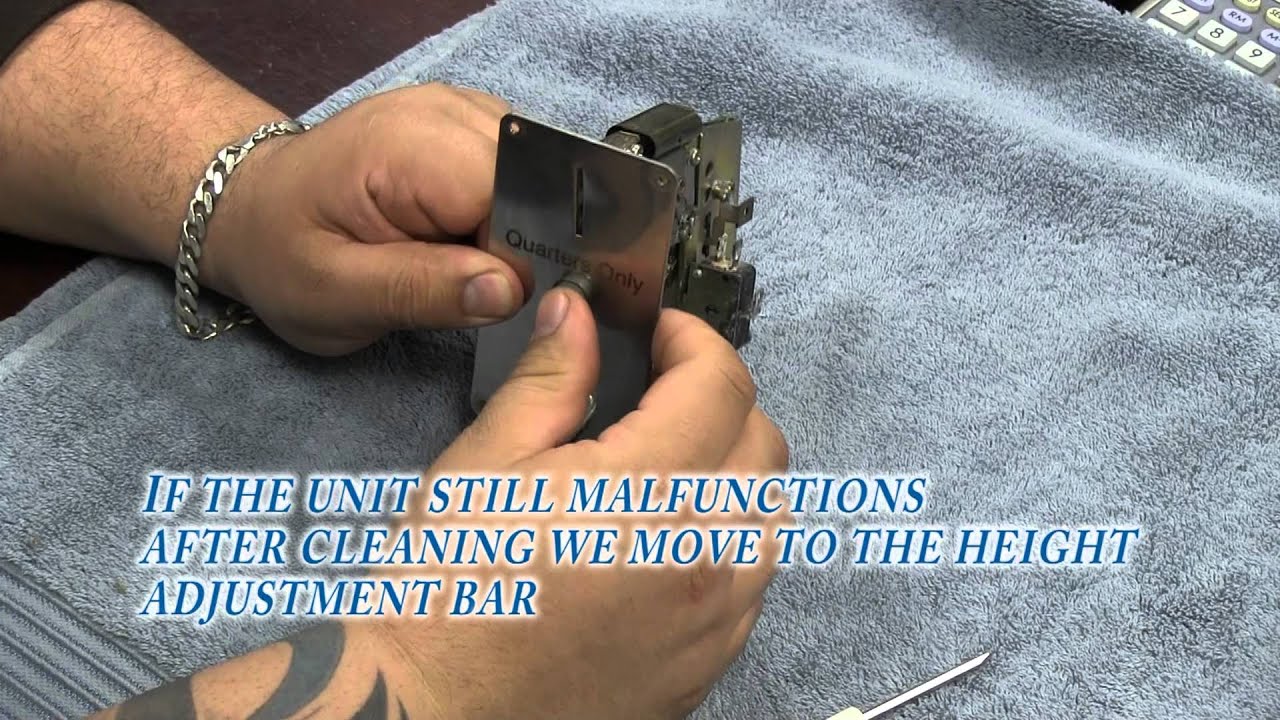
Many operators modify their Dexter washers to accept Canadian $1 coins (loonies) instead of quarters. This requires physical adjustment of the coin guide slides.
Modify Slides for Dollar Coins
Open the coin mechanism housing. Adjust the guide rails to accommodate the larger diameter and thickness of loonies. Secure all fasteners before closing.
While this allows acceptance of dollar coins, it doesn’t eliminate jamming issues caused by wear or dimensional variation.
Prevent Coin Jams with New Coins
Even after mechanical adjustments, recycled loonies often cause jams due to inconsistent thickness. Older or heavily used coins may be thicker than newly minted ones, disrupting the feeder mechanism.
Use Freshly Minted Coins
To minimize jams, source a roll of new, bank-issued loonies. Use these coins to calibrate the acceptor mechanism. Replace worn or irregular coins in circulation.
This simple step significantly improves feeding reliability and reduces service calls.
Replace Faulty Control Board 9473-009-005
When the washer freezes, displays error codes, or won’t start, the control board may need replacement.
Identify Board Failure Symptoms
Common signs include unresponsive touch controls, frozen display during cycle, erratic behavior or random restarts, and error codes pointing to communication failure.
The 9473-009-005 board is a direct replacement for several older models including 9473-009-004, 9473-009-001, 9473-009-002, and 9473-009-003. No rewiring or modifications are needed. This is a plug-and-play upgrade.
Install the New Control Board
Disconnect power at the source. Open the control panel using the service key. Remove mounting screws and disconnect wire harnesses from the old board. Install the 9473-009-005 board in the same position. Reconnect all connectors firmly. Restore power and run a test cycle.
Always check the part number on your existing board before ordering. You can purchase the genuine 9473-009-005 control board from lowlandry.com, an authorized Dexter parts supplier.
Source Genuine Dexter Replacement Parts
Using OEM components ensures compatibility, durability, and warranty compliance. Non-genuine parts may fail prematurely or cause cascading damage.
Buy from Authorized Distributors
Alliance Laundry Systems Distribution is the official source for over 150,000 laundry parts and more than 100,000 manuals and diagrams. Same-day shipping is available on orders before 4:00 PM Pacific Time.
Parts are searchable by model, part number, or description.
Top-Selling Repair Components
• 0935-127-001 Cap, Injector at $32.32
• 5191-102-001 Start Capacitor at $52.91
• 5191-103-001 Run Capacitor at $79.68
• 3310-038-001 Pilot Light at $35.41
• 3310-041-003 Cycle Light at $38.29
These are among the most commonly replaced electrical items.
Fix Common Dexter Washer Problems
Despite their reliability, Dexter machines face predictable wear issues. Recognizing symptoms early prevents costly breakdowns.
Washer Stops Mid-Cycle
Likely causes include door interlock failure, power interruption, or control board communication error. Check door lock engagement and test continuity with a multimeter.
Excessive Vibration During Spin
This is not normal and indicates worn shock absorbers or springs, drum imbalance, or failed bearings. Inspect suspension components and rebalance the load. Replace worn parts immediately.
Unresponsive Controls
This points to touchscreen failure, control board malfunction, or loose wiring harnesses. Reset the machine first. If unresponsive, replace the control board.
Error Codes Appear
Each code corresponds to a specific fault including motor faults, pump failures, or valve errors. Use manufacturer diagnostic tools and service videos to interpret codes accurately.
Water Leaks Under Machine
Common sources include deteriorated door seal, cracked hose, or clogged drain pump. Replace seals every 12 to 18 months in high-use environments.
Longer Wash or Dry Times
This indicates failing heating element, clogged airflow ducts in dryers, or malfunctioning inlet valve. Test heating elements for resistance and clean lint traps regularly.
Unusual Noises
Grinding, squealing, or banging suggests bearing wear, foreign object in drum, or loose motor mount. Stop the machine and inspect immediately to prevent catastrophic damage.
Hire Professional Repair Services
For complex electrical work or major mechanical repairs, use certified technicians.
Automated Laundry Systems
Serving California since 1976, this provider specializes in Dexter repairs for laundromats, hotels, hospitals, and apartment complexes. Services include full diagnostics, control board replacement, motor and pump repairs, firmware updates, and on-site fleet servicing.
Advantages include 45 plus years of experience, fast response times, and eco-conscious repairs to extend equipment life. They use only genuine Dexter parts from Laundry Parts Direct.
AAdvantage Laundry Systems
One of the largest Dexter distributors in the southern US, serving San Angelo and surrounding areas since 1996. They maintain $1 million in stocked parts including motors, seals, control boards, bearings, and drain pumps.
Most repairs are completed same-day or within 24 hours. Maintenance plans extend equipment life by 3 to 5 years. Emergency service is available including after-hours support.
Contact them at 1-800-880-2138 or visit their headquarters at 2510 National Dr, Garland, TX 75041.
Follow Preventative Maintenance Schedules
Proactive care is the cheapest way to avoid downtime.
Monthly Inspections
Check door gaskets for tears. Clean lint traps and drain filters. Verify door lock function. Listen for unusual sounds.
Quarterly Tasks
Lubricate moving parts if specified. Inspect belts and pulleys. Test water inlet and drain speed. Examine electrical connections for corrosion.
Annual Deep Service
Perform a full diagnostic scan. Evaluate bearings and suspension. Calibrate sensors. Update firmware. Replace high-wear consumables.
A $200 seal replacement can prevent a $5,000 machine replacement.
Frequently Asked Questions About Dexter Washing Machine Repair
How Do I Access the Internal Components of a Dexter Washer?
You need a service key to unlock the control panel. First remove the screws from the soap dispenser, then use the service key to detach the control panel cover. Always disconnect power before opening the machine.
Why Does My Dexter Washer Accept Coins But Not Count Them?
This is typically an electrical issue, not mechanical. Check for disconnected yellow wires near the yellow terminal block and rear panel of the control housing. Reconnecting these wires usually restores coin counting function.
What Control Board Replaces Old Dexter Washer Models?
The 9473-009-005 is a plug-and-play replacement for models 9473-009-004, 9473-009-001, 9473-009-002, and 9473-009-003. No wiring modifications are required.
How Often Should I Service My Commercial Dexter Washer?
High-volume operations like laundromats should service machines every 3 months. Moderate-volume facilities like hotels or apartments should schedule service every 6 months.
Where Can I Buy Genuine Dexter Replacement Parts?
Purchase from Alliance Laundry Systems Distribution or authorized suppliers like lowlandry.com. Same-day shipping is available for orders before 4:00 PM Pacific Time.
What Causes Coin Jams in Dexter Washers?
Coin jams are primarily caused by dimensional inconsistency in recycled coins, especially older loonies that are thicker than newly minted ones. Use fresh bank-issued coins to improve feeding reliability.
Key Takeaways for Reliable Dexter Washing Machine Repair
Regular maintenance, accurate diagnostics, and the use of genuine parts are the foundation of reliable dexter washing machine repair. By addressing coin mechanism wiring issues, replacing failed control boards like the 9473-009-005, and partnering with trusted service providers, you ensure maximum uptime and return on investment.
The most common issues stem from loose yellow wires in the coin mechanism, worn control boards, and inconsistent coin dimensions. Always compare wiring with a known-good unit when diagnosing complex problems. Use freshly minted coins to minimize jams and perform cycle tests after every repair to verify complete restoration.
Implement a scheduled maintenance plan today. Monthly inspections, quarterly tasks, and annual deep service dramatically reduce unexpected breakdowns. A small investment in preventive care prevents costly emergency repairs and extends the life of your equipment. Your bottom line depends on keeping your Dexter machines running smoothly.