

Hoover Washing Machine Repair Guide
If your Hoover washing machine won’t spin, makes a loud humming noise, or fails to start, you are not alone. Many homeowners face these problems, especially with older models like the VHD 8144D or compact units such as the Hoover Lite 300. The good news? Most issues are not terminal. With the right diagnosis and repair steps, you can restore full function without replacing the entire unit.
This guide covers everything you need to know about Hoover washing machine repair, from official service options and warranty claims to DIY fixes for common electrical and mechanical faults. Whether you are calling a technician or rolling up your sleeves, you will learn how to identify root causes like worn motor brushes or false capacitor damage and avoid costly mistakes. You will also discover how a simple brush replacement can add 5 to 6 years of reliable service and save hundreds compared to buying new.
Let us get your machine running again.
Check Your Warranty Status Before Repair
Before spending on repairs, confirm your Hoover washing machine coverage status. Repair options depend heavily on age and warranty type.
Appliances Under 12 Months Old
If your appliance is less than a year old, repairs are free. Call Hoover directly at 03446 923 607. Engineers will be dispatched within days. Service is available Monday through Sunday, excluding December 25, 26, and January 1.
10-Year Parts Guarantee Coverage
Hoover offers a long-term parts promise on select models. This applies to machines over 12 months old. Parts are supplied free of charge, though labor may still apply unless covered under an extended plan. Use the same contact number: 03446 923 607.
Extended Warranty with Domestic and General
Many Hoover buyers opt for added protection through Domestic and General Services Ltd. Call 03444 995599 for service scheduling. This includes ongoing maintenance and support. Note that Hoover does not book services for third-party warranties. Contact your provider directly for those.
Out of Warranty Repair Options
Once coverage ends, you still have two practical paths.
Fixed-Price One-Off Repair
This option provides transparent cost for parts, labor, and a 12-month guarantee. Fast booking is available with service in as little as two working days. It is ideal for one-time faults like pump failure or door lock issues.
Repair and Care Monthly Plan
This ongoing coverage plan covers multiple appliances and future breakdowns after the initial repair. It is best for older machines needing regular attention.
Pro Tip: Always verify warranty status before authorizing any repair. Hoover does not book services for non-Domestic and General extended plans.
Why Choose Official Hoover Repair Services
When hiring help, trust matters. Hoover official network offers several advantages over local handymen or unverified technicians.
Nationwide Coverage with Certified Engineers
Service is available across the UK. Local engineers are trained on Hoover systems. There are no travel surcharges or regional gaps.
Transparent Pricing Structure
A quote is provided before work begins. All-inclusive pricing covers parts, labor, and call-out fees. There are no diagnosis charges or surprise markups.
12-Month Repair Guarantee
If the same fault returns, it is fixed again free of charge. This applies to both parts and labor. It provides peace of mind after every visit.
Simple Booking Process
Call 03446 923 607. Pick a date and time that suits you. A qualified engineer arrives with genuine parts.
Access to Genuine Spare Parts
Hoover official store sells door locks, pumps, belts, motor brushes, and control boards. Next-day delivery is available in the UK for orders placed before 9 PM. This avoids counterfeits that fail prematurely.
Expert Note: Using fake or incompatible parts voids any remaining warranty and increases re-failure risk.
Diagnose a Humming Noise That Will Not Spin
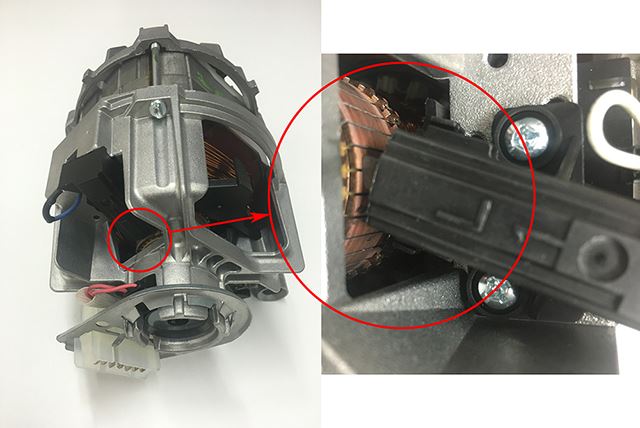
One of the most common Hoover washing machine problems is when the machine powers on, fills with water, then emits a loud humming sound, but the drum does not turn. This symptom often points to a motor issue, not a drive belt or control board failure.
Is It the Capacitor
Many assume a faulty start capacitor is to blame, especially if there is black soot nearby. But here is what really happens. Soot around the capacitor is usually secondary damage. The real culprit is worn motor brushes in DC brushed motors.
How Worn Brushes Cause Failure
In models like the VHD 8144D, the motor uses carbon brushes to transfer power to the spinning armature. Over time, brushes wear down completely. Springs lose tension. No contact with the commutator means no motor rotation. The result is a humming noise and open circuit at the motor.
Visual Clues to Identify
After disconnecting power, remove the back panel. Check for black dust buildup on the motor housing. Look for burn marks near the motor fan intake. Notice any circular soot pattern indicating arcing. Watch for blackened terminals on the capacitor, which are often misleading.
Warning: Always unplug the machine and ensure power cannot be restored during inspection.
Test Motor Brushes with a Multimeter

You do not need advanced tools to confirm brush failure. Here is how to diagnose the issue properly.
Tools You Will Need
You will need a screwdriver to remove the panel. A multimeter is required for testing. Safety gloves and glasses protect you during work.
Step-by-Step Continuity Test
- Disconnect power completely.
- Locate motor connector, usually red and gray wires.
- Set multimeter to continuity or resistance mode.
- Touch probes to red and gray terminals.
- Read the result.
| Reading | Diagnosis |
|---|---|
| Open circuit (OL) | Brushes failed, no contact |
| 1.0 to 1.5 Ω | Normal resistance, motor likely good |
| Infinite resistance | Open windings or broken connection |
If you get no continuity, the brushes are dead.
Replace Worn Motor Brushes at Home
Original replacement brushes may be discontinued, but that does not mean the machine is scrap.
Find Compatible Brush Packs
In the VHD 8144D case, original brushes were angled. No direct Hoover replacement was available. A Samsung-sourced brush pack was used instead. This worked because it had the same physical dimensions. It also matched spring tension and lead length. It is readily available locally and online.
Modify Brushes to Fit
Since the replacement brushes were straight, they required modification. Use a bench grinder to reshape tips. Match the original 30-degree angle. Ensure full contact with the commutator.
DIY Shortcut: Use a file or Dremel tool if no grinder is available. Test fit frequently.
Repair the Commutator Instead of the Motor

Even with damaged brushes, the motor itself may be salvageable.
Signs of Commutator Damage
Look for blackened or pitted copper segments. Notice uneven wear. Check for carbon buildup between segments.
Clean and Restore the Surface
- Disconnect rotor from motor.
- Use 240-grit sandpaper wrapped around a flat block.
- Gently sand commutator until shiny and smooth.
- Wipe clean with isopropyl alcohol.
- Blow out debris with compressed air.
Do NOT use coarse grit. It can deepen grooves and shorten motor life.
After cleaning, retest continuity. A smooth surface improves conductivity and extends performance.
Reassemble and Test Properly
Rushing reassembly leads to repeat failures. Follow these steps carefully.
Key Reassembly Steps
Install reshaped brushes into holders. Ensure springs apply even pressure. Reconnect motor wires securely. Reattach belt and check for cracks or glazing. Replace back panel and secure all screws.
Run a Sense Cycle First
Before loading clothes, select a short spin or rinse cycle. Let the machine go through water fill, load sensing, and drum rotation startup. Listen for smooth acceleration. Check for no grinding or arcing noises. Verify consistent spin speed.
Final Resistance Check
After installation, measure resistance again at motor connector. It should read approximately 1.2 Ω, varying slightly by model. This confirms the circuit is closed and brushes are seated.
In the VHD 8144D repair, this step confirmed successful brush contact and eliminated the hum.
Avoid These Common Repair Mistakes
Even experienced DIYers make errors that lead to recurring issues.
Replacing the Capacitor Unnecessarily
Capacitors often look burnt due to proximity to arcing. But they are rarely the root cause in brush motor failures. Replacing it wastes money and time.
Skipping the Soot Pattern Analysis
Soot spreads in a circular or directional pattern. Tracing it back reveals the true origin of electrical faults. In the case study, the line on the back plate pointed to the motor fan as the source.
Ignoring Carbon Dust Buildup
DC motors generate carbon dust from brush wear. If not cleaned, it insulates components and causes overheating. Clean motor compartment every 2 to 3 years on high-use machines.
Using Straight Brushes in Angled Holders
Mismatched angles mean partial contact. This leads to sparking, noise, and rapid re-failure. Always modify or source correct-angle replacements.
Maintain Your Machine to Prevent Repeat Failures
Prevention beats repair every time. Follow these maintenance practices.
Clean the Motor Compartment Annually
Unplug the machine. Remove back panel. Vacuum carbon dust from motor and fan. Wipe down surfaces with dry cloth. Inspect belt and brushes for wear.
Listen for Early Warning Signs
| Symptom | Likely Issue |
|---|---|
| Humming at startup | Worn brushes |
| Grinding noise | Failing bearing or foreign object |
| Error codes like E01 | Sensor or control board fault |
| Poor spin performance | Clogged pump or belt slip |
Address issues early before they cause secondary damage.
Consider a Maintenance Plan
For machines over 5 years old, enroll in the Repair and Care monthly plan. It covers annual checkups and priority service. This reduces long-term ownership costs.
What If No Technician Is Available
Some users, like those in Wicklow Town, Ireland, struggle to find local support, especially for older or compact models like the Hoover Lite 300.
Solutions When Service Is Limited
Buy Genuine Parts and DIY
Order from Hoover official spare parts store. Use video guides and manuals for step-by-step help. Focus on common fixes including pump, door lock, and filter.
Search for Independent Appliance Repairers
Look for technicians experienced with European brands. Platforms like Checkatrade or TrustATrader list verified engineers. Call and ask if they work on Hoover machines.
Join Online Repair Communities
Forums like Reddit offer free advice. Share photos and error codes for targeted help. Learn from others who have fixed the same model.
Expected Lifespan After Repair
A well-executed repair does not just fix the problem. It extends the machine life significantly.
Post-Repair Performance Gains
This eliminates arcing and power loss. It reduces operational noise. It improves spin efficiency. It restores original wash performance.
How Long Will It Last
With proper maintenance, brush replacement adds 5 to 6 years of reliable use. Machines over 8 years old can still deliver strong performance. Cost of repair is 80 to 150 pounds versus 400 pounds or more for a new unit.
Environmental Win: Repairing reduces e-waste and conserves resources.
Final Checklist: Is Repair Worth It
Before deciding, answer these questions.
Check if the drum, tub, and outer casing are intact. Verify major components like pump, motor, and control board are repairable. Confirm spare parts are available or replaceable with compatible ones. Ensure the cost is less than 50% of a new machine.
If yes, repair is the smart choice.
Frequently Asked Questions About Hoover Washing Machine Repair
How Do I Book a Hoover Washing Machine Repair in the UK
Call 03446 923 607 to schedule service. This number works for in-warranty and out-of-warranty repairs. Service is available Monday to Friday 8 AM to 5:30 PM and Saturday to Sunday 9 AM to 5 PM.
What Causes a Hoover Washing Machine to Make a Humming Noise
A humming noise with no drum movement usually indicates worn motor brushes. The brushes lose contact with the commutator, creating an open circuit. This is often misdiagnosed as a capacitor problem.
Can I Replace Motor Brushes Myself
Yes, with basic tools. You need a screwdriver, multimeter, and safety gear. Remove the back panel, test continuity, and replace brushes with compatible parts. Modify straight brushes to match angled originals if needed.
How Much Does Hoover Washing Machine Repair Cost
Out-of-warranty fixed-price repairs include parts, labor, and a 12-month guarantee. Booking is available in as little as two working days. DIY brush replacement typically costs 80 to 150 pounds for parts.
Is It Worth Repairing an Old Hoover Washing Machine
If the drum and major components are intact and parts are available, repair is worthwhile. A proper repair adds 5 to 6 years of service at a fraction of replacement cost. This also reduces environmental impact.
Where Can I Buy Genuine Hoover Spare Parts
Order from Hoover official spare parts store. Next-day UK delivery is available for orders before 9 PM. Parts include door locks, pumps, belts, motor brushes, and control boards.
Key Takeaways for Successful Hoover Washing Machine Repair
Hoover washing machine repair is more accessible than ever, whether through official services or informed DIY efforts. From diagnosing a humming motor to replacing worn brushes with modified parts, most failures have cost-effective solutions. Always check warranty status first and verify coverage before authorizing repairs. The humming noise problem typically stems from worn motor brushes, not capacitors, so focus diagnostics on the motor assembly. A simple brush replacement can extend your machine life by 5 to 6 years and save hundreds compared to replacement. By leveraging Hoover nationwide support, genuine parts, and detailed technical insights, you can keep your machine running for years. Do not replace it. Repair it.


