Magic Chef Washing Machine Repair Guide
If your Magic Chef washing machine won’t start, displays an error code, or fails to drain, you need a clear path to fix it. These compact washers—common in RVs, apartments, and small homes—rely on fewer components than full-size units, making many repairs DIY-friendly. This guide walks you through error code meanings, component testing with a multimeter, filter cleaning procedures, and the exact replacement parts you’ll need to restore your machine’s performance.
Clean Filters First
Most Magic Chef washer problems start with clogged filters. Cleaning these components resolves many issues without requiring parts replacement.
Lint Filter Cleaning
The lint filter sits beneath the wash plate and traps fabric fibers that would otherwise clog your drain system.
Steps to clean the lint filter:
1. Pull down the tab to release the lint trap
2. Slide the trap down and remove it completely
3. Rinse thoroughly under running water until all lint is removed
4. Reinsert the trap and push up until the clips snap securely into place
Clean this filter after every load, especially when washing pet hair or shedding fabrics. A clogged lint filter restricts water flow and triggers error codes like E2 or E18.
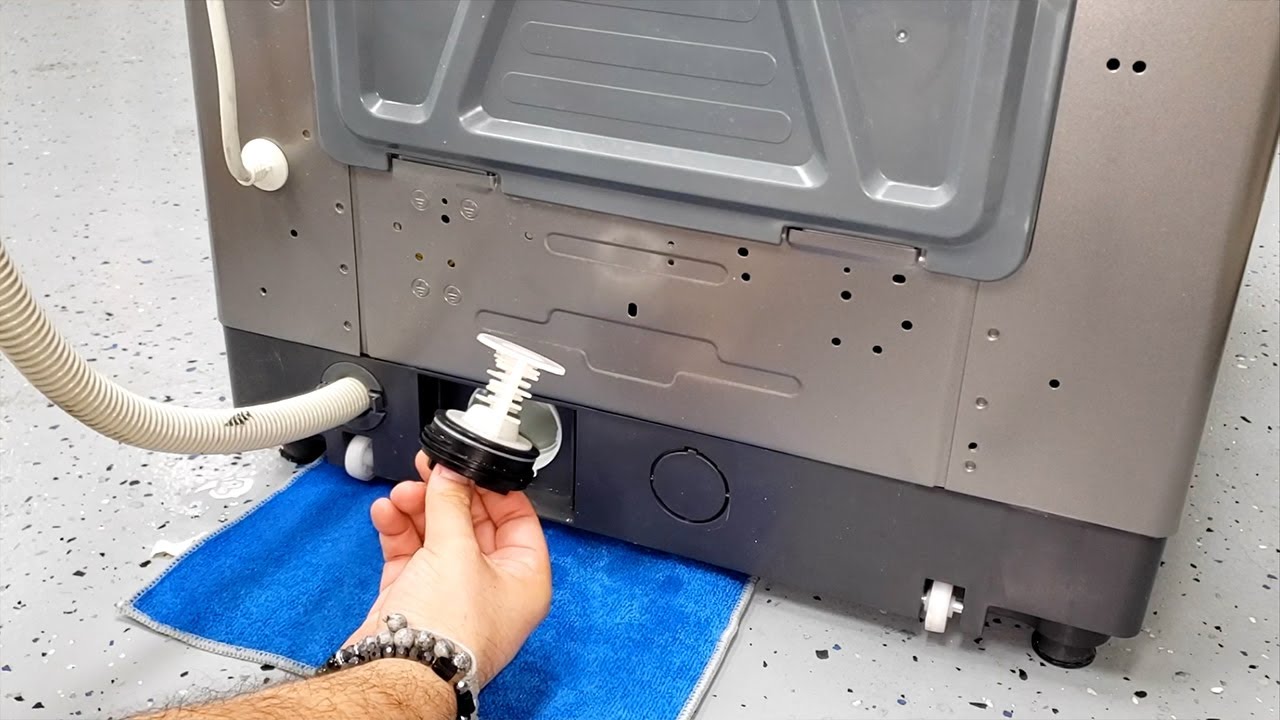
Drain Pump Filter Maintenance
The drain pump filter catches coins, buttons, and small debris that can jam the pump impeller.
Steps to clean the drain pump filter:
1. Place a towel beneath the filter to catch residual water
2. Turn the filter counterclockwise to remove
3. Clear any blockages and rinse thoroughly under running water
4. Reinstall by turning clockwise until tight
Never force the filter shut. If it won’t seal, check for lodged objects inside the housing. Clean this filter monthly, or weekly with heavy use.
Decode Error Codes

Magic Chef washers display specific codes to identify problems. Understanding these codes speeds up diagnosis significantly.
E1: No Water Detected
This code appears when the machine fails to sense water within 30 seconds.
Common causes include:
– Water supply turned off
– Kinked or blocked inlet hose
– Clogged inlet filter
– Faulty water inlet valve
– Blocked air pipe or pressure switch failure
Testing the water inlet valve: Measure resistance between terminals 1 and 2. The reading should be 3.8–1.5 kΩ. Replace the valve if the reading falls outside this range.
E2: Drain Failure
This code indicates drainage takes longer than 10 minutes.
Typical causes:
– Clogged pump filter
– Blocked drain hose
– Failed drain pump motor
– Retractor mechanism failure
Testing the drain pump: Measure resistance between light blue and red wires. Expect 2.2–8 Ω. An open circuit or short indicates pump failure.
E3: Lid Open During Cycle
The machine stops mid-cycle because it cannot confirm the lid is securely closed.
Fix steps:
1. Ensure the lid closes flush with the cabinet
2. Test lid switch continuity (expect 2.5–5 Ω between red and blue wires)
3. Inspect the wiring harness for fraying or disconnection
4. Replace the lid switch if no continuity is detected
Never bypass the lid switch—this is a critical safety interlock that prevents injury during operation.
E4: Unbalanced Load
The machine detects excessive tub wobble during the spin cycle.
Solutions:
– Redistribute laundry evenly in the drum
– Replace all four suspension rods if worn (never replace just one)
– Inspect the balance ring for fluid leaks
E18: Drain Pump Failure
This code appears on front-load and combo models with ActiveWater technology.
Fix steps:
1. Unplug the unit and shut off water supply
2. Access the drain pump behind the lower front panel
3. Remove and inspect the impeller for foreign objects
4. Test motor resistance (expect 2.2–8 Ω)
5. Clear any obstructions from the drain line
Fix Washer Won’t Start
Twenty-five possible causes exist for this symptom, but most fall into three categories.
Power and Connection Checks
Steps to verify power:
1. Test the outlet with a lamp or phone charger
2. Inspect the power cord for cracks, rodent damage, or fraying
3. Check and reset the GFCI breaker if tripped
4. Verify proper grounding (a tingling sensation when touching the washer indicates a grounding problem)
Control System Diagnostics
Steps to check controls:
1. Press and hold Start for 3 seconds (some models require this)
2. Check if Control Lock is enabled—press and hold for 3 seconds to disable
3. Test the touchpad or knob for responsiveness
4. Inspect the ribbon cable connection to the control board
Lid and Interlock Verification
- Close the lid firmly and listen for the magnetic click
- Test the lid switch with a multimeter (expect 2.5–5 Ω)
- Check for a broken actuator on the lid
Even slight lid misalignment can prevent startup. Adjust the hinges if necessary.
Repair Washer Won’t Spin
Thirty-five potential causes exist, but these high-probability fixes cover most cases.
Lid Switch and Safety Lock
- Confirm the lid is fully closed
- Test the lid switch for continuity
- Replace if faulty (lid switches cost under $20)
Motor and Drive System
Diagnostic steps:
1. Listen for humming—this indicates power reaching the motor but mechanical blockage
2. Check the drive belt for fraying, cracking, or looseness
3. Test the motor capacitor (a stationary needle means failure)
4. Inspect motor windings:
– Yellow to light blue: expect 2.5–4.5 Ω
– Blue to light blue: expect 2.5–4.5 Ω
Always unplug before testing electrical components.
Suspension Rods
Worn suspension rods allow the tub to wobble, triggering imbalance sensors that prevent spinning.
Replacement rules:
– Replace all four rods as a matched set
– Re-grease mounting points during installation
– Use OEM parts for proper tension
Mismatched rod tension causes uneven vibration—replace all four at once.
Stop Loud Noises During Operation
Twenty-six possible causes exist, but these are most common.
Foreign Objects in Drum
- Pause the cycle and feel between the inner and outer tub
- Remove coins, zippers, or bra wires
- Check the pump impeller for trapped items
Failed Tub Bearings
Symptoms include:
– Grinding or rumbling during the spin cycle
– Rust stains appearing on the drum
– Wobbling shaft
Replace the rear bearing kit—this requires drum removal.
Pump and Impeller Damage
- Unplug and access the pump
- Spin the impeller by hand—if it feels stiff or broken, replace it
- Clean the housing of all debris
Resolve Washer Won’t Drain
Twenty-one possible causes exist, but filter and hose issues are the most frequent.
Immediate Fixes
Steps:
1. Clean the pump filter (see earlier section)
2. Check the drain hose for kinks or clogs
3. Ensure the drain hose is not installed lower than 30 inches
4. Verify standpipe height is between 39 and 96 inches to prevent siphoning
Component Testing
| Component | Test Method | Expected Reading | Failure Sign |
|---|---|---|---|
| Drain Pump | Resistance (light blue to red) | 2.2–8 Ω | Open circuit or short |
| Drain Valve | Manual operation test | Valve moves freely | Stuck closed or leaking |
| Retractor | Visual inspection | Spring intact, housing solid | Broken spring or cracked housing |
A humming pump with no drainage often means a blocked impeller, not a failed motor.
Eliminate Vibration and Shaking
Twenty-two possible causes exist, but leveling and suspension issues are primary.
Level the Washer
Steps:
1. Use adjustable feet—turn clockwise to raise, counterclockwise to lower
2. Place a level on top and adjust until the bubble is centered
3. Test by gently rocking the unit—no movement should occur
Suspension Rod Replacement
Steps:
1. Remove the cabinet to access the rods
2. Disconnect from top and bottom mounts
3. Install new rods in sets of four
4. Apply grease to bushings during installation
Unbalanced units damage internal components like shock absorbers and drum bearings over time.
Fix Washer Not Filling
Eighteen possible causes exist, but start with the water supply.
Quick Checks
- Confirm water valves are fully open
- Inspect inlet hoses for kinks
- Clean the inlet filter located at the hose connection
Test Water Inlet Valve
- Unplug the washer
- Disconnect the wires
- Measure resistance between terminals 1 and 2 (expect 3.8–1.5 kΩ)
- Replace the valve if the reading is out of range
Pressure Switch and Air Pipe
- Check the air tube for cracks or disconnection
- Test frequency output: no water should read 26.7–30 kHz, with water it drops to 24.5–21.93 kHz
- Replace if no signal change occurs during fill
Stop Leaks Effectively
Eighteen leak sources exist—use this guide to pinpoint the issue.
Common Leak Points
| Location | Check For | Fix |
|---|---|---|
| Inlet Hoses | Loose fittings, cracks | Tighten or replace |
| Drain Hose | Poor connection, splits | Reconnect or replace |
| Tub Seal | Water around drum base | Replace rear bearing and seal |
| Pump Housing | Cracks or gasket failure | Replace pump |
| Outer Tub | Stress cracks | Replace tub assembly |
Slow leaks often go unnoticed until floor damage occurs—inspect monthly.
Prevent Odors and Mold
High-efficiency and compact models are particularly prone to odor buildup.
Monthly Cleaning Routine
- Place one washing machine cleaner tablet in the drum
- Run a heavy-duty cycle with hot water
- Leave the lid open after cycles to dry the interior
Detergent Best Practices
- Use HE detergent only in high-efficiency models
- Never use hand soap (causes dangerous oversudsing)
- Use only one tablespoon per load—excess causes residue buildup
When to Call a Professional Technician
Some repairs require professional tools and expertise.
Call for These Issues
- Drum bearing replacement
- Transmission rebuild
- PCB-level electrical diagnosis
- Steam system descaling
- Washer/dryer combo diagnostics
Professional Repair Services
For residents in the New York metro area, Magic Chef Appliance Repair NYC provides factory-trained technicians who service all boroughs. They offer same-day repairs, 24/7 emergency service, and a price-match guarantee. Contact them at (802) 552-4364 for immediate assistance.
Final Thoughts on Magic Chef Washing Machine Repair
Magic Chef washing machines are reliable when maintained properly, but issues arise from clogged filters, worn components, and electrical faults. The error code system built into these units makes diagnosis straightforward—E1 points to water supply problems, E2 indicates drainage issues, E3 flags lid switch faults, and E4 signals imbalance. By cleaning filters monthly, testing components with a multimeter, and replacing worn parts in matched sets, you can extend your washer’s lifespan significantly. For complex repairs involving the control board, transmission, or drum bearings, contact a certified technician to avoid causing additional damage.
Frequently Asked Questions About Magic Chef Washing Machine Repair
How do I reset my Magic Chef washing machine?
Unplug the washer for 60 seconds, then plug it back in. This clears minor electronic glitches. For models with a control panel, press and hold the Start button for 3 seconds after plugging back in.
Why does my Magic Chef washer display E1 error?
E1 means no water detected within 30 seconds. Check that the water supply is on, the inlet hose is not kinked, and the inlet filter is clean. If these check out, test the water inlet valve resistance.
Can I repair my Magic Chef washer myself?
Yes, many repairs are DIY-friendly. Filter cleaning, lid switch replacement, drive belt replacement, and leveling can all be done at home. Complex repairs involving the control board, transmission, or drum bearings are best left to professionals.
How much does Magic Chef washer repair cost?
DIY repairs typically cost $20-$150 for parts like lid switches, belts, or inlet valves. Professional repairs range from $150-$400 depending on the issue and parts needed.
Where can I find replacement parts for my Magic Chef washer?
OEM and compatible parts are available through appliance parts suppliers. You’ll need your model number (like CMCSTCW30W4) to ensure correct part selection. Magic Chef customer service at 888-775-0202 can help identify compatible parts.