How to Fix Pressure Washer Not Turning On
You pull out your electric pressure washer for a quick clean-up, only to find it will not turn on. No hum or response exists, just silence. Before you assume the motor is dead, check the GFCI plug. A faulty Ground Fault Circuit Interrupter is a common reason a pressure washer fails to start.
This issue often affects older units exposed to moisture over time. The GFCI plug protects against shocks by cutting power when it detects a fault. Replacing this plug takes under 30 minutes and costs less than $20. You will learn to diagnose and replace a bad GFCI plug to restore power safely.
Confirm It Is a GFCI Issue
Verify the GFCI plug is the problem before taking anything apart. Simple checks can rule out other power issues quickly.
Check Power Source First
Rule out simple issues with your electrical outlet.
* Plug into a different grounded outlet.
* Ensure the circuit breaker has not tripped.
* Test the outlet with another device.
If other tools work in the same outlet, the issue likely lies with your pressure washer.
Inspect the GFCI Plug Lights
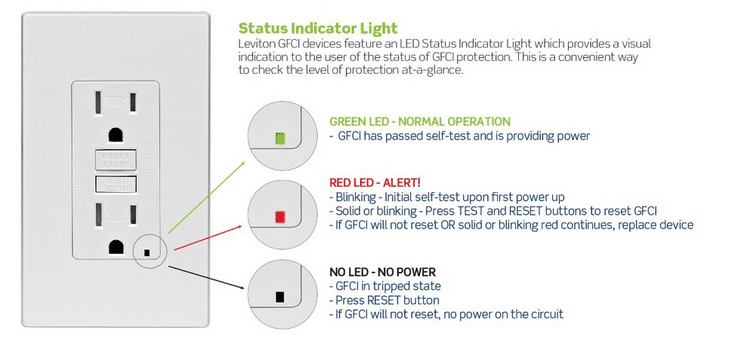
Many GFCI plugs feature indicator lights to show status.
* No light: Possible internal failure or no power.
* Amber or red light: Fault detected.
* Green light: Power is on and ready.
If the light is off or flickering and resetting does not help, the plug may be dead.
Try the Reset Button
Press “Reset” on the GFCI plug firmly. Then press “Test” and listen for a click. Press “Reset” again before testing the washer. If it will not reset or trips immediately, the plug is likely damaged.
Identify Your Plug Type
Matching the correct replacement plug is critical for safety and compatibility. You must match the original configuration exactly.
Two-Prong vs Three-Prong Plugs
Look closely at your current plug to identify the wire count.
* Two-prong: Only black (hot) and white (neutral) wires with no ground wire.
* Three-prong: Includes a green or bare copper ground wire.
Replace with the same type. Do not install a three-prong plug on a two-wire system as it creates a false ground.
Why GFCI Protection Still Matters
Even two-prong setups can use GFCI plugs effectively. They protect against shock without needing a ground wire by monitoring current imbalance. Using a standard plug instead defeats this protection, so never bypass GFCI safety features.
Remove the Old GFCI Plug

Unplug the unit and work in a dry area before starting any repairs. Safety is your top priority when handling electrical components.
Open the Plug Housing
Use a screwdriver to remove the cover screws carefully. Pull apart the plug casing to expose the internal wiring. Take note of wire positions before disconnecting anything.
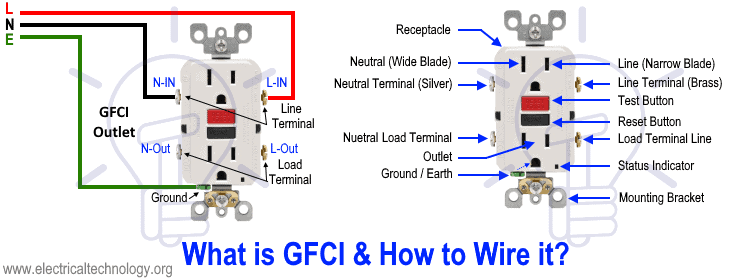
* White wire connects to the silver terminal.
* Black wire connects to the brass terminal.
* Green/bare wire connects to the green grounding screw if present.
Inspect for Damage
Look closely at the internal components for signs of failure.
* Burnt or melted plastic parts
* Corroded or frayed wires
* Loose connections inside the housing
If wires are damaged beyond the plug, you may need to trim and strip them cleanly.
Wire the New GFCI Plug
Use a replacement GFCI plug that matches your original configuration exactly. Follow these steps to ensure a secure connection.
Prepare the Wires
Strip about ½ inch of insulation from the wire ends if they are frayed. Twist strands tightly to prevent loose strands from causing shorts. Clean wire ends ensure a solid electrical connection.
Connect Terminals Correctly
Attach the white wire to the silver (neutral) terminal. Connect the black wire to the brass (hot) terminal. If present, fasten the green/bare wire to the ground terminal.
Pro Tip: Tighten screws firmly. Loose wires cause arcing, heat buildup, and future failure.
Install the Protective Sleeve

The new GFCI plug comes with a rubber or plastic sleeve that you must not skip. This component is vital for outdoor safety.
Slide Sleeve Over Wires
Place the sleeve over the wires before closing the plug housing. Position it so it covers the terminal connections once assembled. This step blocks moisture from entering the plug interior.
This sleeve reduces strain on wires when pulling the cord. It adds insulation and outdoor durability to your repair. Without it, water can seep in and short the circuit even with GFCI protection.
Test Water Flow Before Power
Electric pressure washers are designed to prevent dry running, which can destroy the pump in seconds. Always verify water flow before applying electricity.
Connect to Water Source
Attach the garden hose to the inlet securely. Turn on the water supply fully. Ensure all connections are tight to prevent leaks during operation.
Trigger the Spray Wand
Pull the trigger to flush the system completely. Confirm steady water flow through the wand and pump. If no water comes out, check for kinks in the hose or clogged filters.
Never power on the unit without water flowing. This rule protects your pump from immediate damage.
Activate the GFCI Safely
Now that water is moving, it is safe to restore power to the unit. Follow the correct sequence to engage the safety features.
Plug Into Grounded Outlet
Use an outdoor-rated, GFCI-protected or standard grounded receptacle. Avoid extension cords if possible. If needed, use a heavy-duty, outdoor-rated cord that is 12- or 14-gauge and 25 feet or shorter.
Reset the GFCI
- Press “Reset” and feel for the click.
- Press “Test” to ensure it trips with an audible click.
- Press “Reset” again to enable power.
If it will not reset, check for moisture in the plug or ensure wiring is secure. Try a different outlet if problems persist.
Start the Pressure Washer
With power restored and water flowing, you can now start cleaning. The process is simple once the electrical issue is resolved.
- Turn on the unit if it has a separate power switch.
- Pull the spray wand trigger to engage the motor.
The motor should engage only when the trigger is pressed. This is normal behavior. The pump runs on demand to reduce wear and prevent overheating. If it still does not start, double-check the GFCI reset or listen for a hum indicating a seized pump.
Prevent Future GFCI Failures
A replaced plug can fail again if not protected properly during storage. Moisture is the enemy of electrical components.
Store Plugs Off the Ground
Always hang cords or use a wall-mounted reel for storage. Never leave plugs sitting on wet grass or concrete. Moisture creeping into the plug is the number one cause of early failure.
Use Weatherproof Covers
Install an outdoor outlet cover or bubble cover that seals around the plug. These keep rain, sprinklers, and humidity out to extend GFCI life.
Perform Seasonal Checks
Before each use, inspect the plug for cracks or corrosion. Test “Reset” and “Test” buttons to ensure function. Confirm water flows freely before powering on to catch small issues early.
When to Suspect Other Issues
If replacing the GFCI plug does not fix the problem, consider these less common causes. Your pressure washer not turning on might stem from internal components.
Faulty On/Off Switch
Located on the motor housing, this switch can fail over time. You will hear no sound when the trigger is pulled. Power reaches the GFCI but not the motor. Test with a multimeter for continuity.
Blown Thermal Overload
Some motors have a resettable thermal cutoff for safety. The unit may have run too long or dry, tripping overheat protection. Let the motor cool for 30+ minutes, then look for a small red reset button near the motor.
Failed Motor or Pump
Signs of major failure include a burning smell or visible smoke. You might see melted parts or hear continuous humming without starting. These issues require professional repair or replacement of the unit.
Save Money With DIY Repairs
One user found a non-working pressure washer at a thrift store for $15. After replacing the GFCI plug, it worked like new. This saved over $100 compared to buying a new unit.
Most GFCI plug replacements cost $10–$18 and take under 30 minutes. No special skills are needed, just attention to wiring details. Fixing it yourself avoids unnecessary e-waste and keeps your washer running for years.
Final Tips for Reliable Starts
Keep your pressure washer ready to go with these simple habits. Proper maintenance ensures long-term reliability.
- Always flush water through before powering on.
- Store indoors or under cover, never in rain or snow.
- Never yank the cord from the outlet, pull by the plug.
- Replace frayed cords or cracked plugs immediately.
A well-maintained electric pressure washer can last 5–10 years. The GFCI plug is a small part, but when it fails, it stops everything. Now you know how to fix it fast and get back to cleaning.
Frequently Asked Questions About Pressure Washer Not Turning On
Why won’t my pressure washer turn on at all?
The most common reason is a tripped or faulty GFCI plug. Check the reset button on the plug first. If it will not reset, the plug likely needs replacement.
Can I bypass the GFCI plug to make it work?
No, never bypass the GFCI plug. It protects you from severe electrical shock. Removing it creates a dangerous hazard, especially with water involved.
How much does a replacement GFCI plug cost?
A replacement GFCI plug typically costs between $10 and $18. You can find them at most hardware stores or online retailers.
What if the new GFCI plug trips immediately?
This indicates a short circuit within the pressure washer motor or wiring. Check for water inside the motor housing or damaged internal wires.
How long does it take to replace a GFCI plug?
Most people can complete this repair in under 30 minutes. You only need basic tools like a screwdriver and wire strippers.
Key Takeaways for Fixing a Pressure Washer Not Turning On
A pressure washer not turning on is often caused by a simple GFCI plug failure. Replacing this component is affordable, takes less than 30 minutes, and restores your machine to working order. Always verify water flow before applying power to protect the pump.
Remember to match your plug type exactly and use the protective sleeve for safety. Regular inspections and proper storage prevent future electrical issues. Check your GFCI plug today before assuming your pressure washer is broken.