Washing Machine Not Cleaning Clothes? Fix It Fast
You’ve loaded the laundry, pressed start, and let the machine run its full cycle, only to pull out clothes that still look dingy, feel stiff, or carry a faint odor. If your washing machine is not cleaning clothes, you’re not alone. This frustrating issue affects millions of households, often without obvious error codes or mechanical breakdowns. The machine runs, drains, and spins, but the results fall short of expectations.
The truth is, poor cleaning performance rarely means your washer is broken. More often, it’s a sign of preventable issues: overloading, detergent misuse, blocked components, or neglected maintenance. These small oversights add up silently, reducing cleaning power over time. In this guide, you’ll learn how to diagnose and fix every common cause behind washing machine not cleaning clothes, from quick daily habits to deeper mechanical checks.
Overloaded Drum Prevents Proper Cleaning
When clothes come out dirty, the problem may start before the cycle even begins. Overloading ranks among the top reasons washing machines fail to clean effectively.
Load Size Compromises Tumbling Action
Front-loading washers rely on gravity and tumbling motion to scrub dirt from fabric. If the drum is packed too full, clothes cannot lift and drop properly. Instead, they clump together, blocking water and detergent from reaching all surfaces. Top-loaders face a similar issue. Without space for garments to circulate around the agitator or impeller, soil stays trapped in fibers.
Visual cue: If you cannot fit your hand freely between the top of the laundry and the drum opening, the load is too big.
Optimize Load Capacity for Best Results
• Fill the drum to 75% capacity max
• Leave a hand’s width of space at the top
• Prioritize balance because uneven loads reduce agitation efficiency
Pro tip: Wash bulky items like towels or jeans in smaller batches. They absorb more water and need extra room to move.
Detergent Problems: Amount and Type Matter
Even with perfect loading, poor detergent use can leave clothes unclean. Two key issues, too little detergent and wrong detergent type, undermine cleaning every day.
Under-Dosing Reduces Cleaning Power
Using less detergent than recommended means insufficient surfactants to break down oils, sweat, and ground-in dirt. This leads to dull grayish fabrics, lingering body odor, and residue buildup over time.
Fix: Fill the detergent drawer to the marked line. For pods or dosing balls, follow package instructions exactly.
Adjust dosage based on water hardness (hard water needs more detergent), soil level (workwear versus lightly worn clothes), and load size (larger loads need proportional increases).
Warning: Do not overcompensate. Too much detergent leaves sticky residue that attracts more dirt.
Wrong Detergent Type Causes Poor Performance
Using the wrong formula can sabotage cleaning even if you use the correct amount.
| Fabric/Load Type | Recommended Detergent |
|---|---|
| Whites | Bleach-boosted or optical brightener formulas |
| Colors/Darks | Color-safe, dye-free detergents |
| Delicates | Low-suds, gentle-action detergents |
| HE Machines | High-efficiency (HE) labeled only |
Cold water washes: Use liquid detergent because it dissolves faster than powder.
Hot water cycles: Powder detergents often perform better at high temperatures.
Expert note: Always check the label. Some universal detergents are not compatible with front-loaders or hard water areas.
Clogged Detergent Drawer and Dispenser Lines
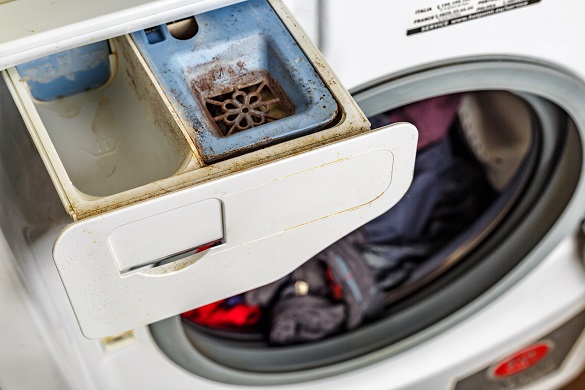
One of the most overlooked causes of poor cleaning? A dirty detergent drawer. Over time, leftover detergent, fabric softener, and limescale build up inside the drawer and the tubes that carry chemicals into the drum. This blockage means your detergent may not dispense when needed or at all.
Clean Drawer and Hoses Monthly
Steps to clean:
- Pull out the detergent drawer until it stops.
- Press the release tab to remove it completely.
- Soak in warm water mixed with white vinegar or a dishwasher tablet.
- Use an old toothbrush to scrub crevices and nozzles.
- Flush dispenser openings with warm water from a turkey baster.
- Wipe dry and reinsert.
Frequency: Every one to two weeks for heavy users, monthly otherwise.
Visual sign: Chalky white residue or slimy film in the drawer signals immediate cleaning is needed.
Run a hot empty cycle afterward to flush any loosened debris from internal lines.
Skip Maintenance Washes? Odors and Residue Follow
Running weekly laundry loads without ever cleaning the machine itself leads to a grim reality. Your washer is dirty. Biofilm, mold, mildew, and soap scum accumulate in the drum, door seal, sump, and hoses. These contaminants transfer directly to your clothes, making them smell musty or feel sticky even after washing.
Run Monthly Hot Maintenance Cycles
Procedure:
- Remove all laundry.
- Select the hottest cycle available (90°C / 194°F).
- Add one of the following: one cup white vinegar, 100g washing soda, or commercial washing machine cleaner.
- Start the cycle.
Focus on the door gasket (front-loaders). Wipe it down weekly with a damp cloth because mold loves the damp rubber fold.
Fact: Skipping maintenance washes ranks as the number one cause of clean clothes that do not smell clean.
Do this monthly or every three months for light use. More often in hard water areas.
Water Not Heating? Greasy Clothes Result

Hot water is essential for dissolving oils, activating detergents, and killing bacteria. If your machine is not heating, you are essentially cold-washing even if you selected a hot cycle.
Signs of Heating Failure
• Clothes feel greasy or stiff after washing
• Stains remain despite correct settings
• Water feels cold during a hot wash cycle (test carefully)
• No error code because many machines do not alert you to partial heating failure
Common Causes of No Heat
• Faulty heating element (most common)
• Malfunctioning thermostat
• Defective control board
Quick test: Run a 60°C+ cycle. Place a waterproof thermometer in the drum during the wash phase. If temperature does not rise above 30°C, heating is failing.
Solution: Heating elements can be replaced (50–100$ part plus labor). DIYers with electrical experience can often do it in under one hour.
If the machine is older than seven years, weigh repair cost against replacement.
Clogged Filter Blocks Drainage and Rinsing
The filter traps lint, coins, hairpins, and other debris before they damage the pump. But when it is clogged, your machine cannot drain properly, leaving dirty water to re-soak clean clothes during the rinse.
Locate and Clean the Filter
Where to find it: Bottom front of the machine, behind a small access panel.
Steps:
- Place towels underneath because up to two cups of water may spill.
- Open the panel and unscrew the filter counterclockwise.
- Remove debris such as coins, hair, and fabric scraps.
- Flush the filter and housing with water.
- Check the impeller (inside the pump chamber) for obstructions.
- Reinstall and tighten securely.
Frequency: Every one to three months depending on use.
Warning: Never run the machine without the filter in place because it protects the pump.
If water drains slowly or the drum retains water after the cycle, clean the filter immediately.
Drain Hose or Pump Obstruction Causes Recontamination
Even with a clean filter, blockages elsewhere in the drainage system can ruin cleaning results. Dirty water must exit the drum completely during the rinse. If it does not, clothes sit in a bath of used water, picking up lint, oils, and microbes.
Check Hose and Pump for Clogs
DIY inspection steps:
- Unplug the machine.
- Disconnect the drain hose from the wall or standpipe.
- Look for kinks or clogs and flush with a garden hose.
- Remove visible debris especially near the pump inlet.
- Reconnect securely.
Listen during drain phase: A humming pump that does not drain suggests a jammed impeller or failed motor.
Pro tip: Elevate the drain hose correctly. Too low causes siphoning; too high causes poor drainage.
Fixing drainage issues stops recontamination and improves rinse efficiency.
Wrong Cycle or Settings Sabotage Cleaning
Using the wrong wash program is a silent killer of cleaning performance. Many users rely on quick washes or delicate cycles for heavily soiled loads, then wonder why clothes are not clean.
Match Cycle to Load Type
| Load Type | Recommended Cycle |
|---|---|
| Workwear, gym clothes | Heavy-duty or cotton (60°C+) |
| Everyday wear | Normal or eco-cycle |
| Delicates, synthetics | Gentle or hand-wash |
| Lightly soiled, small loads | Quick wash (under 30 min) |
Avoid these mistakes: Washing cottons at 30°C when they need 40°C+, using eco-cycles for dirty loads (longer but gentler means less agitation), and skipping pre-soak for stained items.
Fact: Sixty-eight percent of users do not adjust settings based on soil level, leading to subpar results.
Take ten seconds to choose the right cycle. It makes all the difference.
Old or Worn Machine Loses Cleaning Power
Even with perfect use, washing machines degrade over time. Modern units often fail before the three-year mark due to cheaper parts and disposable design. Older models (seven plus years) lose effectiveness from worn drum baffles (reduce tumbling action), weaker motor (less agitation), internal scaling (blocks water flow), and corroded heating elements.
When to Replace Your Washer
Replace if cleaning issues persist after full maintenance, the machine is over seven years old, repair cost exceeds 50% of a new model’s price, or you see frequent error codes or leaks.
Stat: Machines over seven years clean 30–40% less effectively than when new.
Newer models offer better efficiency, smarter sensors, and improved rinsing, but only if used correctly.
Residual Fluff? Check Softener and Rinsing
Clean clothes covered in fluff or lint are not really clean. This issue often stems from poor rinsing or chemical buildup rather than the washer’s spin cycle.
Causes of Fluffy Residue
• Fabric softener overuse: coats fibers and drum, reducing absorbency and attracting lint
• Detergent residue mixing with lint
• Worn internal seals or baffles shedding material
• Insufficient rinse cycles
Solutions
• Reduce or eliminate fabric softener
• Switch to white vinegar (half cup in softener drawer) as a natural alternative
• Add an extra rinse cycle on heavy or bulky loads
• Install a lint filter on the discharge hose if compatible
Pro tip: Run a monthly vinegar wash to dissolve softener buildup in the drum and hoses.
Samsung-Specific Tips: Door Lock and Fill Issues
While most causes apply universally, Samsung front-loaders have unique quirks.
Child Lock Confuses Users
If controls do not respond or the cycle will not start, check for a lit or flashing Child Lock icon. Disable by pressing and holding the Spin or Options button for three to five seconds.
Note: A locked door does not affect cleaning unless it stops the cycle from starting.
Inadequate Water Fill Reduces Cleaning
Symptoms: Drum not filling fully, long fill times, error codes like ND (no drain) or SE (sensor error).
Causes: Kinked or clogged inlet hoses, low household water pressure, faulty water inlet valve.
Fix: Straighten hoses, clean inlet filters (small screens inside hose connections), test water pressure (should be 20–100 psi).
Without enough water, detergent cannot dilute properly, and soil cannot suspend away from clothes.
Prevent Problems With a Maintenance Schedule
Prevention beats repair every time. Follow this simple schedule to keep your washer cleaning at peak performance.
| Task | Frequency |
|---|---|
| Wipe door seal and gasket | After every use |
| Clean detergent drawer | Weekly |
| Run hot maintenance wash | Monthly |
| Inspect and clean filter | Every 1–3 months |
| Descale machine (hard water) | Every 2–3 months |
| Check inlet hoses | Twice a year |
Bonus: Use HE detergent, avoid overloading, and sort laundry by soil level.
Stick to this plan, and your clothes will come out truly clean, cycle after cycle.
Frequently Asked Questions About Washing Machine Not Cleaning Clothes
Why is my washing machine not cleaning clothes even when it runs normally?
Your washing machine may run through all cycles without errors yet still produce dirty clothes due to overloading, incorrect detergent use, clogged components, or lack of maintenance. These issues prevent proper water circulation, detergent activation, or soil removal even when the machine appears to function correctly.
What is the first thing to check when your washer does not clean clothes?
Start by checking the load size. Overloaded drums prevent clothes from tumbling properly, which limits water and detergent contact with fabric. Aim for 75% drum capacity maximum and ensure clothes can move freely during the wash cycle.
How often should I clean my washing machine to prevent cleaning issues?
Run a hot maintenance wash monthly (or quarterly for light use). Clean the detergent drawer weekly and wipe the door gasket after every use. Inspect and clean the filter every one to three months. In hard water areas, descale the machine every two to three months.
Can a washing machine not heat water cause poor cleaning results?
Yes. Hot water activates detergents, dissolves oils, and removes stubborn stains. If the heating element fails, the machine performs a cold wash even on hot settings, resulting in greasy, stiff, or stained clothes. Test water temperature during a hot cycle to confirm heating is working.
How do I know if my washing machine filter needs cleaning?
Clean the filter if water drains slowly, the drum retains water after the cycle, clothes come out wet or dirty, or you hear unusual pump sounds. Check the filter located behind the front access panel every one to three months, removing lint, coins, and debris.
Key Takeaways for Fixing Your Washing Machine Not Cleaning Clothes
A washing machine not cleaning clothes is rarely a hopeless case. In nine out of ten situations, the fix lies in proper loading, correct detergent use, or a simple cleaning task. Start with the easiest checks: detergent drawer, filter, and load size. Then move to deeper diagnostics like water heating and drainage if needed. With consistent care, your washer can deliver fresh, clean laundry for years to come. If problems persist despite thorough maintenance and the machine is over seven years old, consider replacement rather than repeated repairs.