Kenmore Washing Machine Repair Guide
If your Kenmore washing machine won’t spin, drain, or start, you are not alone. Thousands of homeowners face similar issues every year with models ranging from the Kenmore 80 Series to the Elite HE3. The good news? Most problems like a washer that won’t agitate or a door that stays locked can be diagnosed and fixed at home with basic tools and a little know how.
Kenmore washing machines are built by major manufacturers like Whirlpool, LG, and Electrolux, meaning many parts are interchangeable across brands. This makes repairs more affordable and accessible. Whether you are dealing with an LE error code, water leakage, or a grinding noise during agitation, this guide walks you through step by step fixes, diagnostic shortcuts, and proven maintenance tips to get your washer running like new without paying for a technician.
Why Your Kenmore Washer Stops Spinning or Draining
When clothes come out soaked after a cycle, the issue is often spin cycle failure. Common causes include a failed motor coupling especially in Whirlpool built models, a clogged drain pump or blocked hose, a faulty lid switch preventing cycle completion, or a broken drive belt on belt driven models.
Motor Coupling Failure
The motor coupling connects the motor to the transmission. When it fails, the motor runs but the tub does not move. Symptoms include a grinding noise, burning rubber smell, no spin or agitation, and the motor running. This part wears every 5 to 10 years and costs about $30. It takes under an hour to replace.
Clogged Drain Pump
A failed drain pump causes standing water in the tub. Check for blockages in the pump housing or drain hose. If the old pump is full of grease rather than oil, the gearbox is leaking and replacing the pump alone will not fix the problem.
Faulty Lid Switch
The lid switch tells the machine it is safe to spin. If it fails, the washer may not spin at all or may stop mid cycle. Test for continuity with a multimeter to confirm the switch is faulty.
Washer Won not Agitate: Diagnose the Drive System
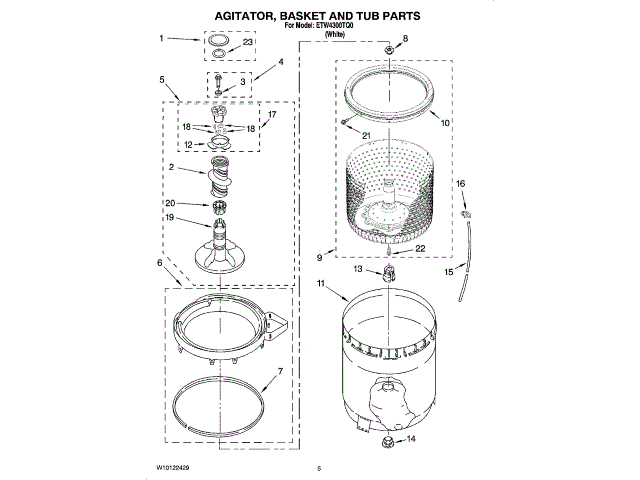
No movement during the wash cycle? The problem likely lies in the agitator drive system. Common causes include stripped agitator dogs, which are small plastic teeth inside the agitator that engage the drive mechanism, a worn motor coupling, or a failed transmission also called a gearcase.
Identifying Stripped Agitator Dogs
Remove the agitator cap. If the inner section spins freely but the tub does not move, the dogs are stripped. This is a common issue with heavy loads or frequent use. Replacement kits cost around $10 and take 30 minutes to install.
Fixing Water Leaks and Seal Problems
Puddles under the machine usually point to a torn door boot seal on front load models, loose or cracked hose connections, a failed drain pump gasket, or a cracked outer tub which is rare but serious.
Door Boot Seal Replacement
Found on front loading models, this seal requires removal of the front panel and clamp ring. Inspect for tears, mold, or deformation. Replace with OEM compatible seal to prevent leaks.
Oil Versus Grease: What the Leak Tells You
Oil near the base indicates gearbox leakage, not a pump issue. If the pump contains grease rather than oil, the gearbox is leaking and must be replaced alongside the pump. Replacing only the pump leads to quick recurrence.
Understanding and Fixing LE Error Codes
The LE code appears on Kenmore Elite HE and HE3 models. It means the motor is drawing too much current or communication failed between the motor and control board.
Causes of LE Errors
The causes include an overloaded drum, a foreign object jamming the pump, a failed motor control board, or worn motor winding.
Fixes for LE Errors
Unplug the washer for 10 minutes to reset the board. Run an empty spin cycle. If LE returns, inspect the pump for blockages. Test motor resistance with a multimeter. Normal resistance is 3 to 6 ohms. Replace the motor control board if faulty. LE codes often return if the root cause like a failing motor is ignored.
Replacing the Drain Pump in 7 Steps
A failed drain pump causes standing water. Replacement takes 60 to 90 minutes.
Tools Needed
Socket wrench set, digital multimeter, bucket, and flat head screwdriver.
Step by Step
Unplug the washer and shut off water valves. Remove the lower front access panel, which has two screws at the bottom. Place a bucket under the pump to catch residual water. Disconnect the wiring harness by pressing the tab, do not pull the wires. Loosen the clamps and remove the hoses. Unscrew the mounting bolts and pull out the pump. Install the new pump, reconnect the hoses and wires.
Use OEM or high quality aftermarket pumps. Cheap ones fail within months.
Fixing No Spin or No Agitate: Motor Coupling Replacement
The motor coupling connects the motor to the transmission. When it fails, the motor runs but the tub does not move.
Replacement Steps
Lay the washer on its back, supported with wood blocks. Remove the motor mounting screws using a 1/4 inch or 5/16 inch socket. Slide the motor forward to release the clamps. Pull off the old rubber coupling from both the motor and transmission shafts. Press the new coupling onto both shafts, aligning the three tabs. Reinstall the motor, secure the clamps and screws. Test the spin cycle.
This repair takes about 45 minutes for beginners.
Replacing the Gearbox When Leaking
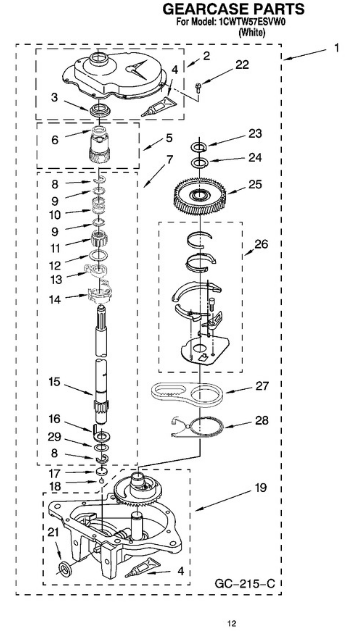
Oil pooling under the washer indicates the gearcase is failing.
Signs of Failure
Signs include oil around the base, no spin despite the motor running, and grinding or clicking during the cycle.
Removal Steps
Remove the agitator, inner tub, and pump motor assembly. Support the washer and remove the 1/2 inch bolts from the motor bracket. Use a 2 by 4 and hammer to gently pry the transmission free if stuck. Pull the gearcase downward.
Installation Steps
Remove the plastic plug from the breathing hole with a flat head screwdriver. Install the new clutch over the shaft. Insert the plastic spacer under the clutch to prevent metal contact. Press the clutch pin fully into the transmission hole. Grease the shaft with high temperature grease before installing the drive basket.
Never run the washer without grease. The bearings will fail quickly.
Repairing a Broken Agitator
If the agitator spins freely but does not move the clothes, the agitator dogs are stripped.
Fix in 5 Steps
Remove the cap from the top of the agitator. Unscrew the center bolt using a 3/8 inch hex or socket. Pull the agitator straight up. Tap with a rubber mallet if stuck. Open the top cover by removing two clips. Replace the dogs with kit number 80040. Reassemble and reinstall.
Use an impact driver to break loose a seized bolt.
Removing and Reinstalling the Inner Tub
This procedure is needed for gearbox or drive basket replacement.
Removal Steps
Remove the agitator. Use a spinner wrench on the tub nut. Tap counterclockwise to loosen. Insert a 2 by 4 under the tub and lever down gently if stuck. Lift the tub straight up.
Reinstallation Steps
Align with left and right hand grooves. Slide over the hub, turn clockwise, and wiggle down until seated. Hand tighten, then secure fully with the spinner wrench.
The tub should sit flush with no wobble.
Proper Lubrication for Key Components
Using the wrong lubricant destroys parts. Follow this guide.
Use silicone based slide glide on the brake and clutch shaft with a thin film only. Apply slide glide to the drive basket spring with a light coat, no grease. Use high temperature grease on the gearbox shaft before installation. Keep the breathing hole clear with a paperclip.
Never use petroleum based grease on brake or clutch parts. It degrades rubber and causes slippage.
Calibrating the Control Board After Major Repairs
After replacing the motor, pump, or gearbox, calibrate the control board.
Calibration Steps
Plug in the washer. Start a cycle and let it reach the rinse stage. Press Start. All LEDs should flash. Wait 1 to 2 minutes for calibration to complete. Run a test cycle to verify full spin speed, smooth agitation, and no error codes.
Failure to calibrate may cause LE codes or incomplete cycles.
Deciding: Repair or Replace Your Washer
Use this decision framework.
Repair If
Repair if the washer is under 10 years old, repair cost is less than 50 percent of replacement value, parts are available, and there is a single failure.
Replace If
Replace if the washer is over 12 years old, there are multiple failures, repair exceeds $300, or the machine is energy inefficient.
Repairing reduces e waste. Kenmore is modularity supports sustainability.
Testing and Verifying Repair Success
Never assume it is fixed. Run this final checklist.
Dry Run Test
Run the spin cycle empty. Check for vibration, noise, and smooth rotation.
Leak Inspection
Watch the pump, hoses, door seal, and base for drips.
Full Functional Test
Load with towels. Run a complete cycle. Confirm the washer fills properly, agitates and spins, drains fully, and the lid unlocks after the cycle.
Long Term Monitoring
Run 2 to 3 cycles. Clean the drain pump filter monthly. Inspect hoses annually.
Essential Tools for Kenmore Repairs
Socket wrench set for removing motor, pump, and tub. Digital multimeter for testing switches, motors, and boards. Spinner wrench for removing the inner tub nut. Narwhal 6 in 1 driver for opening the control panel and housing. Impact driver for loosening seized agitator bolts. Flat head screwdriver for prying out the door switch and removing plugs. 2 by 4 wooden block for leverage on stuck parts.
Always unplug before working. Wear safety glasses.
Frequently Asked Questions About Kenmore Washing Machine Repair
How Do I Reset My Kenmore Washer After a Repair?
Unplug the washer for 10 minutes to reset the control board. Plug it back in and run a calibration cycle by starting a wash cycle and pressing Start at the rinse stage. Wait 1 to 2 minutes for the LEDs to flash and calibration to complete.
What Causes a Kenmore Washer to Stop Spinning?
The most common causes are a failed motor coupling, a clogged drain pump, a faulty lid switch, or a broken drive belt. Check these components in order. The motor coupling is a $30 part that takes under an hour to replace.
Is It Worth Repairing a 15 Year Old Kenmore Washer?
Probably not. If the washer is over 12 years old with multiple failures, replacement is usually the better choice. However, if it is a single failure like a pump or coupling and the machine has been reliable, repair may be worth the investment.
Can I Replace the Gearbox Myself?
Yes, with proper tools and guidance. The job requires removing the agitator, inner tub, and motor pump assembly. It takes 2 to 3 hours for beginners. The key steps are supporting the washer securely, using a 2 by 4 to pry the transmission free, and applying high temperature grease to the shaft before reassembly.
Why Does My Kenmore Washer Leak Water Every Time I Use It?
Common causes include a torn door boot seal on front load models, loose hose connections, a failed drain pump gasket, or a cracked outer tub. Inspect the door boot seal first as it is the most frequent source of leaks.
What Does the LE Error Code Mean on My Kenmore Elite?
The LE code indicates motor overload or communication failure between the motor and control board. Causes include overloading, a foreign object jamming the pump, a failed motor control board, or worn motor windings. Unplug for 10 minutes to reset. If it returns, inspect the pump and test the motor.
Key Takeaways for Fixing Your Kenmore Washer
Kenmore washing machine repair is doable at home with the right guidance. Most issues stem from a few common parts: the motor coupling, drain pump, lid switch, and gearbox. By diagnosing accurately, using correct lubricants like silicone slide glide instead of grease on brake components, and calibrating the control board after major repairs, you can extend your washer life by years. Save hundreds by fixing it yourself and keep your machine out of the landfill. Start with the simplest checks first, work through the diagnostic steps methodically, and always test thoroughly before calling the job complete.