How to Install Washing Machine Drain Hose
Installing a washing machine drain hose correctly prevents leaks, water damage, and frustrating error codes that can leave your laundry routine in chaos. Whether setting up a new washer or replacing an aging hose, proper installation protects your pump, ensures efficient drainage, and keeps your machine running smoothly for years. This guide walks you through every step, from securing the connection at the machine to routing the hose toward your specific drain type. You’ll learn the exact height requirements, common mistakes to avoid, and brand-specific tips for Samsung, LG, and other popular models.
Secure the Drain Hose Clamp
The clamp that secures your drain hose to the washing machine is the first critical connection point. A loose or improperly tightened clamp is one of the most common causes of leaks and water damage in laundry rooms.
Slide Clamp Onto Port First
Always position the clamp onto the rubber stem of the drain port before connecting the hose. The drain port sits on the back of your machine, typically in the bottom-left corner, and connects directly to the drain pump. Trying to slide the clamp into place after the hose is attached is nearly impossible due to limited working space.
Tighten with Proper Tools
Factory-installed clamps use a tight spring mechanism that cannot be closed securely by hand alone. Use adjustable pliers, channel locks, or needle-nose pliers to fully tighten the clamp until it won’t budge. After tightening, tug gently on the hose to confirm it is firmly attached and won’t come loose during operation.
Attach Hose to Drain Port
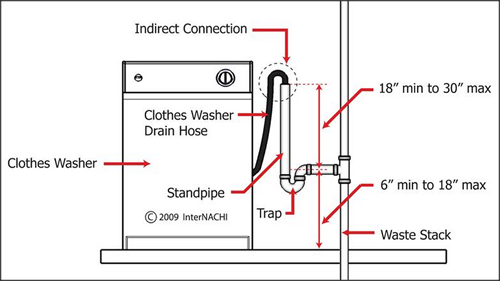
The connection between your drain hose and the washing machine’s drain port must be watertight and properly oriented. A poor connection here causes immediate leaks or long-term pump strain that can shorten your machine’s lifespan.
Slide Hose Over Rubber Stem
Push the drain hose fully onto the rubber stem until there are no gaps and the fit feels completely snug. Partial connections where the hose sits loosely are a leading cause of leaks. The hose should seat all the way down onto the stem with no visible space between the hose and port.
Route Hose Upward
Always route the hose upward from the machine, never downward. An upward path prevents backflow, improves drainage efficiency, and reduces stress on the connection. It also helps prevent siphoning and saves valuable space behind the unit. Never force excess hose back into the cabinet, as this creates kinks, noise, or restricted water flow.
Install Mounting Bracket
Most washing machines include a plastic mounting bracket designed to hold the drain hose securely and prevent accidental dislodging during powerful spin cycles. This small component prevents major problems down the line.
Snap Bracket into Position
Insert the larger end of the bracket into one hole above the drain port, then press the smaller end with the pinch point into the adjacent hole until it snaps securely into place. The bracket stabilizes the hose and reduces vibration stress on the connection point.
Prevent Disconnection During Use
Without this bracket, the hose can be pulled out by movement or water pressure during operation. Repeated cycles gradually loosen the clamp over time, increasing the risk of leaks or complete detachment. The bracket keeps everything stable throughout the wash cycle.
Route Hose Without Kinks

Proper routing protects the hose and ensures unobstructed water flow throughout every drain cycle. How you route the hose affects drainage speed, pump strain, and whether error codes appear.
Avoid Sharp Bends and Pinching
Keep the hose path smooth and gradual. Never bend the hose sharply or allow it to get pinched between the washer and the wall. Kinks restrict water flow, slow drainage dramatically, and may trigger error codes like LF or 4C indicating drainage problems.
Use Beaded Tie Straps
Secure the hose along its path using beaded tie straps, which are either included with your machine or available at hardware stores. These allow slight flexibility while maintaining a gentle curve. Avoid rigid zip ties or metal clamps that compress the hose and reduce performance. Never use tape or sealants to fasten the hose, as these restrict airflow and promote siphoning.
Connect to Standpipe Drain
A standpipe is a vertical pipe, typically 1.5 to 2 inches in diameter, extending from the floor or wall. This is one of the most common and effective drainage options for washing machines.
Insert Hose Correctly
Place the end of the drain hose into the top of the standpipe, but no more than 8 inches deep. Deeper insertion blocks airflow and creates a siphon effect that causes water to continuously drain from the washer even when it should be filling.
Maintain Air Gap
Ensure the hose does not form an airtight seal inside the pipe. An air gap is required to break the siphon and allow atmospheric pressure to equalize. Use a beaded tie strap to hang the hose loosely, keeping it stable without sealing the connection.
Follow Height Rules
The top of the standpipe must be between 39 inches and 96 inches above the floor. Below 39 inches increases siphoning risk significantly. Above 96 inches exceeds the pump’s lifting capacity and causes drainage failure.
Hook Up to Laundry Tub
Using a utility sink or laundry tub is a simple alternative when a standpipe isn’t available. This setup requires specific precautions to prevent siphoning and contamination.
Hang Hose Over Edge
Drape the hose over the rim of the tub, ensuring the end does not touch standing water. Contact with water creates a siphon, leading to backflow and potential contamination of your clean laundry.
Keep Tub Within Height Range
The top of the tub must be between 39 and 96 inches above the floor. If it’s too low, siphoning occurs. If too high, the pump can’t push water out effectively.
Secure to Prevent Slipping
Use a tie strap or safety chain to anchor the hose to the faucet or nearby fixture. This prevents it from slipping into the tub during operation, which would eliminate the air gap and cause serious siphoning problems.
Use Siphon Brake for Floor Drains
Connecting directly to a floor drain requires special precautions to avoid continuous self-draining that leaves your washer unable to fill properly.
Install Siphon Brake Kit
A siphon brake kit must be used when connecting to a floor drain. These kits are sold separately at hardware stores. Install the brake at least 28 inches above the floor. This device breaks the siphon by allowing air into the system when drainage stops.
Connect Hose to Brake Fitting
Attach the drain hose to the siphon brake outlet using an appropriate clamp. Ensure all connections are airtight except for the designated vent in the brake, which must remain open to function properly.
Prevent Back-Siphoning
Without a siphon brake, water flows back into the washer after draining, especially if the hose is submerged. This leads to overfilling, poor wash performance, and mold growth inside the machine.
Follow Samsung Height Requirements
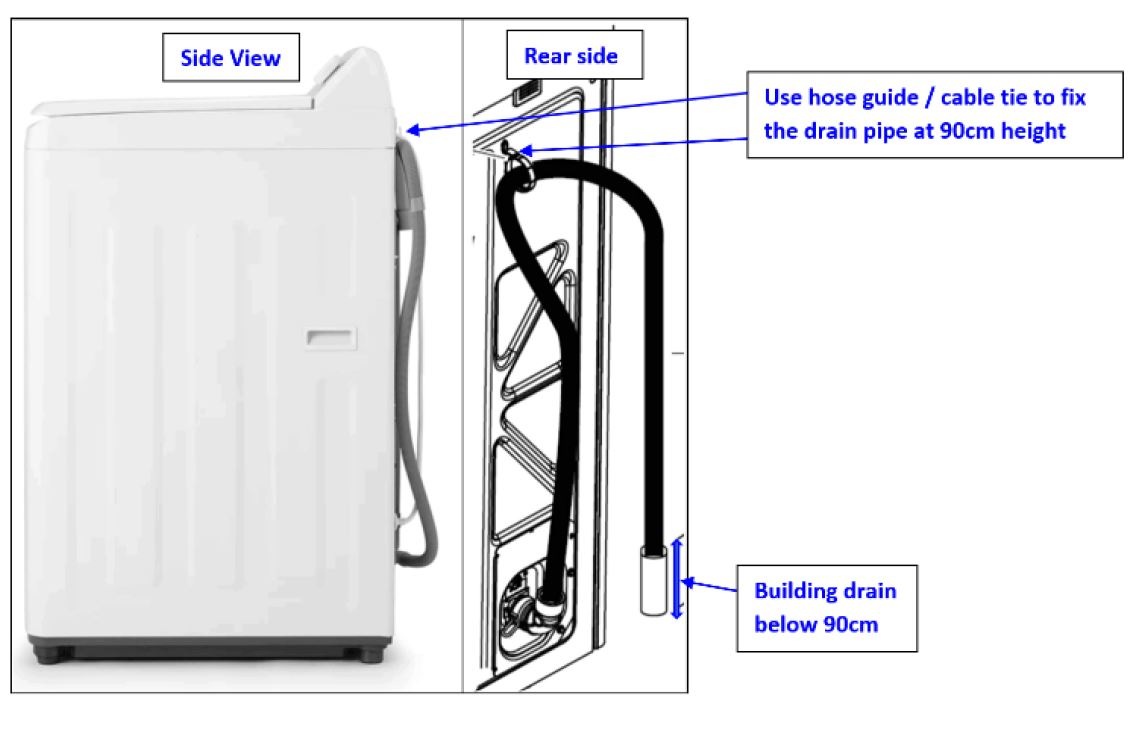
Samsung washers have stricter installation rules due to sensitive error detection systems that monitor drainage constantly. Incorrect installation triggers specific error codes and performance problems.
Set Outlet Between 60-90 cm
For Samsung models, the drain hose outlet must be between 60 cm and 90 cm above the floor. Going below 60 cm triggers error codes 4C or LC, indicating siphoning has occurred.
Avoid Common Samsung Errors
Error 4C or LC appears when siphoning happens due to low hose placement. This causes water re-entering the drum, overfilling, poor wash performance, and unpleasant odors from mold growth. Proper height prevents these issues.
Install Joint Ring Properly
On Samsung units, insert the hose into the marked outlet, then tighten the joint ring around the connection. It should be snug but never airtight. Airflow is critical to prevent siphoning, so a completely sealed connection causes problems.
Install Elbow Bracket on LG/Samsung Models
Many modern washers, including LG and Samsung, require an elbow bracket to secure the hose end properly. This bracket prevents sagging and ensures proper support.
Clip Hose into Bracket
Attach the bracket within 4 inches of the hose end. This prevents sagging and ensures proper support when hanging over a tub or connecting to a wall drain.
Measure Exposed Hose Length
After installation, check that no more than 4 inches of bare hose extends beyond the bracket. Excess length allows moisture to collect inside, promoting mold, mildew, and microbial growth over time.
Secure to Water Supply Line
For wall-mounted drains, use a tie strap to fasten the hose to the cold-water supply line. This prevents movement during operation and maintains correct alignment throughout cycles.
Prevent Siphoning and Clogs
Siphoning is a major cause of drainage problems and error codes. Preventing it requires proper airflow management at every connection point.
Never Seal the Drain Connection
Do not use tape, clamps, or sealants to create an airtight seal between the hose and drain. This blocks air intake and turns the system into a siphon that pulls water back into the washer continuously.
Remove Factory Obstructions
Take off any tape, zip ties, or caps left on the hose or connection points from the factory. These restrict airflow and trigger error codes like LF or 4C. Check both ends of the hose and remove everything before connecting.
Allow Atmospheric Venting
An open air path lets pressure equalize when the pump stops. This breaks the siphon and keeps water where it belongs, outside the machine. Never cover or seal the air gap intentionally.
Test Drainage Performance
After installation, run a test cycle to verify everything works correctly before your first full laundry load.
Run Short Spin or Rinse Cycle
Select a brief cycle that includes draining, such as Rinse and Spin or Quick Wash. Use a small load to simulate real conditions without risking overflow if something is wrong.
Check for Leaks and Noises
Inspect the connection point for drips during the entire cycle. Listen for grinding, humming, or gurgling sounds from the pump, which may indicate blockages or strain.
Monitor Drain Time
Drainage should take 2-3 minutes. Longer times suggest kinks, high discharge points, or partial clogs. If water remains in the tub after draining, recheck the hose path and height.
Watch for Error Codes
If LF, LD, 4C, or LC appears, pause the cycle and review your installation. Check hose height, insertion depth, air gaps, and look for kinks or obstructions. Press Pause/Cancel, wait one minute, then restart. If the error returns, inspect the entire system.
Maintain Hose and Pump
Regular maintenance prevents clogs, odors, and premature wear on your drain system and pump.
Inspect Hose Monthly
Look for cracks, bulges, kinks, or soft spots. Replace the hose if any damage is found, because even small leaks lead to water damage over time.
Clean Pump Filter Regularly
Front-load washers collect lint and debris in the drain pump filter. Clean it every few months, especially after washing towels or pet bedding that sheds heavily.
Flush Hose Periodically
Pour hot water down the hose occasionally to dissolve soap scum and clear minor buildup. For deeper cleaning, disconnect and flush with a garden hose.
Check Clamp and Bracket Annually
Ensure the clamp hasn’t loosened and the bracket remains snapped in place. Corrosion or vibration weakens connections over time, so annual checks catch problems early.
Fix Common Drain Errors
Even with correct installation, issues can arise. Here’s how to troubleshoot the most common problems.
LF or LD Error
This indicates slow or failed drainage. Causes include kinked or clogged hose, excessive insertion into standpipe exceeding 8 inches, airtight seal blocking airflow, or discharge point above 96 inches. Re-route the hose, shorten insertion depth, remove any sealants, and verify the height is correct.
4C or LC Error
This Samsung-specific error means siphoning has occurred, usually because the drain outlet is below 60 cm, the hose is submerged in water, or no air gap exists. Raise the discharge point, maintain the air gap, and ensure the elbow bracket is installed correctly.
Water Backflow After Cycle
If water returns to the drum after draining, check for low hose placement, confirm no airtight seals exist, and install a siphon brake if using a floor drain. These issues often stem from improper height or sealed connections.
Final Installation Checklist
Before regular use, confirm every detail meets safety and performance standards.
• Drain hose securely clamped to drain port with pliers
• Mounting bracket snapped into place
• Hose routed upward with no kinks or pinches
• Discharge point 39-96 inches high or 60-90 cm for Samsung
• Hose inserted no more than 8 inches into standpipe or tub
• No tape, zip ties, or sealants blocking airflow
• Elbow bracket within 4 inches of hose end if required
• Washer plugged into grounded three-prong outlet
• Power disconnected during install, restored after
• Test cycle completed with no leaks, errors, or noise
Key Takeaways for Installing Your Washing Machine Drain Hose
Proper installation of your washing machine drain hose prevents costly repairs, extends your appliance’s life, and ensures optimal performance cycle after cycle. The most critical factors are maintaining correct height between 39-96 inches, never creating an airtight seal that blocks airflow, and routing the hose upward without kinks. Samsung models require the stricter 60-90 cm range to avoid error codes 4C and LC. Using the mounting bracket, beaded tie straps, and proper insertion depth of 8 inches or less keeps everything secure. Test your installation with a short cycle before doing full laundry loads, and perform annual checks on the clamp, bracket, and hose condition. For model-specific guidance, always consult your Use and Care Guide or contact manufacturer support.
Frequently Asked Questions About Installing a Washing Machine Drain Hose
How deep should the drain hose go into the standpipe?
Insert the drain hose no more than 8 inches into the standpipe. Deeper insertion blocks airflow and causes siphoning, where water continuously drains from the washer.
What happens if the drain hose is too low?
If the drain hose is too low, below 39 inches or below 60 cm for Samsung models, siphoning occurs. This causes water to flow back into the washer after draining, triggers error codes like 4C or LF, and leads to poor wash performance.
Can I use tape to secure the drain hose?
Never use tape to secure the drain hose. Tape creates an airtight seal that blocks necessary airflow and causes siphoning. Use beaded tie straps or the manufacturer’s mounting bracket instead.
Why does my washer show error code 4C or LC?
Error code 4C or LC on Samsung washers indicates siphoning, usually caused by the drain hose being installed below 60 cm, the hose submerged in water, or no air gap at the drain connection. Raise the discharge point and check for proper installation.
How often should I inspect my drain hose?
Inspect the drain hose monthly for cracks, bulges, kinks, or soft spots. Check the clamp and bracket annually for tightness. Replace the hose immediately if any damage is found.