Admiral Washing Machine Repair Guide
If your Admiral washing machine won’t spin, bangs during the cycle, or stops mid-wash, you are not alone. Thousands of homeowners face these issues every year, especially with popular models like the ATW4475XQ0 and ATW4675YQ0. The good news? Most Admiral washer problems are repairable, often for under $50 and in less than an hour. Thanks to shared components with Whirlpool and Kenmore, parts are widely available, and repairs are straightforward for DIYers.
This guide delivers step-by-step fixes for the most common Admiral washing machine issues: banging during spin, poor rinsing, failure to complete cycles, and more. You will learn how to use built-in diagnostic modes, replace key components, and decide when to call a pro. Whether you own a top-loader from 2005 or a new model from Home Depot, this is your complete repair roadmap.
Decode Admiral Washer Error Light Patterns
Admiral top-load washers like the ATW4675YQ0 use LED indicators to communicate internal faults. If your washer stops mid-cycle, check the light sequence before assuming motor failure.
Enter Diagnostic Mode on Your Admiral Washer
- Turn control panel off
- Press: Left → Right → Right → Right → Left → Right
- Turn timer knob clockwise one click
- Press Start
The washer enters error-code display mode. No tools needed.
Read the Error Light Patterns
The diagnostic mode displays specific light sequences:
- All four lights on: Fill, Rinse, Final Spin, Cycle Complete
- Then: Rinse, Final Spin, Cycle Complete (Fill light off)
This pattern means the washer failed to reach target RPM during spin. This is not a motor issue. It is likely a faulty actuator (speed sensor) or mechanical obstruction.
Run Auto Test Cycle After Repairs
After making repairs, verify function:
- From diagnostic mode, turn timer knob two clicks right
- Press Start
The washer runs a full diagnostic cycle and stops if an error persists.
Exit Diagnostic Mode
Hold Start while turning the timer: Left → Right → Right → Right → Left → Right
Fix Banging During Spin Cycle

A violent thumping noise during spin is one of the most common Admiral washer complaints. It is not the drum. It is the suspension rods.
Identify the Cause of Spin Cycle Banging
Watch for these symptoms:
- Banging worsens with load size
- Machine shifts across floor
- Noise comes from bottom or sides
The root cause is worn suspension rods (shock absorbers). These support the tub. When broken, the inner tub slams into the outer casing.
Replace Admiral Washer Suspension Rods
Tools Needed:
- Phillips screwdriver
- Ladder or support stand
- Gloves (sharp edges inside)
- $30 repair kit (4 rods + 4 plastic cups)
Safety First:
- Unplug washer
- Shut off water valves
- Disconnect inlet and drain hoses
- Move to open area (garage or patio)
Access the Tub:
- Remove two screws at back of top panel
- Slide panel forward, tilt back, rest on ladder
- Locate four suspension rods connecting tub to cabinet
Swap the Rods:
- Lift old rod upward, twist slightly, slide down
- Remove plastic mounting cup (replace with new)
- Insert new rod through top hole
- Push until locking tabs engage
- Repeat for all four corners
Replace one rod at a time if you are worried about tub stability. The remaining three support the weight.
Reassemble and Test:
- Reattach top panel
- Reconnect hoses and power
- Run spin cycle with towels (balanced load)
The result is silent, smooth operation. No more wall damage. These kits work on Whirlpool, Kenmore, and Estate models because they share the same platform.
Fix Low Rinse Water Level
If your clothes come out soapy and under-rinsed, the rinse fill level cam may be set too low. This especially affects ATW4475XQ0 models.
Check Your Fill Switch Type
Only models with dual fill switches can be adjusted.
- Single switch: Fixed fill level (no adjustment possible)
- Dual switches: Separate wash and rinse fill control (adjustable)
Adjust the Rinse Fill Cam
Access the Control Panel:
- Remove two screws at rear of console
- Pull panel forward, lift up
Timer and fill valve assembly are now exposed.
Make the Adjustment:
- Locate rinse fill switch (smaller cog next to main cam)
- Find rinse-fill cam on same shaft
- Press and hold spring-loaded plunger (releases cam)
- Lift cam, rotate to higher setting (more water)
- Release plunger to lock
No parts are needed. This takes 5 minutes.
Test the Cycle:
- Run a full wash
- Rinse should now fill to normal level
- Agitation improves, soap residue gone
This verified fix works on Admiral ATW4475XQ0 and similar Whirlpool-based units.
Diagnose Washer That Won’t Spin
Washer fills and agitates but will not spin? Do not replace the motor. Check the lid switch first.
Test the Lid Switch
The lid switch is located near the lid hinge. It prevents spinning when the lid is open. This is a common failure point.
Use a Multimeter:
- Set to continuity mode
- Disconnect wires from switch
- Close lid: Should show continuity
- Open lid: No continuity
If no continuity when closed, the switch is bad.
Replace the Lid Switch
- Order correct part for your model
- Disconnect power
- Remove console or front panel
- Unplug wiring harness
- Install new switch
Never bypass the switch. This is a safety hazard.
Replace Drive Belt on Belt-Driven Models
If the motor runs but the drum does not move, a broken belt may be the culprit.
Confirm Your Model Uses a Belt
Not all Admiral models use belts. Direct-drive models skip the belt entirely.
- Belt-driven: Motor under tub, belt connects to transmission
- Direct-drive: Motor shaft connects directly to drum
Drive Belt Replacement Steps
- Unplug washer
- Remove front or back panel
- Loosen motor mount to release tension
- Slide off old belt
- Install new belt (exact size)
- Re-tension motor, reassemble
The cost is $15 to $25 for a belt. This is DIY-friendly.
Clear Drain Pump Clogs
Water left in tub after cycle? A clogged drain pump is likely the cause.
Common Blockages
- Socks
- Coins
- Hair and lint
- Zip ties or packaging
Access and Clear the Pump
- Place towels and bucket underneath
- Remove lower access panel
- Locate pump (near motor)
- Disconnect drain hose
- Remove debris by hand
- Spin impeller (should rotate freely)
- Reconnect hose, reassemble
Replace the pump if the impeller is cracked or the motor fails continuity test.
Replace Actuator Speed Sensor
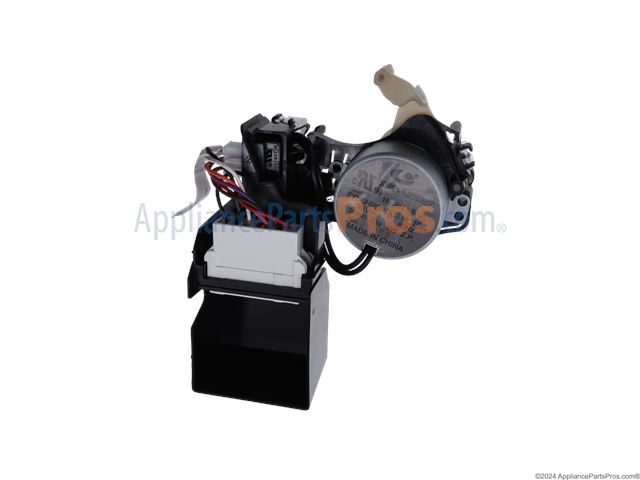
Washer stops mid-cycle? Error lights flash? The actuator may be faulty.
Actuator Failure Symptoms
- Fails to reach spin speed
- Stops during high-RPM phase
- Cycle Complete light behavior in diagnostic mode
This is not the motor. The sensor tells the board the drum is not spinning fast enough.
Replace and Calibrate the Actuator
- Order correct actuator for model
- Install new part
- Calibrate immediately or errors return
Calibration Steps:
- Enter diagnostic mode: Left → Right → Right → Right → Left → Right
- Turn timer knob four clicks clockwise until Rinse light is on
- Press Start
- Wait 5 to 10 minutes for calibration to complete
Skipping calibration causes repeat failures. This step is critical.
Replace Mode Shifter on ATW4675YQ0
This part controls the shift from wash to spin. Part number W10006355.
Mode Shifter Symptoms
- Will not spin out
- Grinding or clicking noise
- Not completing cycles
Repair Tips
- Use OEM part only (aftermarket versions fail early)
- Ensure proper alignment during install
- Test with diagnostic cycle afterward
When to Call a Professional
Some repairs are not worth the DIY risk.
Call a Technician If:
- Bearing failure (jet-engine roar during spin)
- Tub seal leak (requires full disassembly)
- Control board failure (complex wiring)
- Gas dryer issues (safety hazard)
- You lack tools or confidence
Professional Repair Services
Priority Appliance Repair:
- Nationwide service
- 24-hour dispatch
- 1-year warranty on parts
- Technicians carry common parts
Appliance Services Staten Island, NY:
- Phone: (646) 960-3132
- Same-day appointments
- Evening and weekend availability
Sears Home Services:
- Phone: (802) 613-1926 or 1-800-4-MY-HOME
- Certified Whirlpool and Admiral techs
- Diagnostic fee credited to repair
- Average costs: Minor repair $150 to $250, Major repair $250 to $400
Essential Tools for Admiral Washer Repair
Have these on hand before starting:
- 5/16 inch nut driver (or drill bit)
- Phillips screwdriver
- 1/4 inch nut driver
- Ladder (for top panel access)
- Multimeter (test switches, motors)
- Bucket and towels (water spill control)
- Gloves (sharp internal edges)
Always unplug before working. For gas dryers, shut off gas supply.
Prevent Future Admiral Washer Problems
Extend your washer’s life with simple maintenance.
Monthly Tasks
- Clean detergent drawer
- Wipe door gasket (prevent mold)
Every 3 Months
- Run cleaning cycle with vinegar or washer cleaner
Every 6 Months
- Clean inlet hose screens (remove, flush debris)
- Inspect hoses for cracks or bulges
Annually
- Level the washer (use bubble level, adjust feet)
- Clean drain pump filter
Every 2 Years
- Check suspension rods for wear
Every 5 Years
- Replace rubber water hoses with braided stainless steel
Use regular detergent unless your model specifies HE.
Repair vs. Replace Your Admiral Washer
Repair If:
- Washer is under 10 years old
- Cost is under 50% of new unit
- Motor, tub, transmission are good
- You prefer reliability over smart features
Replace If:
- Over 15 years old
- Bearings or transmission failed
- Rust or structural damage
- Repair exceeds $400
- You want larger capacity or quieter operation
1990s to 2000s Admiral washers often outlive modern units due to simpler design.
Find the Right Parts for Your Admiral Washer
Thanks to Whirlpool ownership, parts are cross-compatible.
Compatible Brands
- Whirlpool
- Kenmore (Sears)
- Estate
- Roper
- Maytag (some)
Best Parts Sources
- Amazon (fast shipping, affordable kits)
- RepairClinic.com (model-specific diagrams, videos)
- Sears PartsDirect (OEM and compatible)
- AppliancePartsPros.com (schematics, support)
- Local shops (may have NOS – New Old Stock)
Enter your model number (e.g., ATW4475XQ0) for exact matches.
Key Takeaways for Admiral Washing Machine Repair
Admiral washers are DIY-friendly. Do not toss a fixable machine. Many $20 repairs solve dead washer issues.
Watch for bearing noise. A deep roar during spin means expensive fix. Consider replacement in these cases.
Water inlet valves fail often. Clean screens or replace if filling slow.
Swollen capacitors kill motors. Replace if bulging or leaking.
OEM parts last longer, especially for actuators and mode shifters.
Calibration is mandatory after actuator replacement. Do not skip it.
Frequently Asked Questions About Admiral Washing Machine Repair
How do I find my Admiral washer model number?
The model number is located on a label inside the washer lid, behind the control panel, or on the back of the machine near the top. It typically begins with letters like ATW, AAV, or LNC followed by numbers.
Why does my Admiral washer stop mid-cycle?
This is often caused by a faulty actuator (speed sensor) that fails to reach target RPM. Run diagnostic mode to confirm. Replace the actuator and recalibrate to fix.
Can I replace Admiral washer parts myself?
Yes. Most repairs like suspension rod replacement, lid switch, drive belt, and drain pump clearing are DIY-friendly. Use OEM parts and follow calibration steps when required.
How much does Admiral washer repair cost?
DIY repairs typically cost $15 to $50 for parts. Professional repairs range from $150 to $400 depending on the issue. Bearing replacement can cost $400 to $600.
Are Admiral and Whirlpool parts interchangeable?
Yes. Admiral is owned by Whirlpool, and many parts are cross-compatible with Whirlpool, Kenmore, Estate, and Roper models.
How long do Admiral washing machines last?
With proper maintenance, Admiral washers can last 15 to 20 years. Many 1990s to 2000s models outlast modern units due to simpler design with fewer electronic components.