How to Connect a Pressure Washer
Connecting a pressure washer incorrectly often leads to pump failure, dangerous leaks, or severe safety hazards during operation. Whether you own an electric or gas-powered model, the setup process demands specific attention to hose selection, adapter fitting, and system priming to ensure longevity. This guide details exactly how to connect a pressure washer using proven methods that protect your equipment and maximize cleaning power.
You will learn the correct sequence for attaching water supplies, selecting durable brass adapters, and purging air from the pump before startup. We also cover critical safety steps for gas engine ignition and proper shutdown procedures to prevent internal damage. Follow these instructions to set up your machine confidently and avoid common mistakes that void warranties.
Select the Right Water Supply Hose for Maximum Flow

Choosing the correct water supply line is the first step in preventing pump cavitation and overheating. A substandard hose restricts water volume, forcing the pump to work harder than necessary while drawing in air bubbles that cause premature wear.
Use a Mains-Fed Garden Hose at Least 15 Meters Long
Always select a mains-fed garden hose with a minimum length of 15 meters to guarantee steady water delivery. Shorter hoses or those not rated for continuous pressure can collapse internally, starving the pump of water. Look for labels indicating “high-flow” or “pressure washer compatible” to ensure the lining withstands constant use without degrading.
Prevent Flow Restrictions with Free-Flowing Adapters
Install a free-flowing hose adapter at the tap end to eliminate bottlenecks before water enters the machine. Standard spray nozzles or narrow fittings on regular hoses choke the flow, reducing overall efficiency and straining the motor. Inspect older hoses for internal slime or loose lining that could clog the inlet filter and damage pump valves.
Choose a Durable Tap Adapter for Your Connection
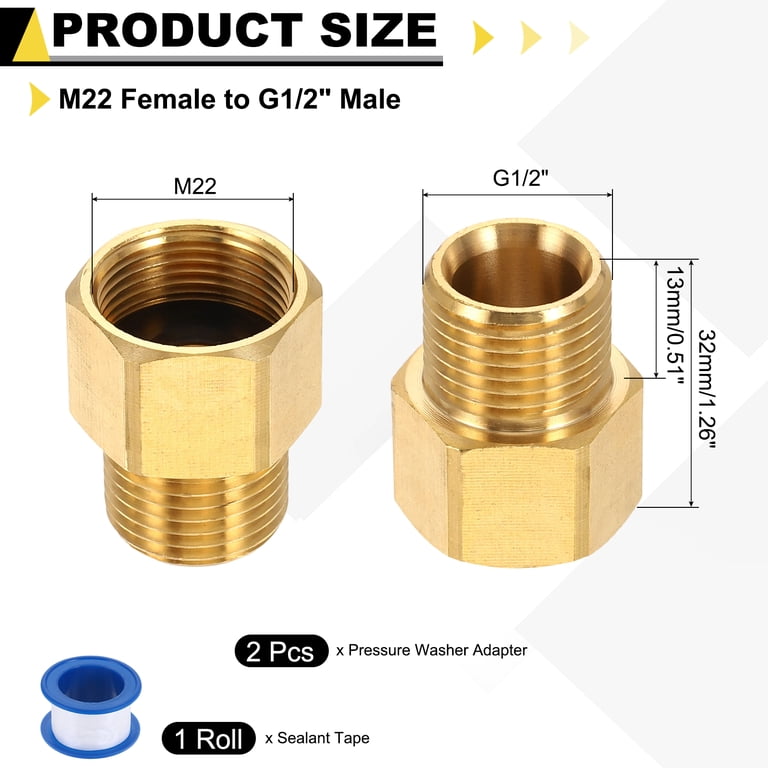
The adapter connecting your hose to the tap must match your local plumbing standards to prevent leaks. Using the wrong material or thread size results in poor performance and potential water damage to your workspace.
Match the 3/4-Inch BSP Thread Standard
Most outdoor taps utilize a 3/4-inch BSP (British Standard Pipe) thread, so verify your adapter matches this specification exactly. A mismatched thread causes cross-threading, leaks, or an insecure fit that fails under high pressure. Clean any corrosion or mineral buildup from the tap threads with vinegar before attaching the new adapter for a smooth seal.
Prefer Brass Adapters for Frequent Use
Select a brass tap adapter if you plan to use your pressure washer regularly or for heavy-duty tasks. Brass resists corrosion and withstands high stress far better than plastic alternatives, which often crack in cold weather or split when overtightened. Hand-tighten plastic adapters only, but you can use a wrench to snug brass fittings without fear of stripping, provided you do not overtighten.
Assemble Hose Connections with Internal Clamping Teeth

Proper assembly of the hose and adapter ensures the connection survives high-pressure surges without blowing off. Many users fail to push the hose deep enough, leading to sudden disconnections and dangerous hose whipping.
Push Hose Fully to Internal Clamping Teeth
Insert the hose into the adapter until it hits the internal clamping teeth located deep inside the fitting. Never let the hose rest on the outer rim or shallow area, as water pressure will easily force it off during operation. Unscrew the adapter collar, slide the hose in until it bottoms out, and then tighten the collar firmly to compress the teeth into the hose wall.
Add Clearance with a Short Extension Pipe
Use a 6–12 inch extension pipe between the tap and the main hose if your machine sits on a reel or far from the water source. This short rigid section reduces strain on the tap connection and prevents twisting that could loosen the fitting over time. Secure both ends tightly to maintain a leak-free path for water delivery.
Connect to Water Source Using Step-by-Step Instructions
Following a logical order when connecting components prevents water waste and ensures every joint is secure before pressure builds. Rushing this stage often leads to sloppy connections that fail immediately upon startup.
Attach Adapter to Tap Before Connecting Hoses
Screw the tap adapter directly onto the outdoor faucet first, ensuring it sits straight and secure. Hand-tighten plastic versions or use a spanner for brass models, applying thread seal tape if minor dripping occurs. This foundational step anchors your entire supply line and prevents wobbling during operation.
Build the Supply Line in Correct Order
Assemble the water path systematically to maintain control and alignment throughout the setup.
* Connect a short 1–2 foot hose to the secured tap adapter.
* Attach a second adapter to the free end of this short segment.
* Link your main 15-meter garden hose to that adapter.
* Connect the opposite end of the garden hose to the pressure washer water inlet.
For specific brands like Kärcher, attach the suction hose and filter kit to the machine inlet first, then connect the garden hose to the kit. Never turn on the water until every joint is fully assembled to avoid uncontrolled spraying.
Attach High-Pressure Hose and Spray Gun Components

Once the water inlet is secure, you must connect the high-pressure output side to complete the fluid circuit. This stage involves handling specialized fittings that lock the spray gun to the pump outlet.
Connect High-Pressure Hose to Pump Outlet
Attach the high-pressure hose to the pump outlet on the machine, ensuring the fitting clicks into place or threads tightly by hand. Check that the internal O-ring is present and undamaged, as a missing seal causes immediate leaking under pressure. A secure connection here is vital for maintaining the high PSI required for effective cleaning.
Link Spray Gun and Wand Securely
Connect the spray gun to the free end of the high-pressure hose, then screw on the wand and your chosen nozzle. Verify that all latches or locks engage properly to prevent the gun from disconnecting during use. A loose wand can spray water uncontrollably, creating safety hazards and reducing cleaning precision.
Prime the Pump to Prevent Dry Running Damage
Priming removes air from the system and fills the pump with water, which is essential for lubrication and cooling. Skipping this step causes dry running, which burns seals and cracks pistons within seconds.
Purge Air from System Before Powering On
Follow this sequence to ensure all air pockets are expelled before the motor engages.
1. Keep the power switch off to prevent accidental startup.
2. Open the water tap fully to fill the hoses.
3. Squeeze and hold the spray gun trigger continuously.
4. Wait for a steady stream of water with no sputtering or bubbles.
5. Release the trigger once the flow is consistent, usually taking 10–15 seconds.
Recognize Electric Self-Priming Cycles
Many electric pressure washers perform an automatic self-priming cycle when powered on after connection. The motor runs briefly to pressurize the system and then shuts off automatically, which is normal behavior. Do not pull the trigger until this cycle completes to avoid introducing air back into the pump.
Start Gas-Powered Units with Correct Fuel Settings
Gas models require a specific startup sequence involving fuel, throttle, and choke settings to ignite safely. Incorrect settings often lead to stalling, flooding, or difficulty starting the engine.
Set Fuel Valve and Throttle to Rabbit Speed
Turn the fuel valve to ON and slide the throttle lever to “rabbit” (high speed) before attempting to start. Engage the choke only if the engine is cold, as this enriches the fuel mixture for easier ignition. Starting at low throttle (“turtle”) frequently causes the engine to stall or fail to catch.
Pull Starter Cord Smoothly and Adjust Choke
Flip the red power switch to ON and pull the recoil starter cord with a firm, smooth motion. Let the engine run for a few seconds, then move the choke to OFF to prevent flooding. Allow the engine to warm up fully before squeezing the trigger to begin cleaning.
Follow Proper Power On and Off Sequences
Adhering to the correct order of operations protects the pump from pressure surges and internal stress. Improper shutdowns leave residual pressure in the system, which can damage seals and hoses over time.
Turn On in Correct Order to Prevent Surges
Activate your system in this specific sequence to ensure smooth operation.
1. Open the water tap to allow flow.
2. Start the machine by pressing the power button or pulling the cord.
3. Pull the spray gun trigger to release water and engage the pump.
The unit will cycle on and off automatically as you squeeze and release the trigger, maintaining consistent pressure throughout the task.
Shut Down Properly to Release Residual Pressure
Reverse the startup process to safely power down your pressure washer.
* Gas models: Turn off the engine first.
* Electric models: Switch off at the power button.
* Close the water tap to stop the supply.
* Squeeze the trigger for 3–5 seconds to drain remaining pressure.
This final step relieves stress on internal components and prevents leaks during storage.
Clean Inlet Filters and Maintain Water Quality
Regular maintenance of the water intake system prevents debris from entering and damaging the pump internals. Neglecting this step leads to clogged filters and reduced performance over time.
Check and Clean Inlet Filter After Use
Remove and inspect the inlet filter located at the water intake point after every few uses. Rinse away sand, grit, or leaves that may have accumulated, as a clogged filter restricts flow and strains the motor. Replace the filter immediately if you notice cracks or significant wear.
Use Only Clean Potable Water Sources
Connect exclusively to a clean, potable water source to avoid introducing abrasive particles into the pump. Never draw water from buckets, ponds, or rain barrels unless using a dedicated suction hose with a high-quality filter. Dirty water erodes pump valves and seals, leading to costly repairs.
Store Correctly and Winterize to Prevent Freezing
Proper storage extends the life of your pressure washer, especially in climates where temperatures drop below freezing. Water left inside the pump can freeze, expand, and crack the housing permanently.
Flush Residual Water Before Storage
Run the machine for 5 seconds after shutting off the water supply to expel remaining liquid from the pump. Alternatively, hold the trigger down after shutdown to drain the system completely. This simple step prevents ice formation that destroys internal components during winter months.
Store in Frost-Free Area and Coil Hoses Loosely
Keep the pressure washer in a dry, indoor location away from freezing temperatures and moisture. Disconnect both garden and high-pressure hoses, drain them, and coil them loosely to prevent kinks. Never hang hoses by their fittings, as this stresses the joints and causes leaks later.
Troubleshoot Common Connection and Pressure Issues
Even with careful setup, issues like air locks or leaks can occur. Knowing how to diagnose these problems quickly saves time and prevents further damage.
Fix Air Locks and Low Pressure Problems
If water sputters or pressure drops suddenly, re-prime the system by holding the trigger until flow stabilizes. Check for kinks in the garden hose and ensure the tap is fully open to maximize water volume. Trapped air disrupts pump function and significantly reduces cleaning power.
Address Leaks at Connection Points
Turn off the tap and disconnect any joint showing signs of leakage to inspect the seal. Reseat the hose firmly onto the clamping teeth and tighten the adapter securely. Replace worn O-rings or cracked adapters immediately, as even small leaks waste water and lower efficiency.
Follow Safety Best Practices During Operation
Safety remains the top priority when operating high-pressure equipment, as improper use can cause serious injury. Always adhere to recommended guidelines to protect yourself and your property.
Wear Protective Gear and Use Quality Components
Always wear safety goggles to protect eyes from ricocheting debris and gloves to shield hands from spray. Invest in brass fittings and commercial-grade hoses, as cheap plastic parts can fail under pressure and cause injuries. Never point the nozzle at people, animals, or electrical fixtures.
Ensure Electrical Safety for Electric Models
Plug electric units into a GFCI-protected, grounded outlet to prevent shock hazards. Avoid using extension cords unless they are rated for outdoor, heavy-duty use, and keep all cords away from water pools. Faulty wiring or improper grounding increases the risk of electrical accidents significantly.
Frequently Asked Questions About Connecting Pressure Washers
What happens if I do not prime the pump before starting?
Failing to prime the pump causes dry running, which generates instant heat and burns seals or cracks pistons. Water acts as a lubricant and coolant, so running the machine without it voids warranties and causes irreversible damage.
Why is my pressure washer sputtering or losing pressure?
Sputtering usually indicates an air lock in the system or a restricted water supply. Re-prime the pump by holding the trigger until a steady stream appears and check that your garden hose is not kinked or too short.
Can I use any garden hose for my pressure washer?
No, you must use a mains-fed garden hose at least 15 meters long designed for continuous pressure. Standard hoses may collapse internally or burst, restricting flow and damaging the pump through cavitation.
How do I stop leaks at the tap adapter connection?
Ensure the adapter matches the 3/4-inch BSP thread and push the hose fully onto the internal clamping teeth before tightening. Apply thread seal tape if necessary and avoid overtightening plastic adapters, which can crack under stress.
What is the correct shutdown sequence for a pressure washer?
Turn off the engine or motor first, then close the water tap, and finally squeeze the trigger to release residual pressure. This sequence prevents pressure spikes and protects internal seals from stress damage.
Key Takeaways for Connecting Your Pressure Washer Safely
Successfully connecting your pressure washer relies on selecting the right 15-meter mains-fed hose, using durable brass adapters, and strictly following the priming process. Always push hoses onto internal clamping teeth, purge air before powering on, and shut down in reverse order to release pressure. By adhering to these steps, you ensure safe operation and extend the lifespan of your machine significantly.
Take action now by inspecting your current setup for worn hoses or plastic adapters that might fail under pressure. Proper preparation today prevents costly repairs and safety hazards tomorrow, keeping your cleaning projects efficient and effective.