Estate Washing Machine Repair: Quick Fix Guide
If your Estate washing machine won’t spin, agitate, or drain, you are not alone. These vintage top-loading models, often built by Whirlpool under the Estate brand, are reliable but prone to predictable wear and tear. With estate washing machine repair becoming a growing search topic, homeowners and DIYers are looking for clear, actionable fixes. This guide delivers exactly that: a complete, step-by-step roadmap to diagnosing and repairing your machine using only real data from technical sources.
You will learn how to identify the most common failure points, like a faulty lid switch or worn agitator dogs, and fix them safely and efficiently. Whether you are restoring a junked unit or troubleshooting a sudden breakdown, this guide covers every critical component, test, and replacement protocol. No fluff, no guesswork, just proven repair strategies used by professionals.
Decode Common Failure Symptoms
Recognizing what a symptom means saves hours of unnecessary disassembly. Estate washers follow consistent failure patterns, especially in older models.
Washer Won’t Spin or Drain
This is the most frequent issue reported. Possible causes include lid switch failure, worn motor coupler, failed clutch, faulty timer or control board, and clogged drain pump.
Pro Tip: If the washer fills but does nothing after, test the lid switch first. It is the number one culprit.
Washer Won’t Agitate
Agitation failure often stems from internal mechanical wear. Worn agitator dogs are very common, along with broken motor coupler, lid switch malfunction, and neutral drain kit misalignment. If the drum spins but does not agitate, the problem is likely not electrical. Focus on transmission-side components instead.
Loud Noise or Excessive Vibration
Unusual sounds point to mechanical instability. A worn clutch produces grinding or squealing. Loose tub or stabilizer spring, damaged spin tube, and unbalanced load or uneven floor are also culprits. Inspect suspension parts and ensure all mounting hardware is tight.
Water Leaks Under the Machine
Leakage usually means seal failure. Failed transmission shaft seal, cracked tub or spin tube seal, loose hose fittings, and degraded door gasket are common causes. Check the weep hole at the base. If it is dripping, water has entered the clutch housing.
Test the Lid Switch First
The lid switch is the most commonly failed part in Estate washers and should always be your first diagnostic step.
Bypass the Lid Switch to Confirm Motor Function
Tools Needed: Jumper wire, screwdriver
Time Estimate: 10 minutes
Unplug the washer. Remove the top panel by unscrewing two rear screws and flipping the panel forward. Locate the lid switch connector, usually near the front rim. Disconnect the wiring harness. Short the two gray wires together while keeping the green wire grounded. Plug in the washer and start a spin cycle.
If the motor runs, the lid switch is faulty. If nothing happens, move to motor or coupler testing.
Warning: Never operate the washer with the lid switch bypassed for extended use. It is a safety hazard.
Replace a Faulty Lid Switch
Disconnect power. Remove the front panel. Unplug the old switch and remove mounting clips. Install the new switch, reconnect wires, and test.
Cost: Approximately $15 to $25. Always inspect for charring or melted plastic. These are signs of electrical overload.
Inspect the Motor Coupler

The motor coupler connects the motor to the transmission and acts as a mechanical fuse.
Signs of Coupler Failure
Look for cracked or melted rubber center. Watch for free-spinning prongs. If the washer hums but does not agitate or spin, the coupler is likely bad. Even slight degradation can cause slippage and failure.
How to Test and Replace
Unplug the washer. Remove the pump and front access panel. Disconnect the motor and inspect the coupler. Spin the motor shaft by hand. If it turns freely with no resistance, the coupler is likely bad.
Replacement Steps
Remove old coupler from motor and transmission shafts. Press new coupler into place, ensuring proper alignment. Reconnect motor and pump.
Time Required: 30 to 45 minutes
Difficulty: Moderate
Pro Tip: Replace the coupler anytime you open the cabinet. It is cheap insurance against future failure.
Diagnose Clutch and Transmission Issues
If the washer spins weakly or not at all, the clutch is likely worn, especially if water has entered the system.
Check for Free-Spinning Clutch
Remove the spanner nut and tub. Try to rotate the clutch by hand. If it turns freely, it has failed due to water intrusion from a bad transmission shaft seal.
Replace the Clutch Assembly
Tools Needed: Spanner wrench, socket set, C-clip pliers
Parts Required: New clutch, C-clip, retainer ring
Remove motor, pump, and tub. Take off dust cover and seat clip. Pull out old clutch. Install new clutch with spring facing away from cam. Secure with new C-clip and retainer ring.
Critical: Use a new rubber dampener and ensure correct spring orientation. Wrong installation causes premature failure.
Fix No-Agitation with Agitator Dog Replacement
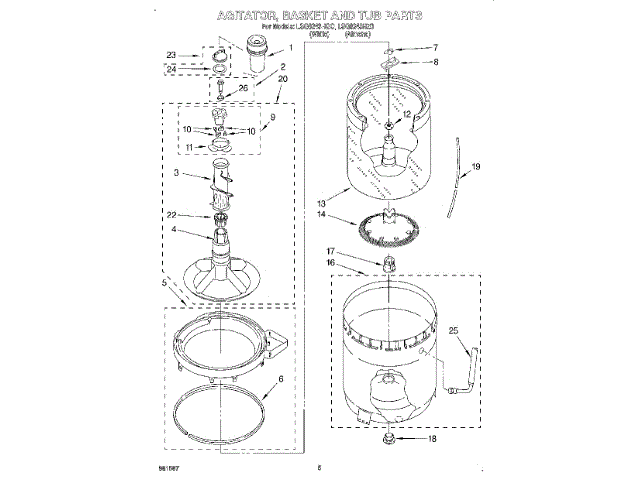
When the agitator spins freely in both directions, the agitator dogs are worn out. These are small plastic shims that allow agitator to move in one direction only during agitation.
Replace Agitator Dogs in 20 Minutes
Tools: 7/16-inch socket, screwdriver
Parts: Agitator dogs, agitator bolt
Pull off the agitator by lifting straight up. Remove the center bolt using a socket or magnet. Flip agitator and remove old dogs from housing. Insert new dogs, usually 4 to 6 pieces. Reinstall bolt with rubber washer underneath. Reinsert agitator and test.
Test: Agitator should move up during agitation but not spin freely.
Expert Note: Replace the bolt and dogs together. A worn bolt can damage new dogs.
Replace All Seals During Rebuild

Water in the transmission destroys clutches and bearings. Always replace all seals during a major repair.
Key Seals to Replace
Transmission Shaft Seal: Part number WLDW-L449. Failure sign is grease or rust at base.
Spin Tube Seal: Failure sign is wobble or noise.
Tub Seal: Failure sign is leaks under machine.
Seal Replacement Protocol
Clean all mating surfaces thoroughly. Press in new shaft seal using a socket. Apply Ultra Black gasket maker to screw holes to prevent leaks. Polish spin tube with fine-grit sandpaper before reassembly. Let sealant cure overnight before testing.
Warning: Skipping seal replacement leads to repeat clutch failures.
Install the Neutral Drain Kit Correctly
This kit allows the tub to spin freely during the drain cycle. Incorrect installation causes binding and spin failure.
Align the Neutral Drain Kit
Position the plate so the hole aligns with the transmission. Secure with Allen screw and blue Loctite to prevent loosening. Ensure the trip lever plastic side is up. Rotate cam. It should engage 8 to 10 times before spin activates.
Test: Tub should spin freely when lifted slightly during drain.
Common Mistake: Installing the lever upside down. This prevents proper engagement.
Reassemble with Best Practices
Proper reassembly prevents future issues and ensures smooth operation.
Motor and Pump Reinstallation
Rock the motor side-to-side to engage the coupler. Align pump T-groove with motor housing. Secure with clips. Do not force.
Tub and Spanner Nut
Lower tub onto spin tube. Install spanner nut and tighten until center flares slightly. This locks the tub. Reattach stabilizer spring and splash guard.
Lubrication Points
Transmission: Fill with 85 to 90 weight gear oil until oil covers internal ledge.
Splines: Apply silicone grease before agitator installation.
Clutch and shafts: Lightly lubricate moving parts.
Test for Leaks and Function
Never plug in a repaired washer without validation.
Run a Full Diagnostic Cycle
Use GFCI-protected outlet for safety first. Start a short wash cycle. Monitor the weep hole. It should stay dry. Check base of machine for no leaks. Verify spin speed reaches full RPM with no slippage. Confirm agitation moves in one direction only. Ensure drain completes in 2 to 3 minutes. Listen for grinding, knocking, or humming.
If GFCI trips: Check for ground faults in motor windings or control board.
Prevent Future Breakdowns
A repaired Estate washer can last years with proper care.
Monthly Maintenance Checklist
Test lid switch operation. Inspect hoses for cracks or bulges. Listen for unusual noises during spin. Check floor for leaks.
Annual Proactive Replacements
Replace agitator dogs and bolt. Replace motor coupler. Replace transmission seals if residue appears.
Pro Tip: Keep spare agitator dogs and couplers on hand. They fail often and are cheap.
Protect from Environment
Never store in freezing temperatures. Water lines can burst. Replace frozen cold-water hoses before testing. Store spare machines indoors.
Source Reliable Replacement Parts
Use genuine or high-quality aftermarket parts to avoid repeat repairs.
Where to Buy
Repair Clinic (Burke America Parts Group) supplies authorized parts since 1912. Online appliance parts retailers like AppliancePartsPros and PartSelect are reliable options. Salvage units can provide screws, knobs, and clips from donor machines.
Common Part Numbers and Costs
| Part | Approx. Cost |
|---|---|
| Agitator Dogs | $7 each |
| Motor Coupler | $15–$20 |
| Clutch Assembly | $40–$60 |
| Lid Switch | $15–$25 |
| Transmission Shaft Seal | $10–$15 |
| Neutral Drain Kit | $25–$35 |
Note: Burke America supplies OEM-equivalent parts trusted by professionals.
Restore Fire-Damaged or Junk Units
Even severely damaged Estate washers can be revived.
Fire Damage Repair Steps
Replace charred ground-fault switch. Inspect control board for melted traces or swollen capacitors. Replace burned wiring and screw terminals. Clean soot from chassis with Purple Power degreaser. Re-ground all connections.
Safety: Always use GFCI protection during testing. Fire-damaged units are high-risk.
Restore a Junk Machine
Thaw frozen water lines with warm water. Pressure-wash interior and base. Replace clutch, seals, agitator dogs, and coupler. Re-lubricate transmission. Test with GFCI.
Outcome: Fully functional washer ideal for backup or resale.
Final Validation: Is Your Repair Successful?
A properly repaired Estate washing machine should complete full wash cycles without stopping. It should spin at full speed with no slippage. It should drain completely in 2 to 3 minutes. It should operate quietly with no knocking or grinding. It should not leak from base or weep hole. It should not trip GFCI or breaker.
Real-World Proof: Multiple sources confirm fire-damaged and discarded units have been restored to full operation using these methods.
Key Takeaways for Lasting Estate Washing Machine Repair
Always test the lid switch first. It is the most common failure point in estate washing machine repair. Bypass testing confirms motor function when you short the gray wires. Clutch should not turn by hand. If it does, replace seals and clutch together. Replace all seals during rebuild to prevent repeat failures. Neutral drain kit must be timed correctly. Misalignment causes spin issues. Use GFCI during all testing. Safety is non-negotiable. Document your repair. Note part swaps and modifications for future service.
With this guide, you are equipped to tackle any estate washing machine repair, from simple lid switch fixes to full transmission rebuilds. Save money, avoid service calls, and extend the life of your machine with confidence.
Frequently Asked Questions About Estate Washing Machine Repair
Why does my Estate washer fill with water but not spin or drain?
This is typically a lid switch failure. The lid switch prevents operation when the lid is open. If it fails, the machine fills but will not proceed to agitation or spin. Test the lid switch first using the bypass method before replacing more expensive components.
How do I test if the motor coupler is bad on my Estate washer?
Unplug the washer and remove the front access panel. Disconnect the motor from the transmission. Spin the motor shaft by hand. If it turns freely with no resistance, the coupler is bad. Look for cracks, melting, or free-spinning prongs as additional signs of failure.
Can I replace agitator dogs myself, or do I need a professional?
You can replace agitator dogs yourself in about 20 minutes. Remove the agitator, take out the center bolt, swap the old dogs for new ones, and reassemble. This is one of the simplest DIY repairs for estate washing machine repair and costs approximately $7.
What causes the clutch to fail in Estate washers?
Clutch failure is usually caused by water intrusion from a failed transmission shaft seal. Water gets into the clutch housing, corroding the internal components. Always replace the transmission shaft seal when replacing the clutch to prevent repeat failure.
How often should I perform maintenance on my Estate washing machine?
Perform monthly checks on lid switch operation, hoses, and unusual noises. Annually inspect motor coupler, agitator dogs, and transmission seals. Proactive replacement of wear parts like agitator dogs and coupler prevents sudden breakdowns and extends machine life.
Is it worth repairing an older Estate washing machine, or should I replace it?
Estate washers are highly repairable with readily available parts. Most repairs cost $15 to $60 in parts. With proper maintenance, a repaired unit can last many more years. Given the durability of these machines, repair is usually the better economic choice compared to replacement.