Washing Machine Keeps Filling and Draining: Quick Fix
Your washing machine fills with water, then immediately starts draining. A few seconds later, it fills again. The cycle never advances. No agitation. No spin. Just an endless loop of filling and draining, wasting water and leaving clothes unwashed.
This continuous fill-and-drain cycle is a common but fixable issue affecting both top-load and front-load models. The root cause is usually not a broken pump, as many assume. Instead, it is typically a problem with water level detection, improper drain hose setup, or slow filling, all tricking the machine into thinking something is wrong.
Fix Drain Hose Siphoning First
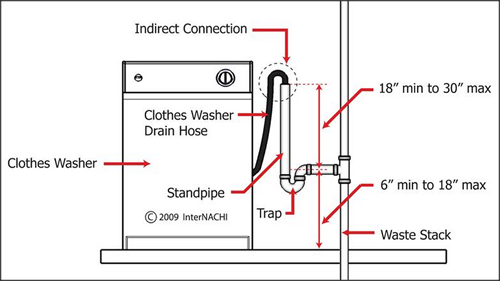
If your washer fills and drains nonstop, siphoning is the most likely culprit. It happens when the drain hose creates a vacuum that pulls water out as fast as it enters, preventing the tub from ever reaching the correct level. The control board never gets the full signal, so it keeps refilling.
Install a Proper High Loop
A high loop in the drain hose breaks the siphon by introducing air into the system. Without it, water can be sucked out unintentionally.
- Minimum height: 30 inches above the washer base
- Maximum height: 8 feet to avoid pump strain
- Route the hose upward and secure it to the back of the machine or wall with a zip tie or clip
- Do not let the hose dip or sag, as this defeats the purpose
Pro Tip: Use the manufacturer-supplied drain hook if your model includes one. It ensures consistent loop height.
Prevent Deep Insertion into Standpipe
If the hose is pushed too far into the standpipe or laundry tub, it can create a sealed siphon.
- Maximum insertion depth: 4½ to 5 inches
- Minimum insertion to prevent ejection: 7 inches
- If you cannot meet both, use a hose clamp to secure the hose at 7 inches and allow a small air gap
Ensure an Air Gap at the Drain
Never seal the hose end inside the drain. A sealed connection prevents air entry and encourages siphoning.
- Leave at least 2 inches between the end of the hose and the drain opening
- Do not use tape, foam, or putty to seal around the hose
Use an Anti-Siphon Clip for Low Drains
If your discharge point is lower than 30 inches, such as in a basement or utility sink, an anti-siphon clip is required.
- Available from GE Appliances at 1-800-GE-CARES
- Simply thread the hose through the clip and mount it to the washer back panel
- It introduces an intentional air break to stop siphoning
Real Fix: A 2-year-old Hotpoint top-loader stopped cycling after a plumber rerouted the drain pipe. Reinstalling the hose with a high loop and anti-siphon clip resolved the issue in one cycle.
Diagnose Slow Fill or Stuck Inlet Valve
If the washer takes too long to fill, the control board may assume a fault and trigger an early drain. This timeout-induced drain mimics siphoning but stems from inadequate water flow.
Time the Fill Cycle
- Normal fill time: Less than 6 minutes, varies by load and model
- Timeout threshold: Most machines abort fill after 6 to 8 minutes and jump to drain
- If your washer drains after 7 or more minutes of filling, slow fill is the likely cause
Check Inlet Hose Screens for Clogs
Mineral deposits and sediment can block the small filters inside the water inlet connections.
- Turn off hot and cold water valves
- Disconnect hoses from the back of the washer
- Remove and inspect screen filters at the hose connections
- Clean under running water or replace if damaged
- Reconnect and test
Warning: A clogged screen can reduce water pressure enough to trigger a timeout, even if the inlet valve is working fine.
Test for a Stuck Open Inlet Valve
If water continues flowing after unplugging the washer, the inlet valve is mechanically stuck open and must be replaced.
- Start a fill cycle
- Unplug the washer mid-fill
- If water keeps flowing, the valve has failed
- If water stops immediately, the issue is electrical or control-related
Replace the Inlet Valve if Needed
- Example part: GE WH13X10029 fits many GE and Kenmore models
- Cost: $30 to $60
- Installation involves removing the top panel, disconnecting water lines and electrical connectors, unmounting the old valve, and installing the new one
User Success: A GE GFWN1000 front-loader took over 8 minutes to fill. After replacing the inlet valve, fill time dropped to 1 minute, and the cycle was restored.
Inspect the Pressure Switch System
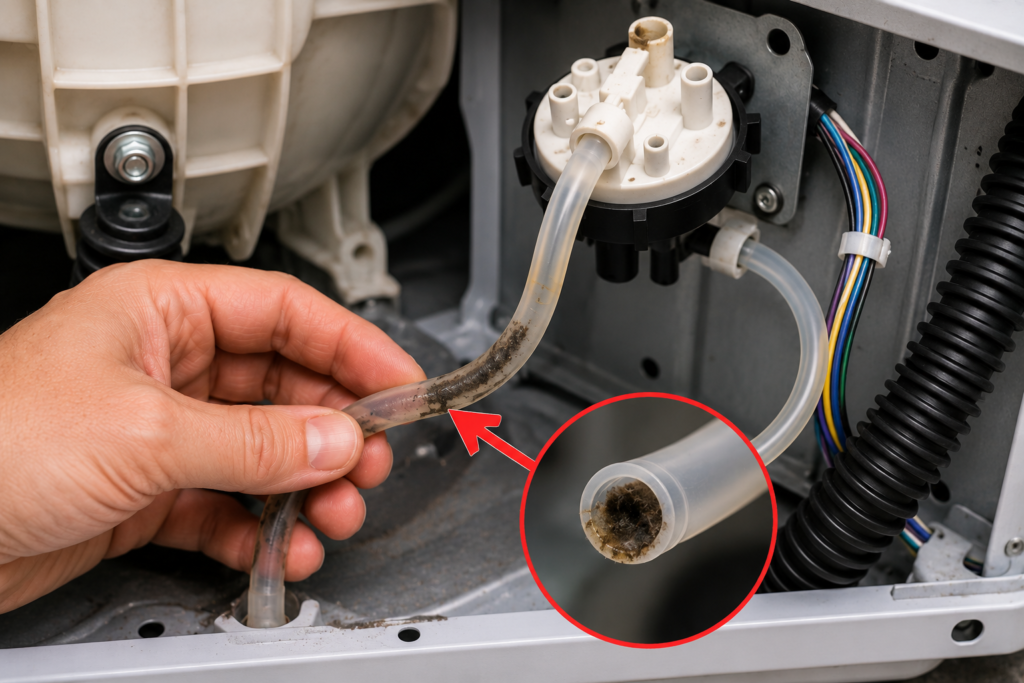
The pressure switch tells the control board when the tub is full. If it fails to detect water, the machine never starts agitation and may drain prematurely.
Locate the Pressure Hose
A thin, transparent plastic tube runs from the outer drum to the pressure switch, usually behind the control panel or near the pump. It uses air pressure to sense water level.
Check for Disconnection or Damage
The hose gets knocked loose during cleaning or maintenance. Reconnect it only when the tub is completely empty, otherwise calibration is off.
Look for cracks or splits in the tubing, kinks or blockages, moisture inside which indicates a leak, and loose connections at either end.
Test the Hose for Leaks
- Remove the hose
- Seal one end with a finger or tape
- Blow air into the other end while submerging it in water
- If bubbles appear, the hose is leaking and must be replaced
Clear Blockages
Blow through the hose or use compressed air. Soak in vinegar if mineral buildup is suspected. Replace if damaged, cost is $10 to $20.
Real Fix: A Kenmore GE 2130 model drained immediately after fill. The owner discovered the clear tube was disconnected during drum cleaning. Reattaching it solved the problem.
Replace the Pressure Switch if Needed
If the hose is intact but the issue persists, the switch itself may be faulty.
- Part cost: $40 to $80
- Installation difficulty: Moderate, requires access to control panel
- Use a multimeter to test for continuity if unsure
Expert Note: Most bad pressure switches are actually caused by leaky or disconnected hoses. Test the tube first.
Reset the Control Board
A software glitch or electrical hiccup can cause the washer to skip cycles or misread sensor data.
Perform a 15-Second Power Reset
This clears temporary faults and resets the control logic.
- Unplug the washer from the wall
- Wait 15 seconds to allow capacitors to discharge
- Plug it back in
- Start a fresh cycle
User Fix: One GE owner reported the machine repeated rinse cycles endlessly. After a 15-second reset, it ran normally.
Check for Wiring or Moisture Damage
If the problem returns, inspect the control panel for corroded or loose wires, burnt spots or bulging capacitors, and signs of water exposure which indicates past leak.
Caution: If you see damage, stop and call a technician, especially if the machine is under warranty.
Rule Out Drain Pump and Timer Issues
While less common, these components can contribute to the symptom.
Check for Continuous Drain Pump Operation
Listen during the fill phase. If the pump runs constantly, it may be stuck on due to a faulty relay or control signal. This is more likely in machines over 3 years old.
Inspect Mechanical Timer on Older Models
In pre-digital washers, a worn timer can cause incorrect sequencing. Symptoms include skipping agitation and jumping to drain. Replace if stuck or noisy.
Note: This is rare in modern machines with digital controls.
Prevent Future Fill-and-Drain Cycles
Avoid recurring issues with simple maintenance.
Clean Inlet Screens Every 6 to 12 Months
This prevents slow fill and timeout errors. It takes 5 minutes using a wrench and cloth.
Inspect Drain Hose Quarterly
Ensure the high loop is intact. Check for kinks or flattening. Confirm air gap at the drain.
Service the Drain Pump Filter
Located behind a front access panel. Remove lint, coins, or debris every 6 months. This prevents partial clogs that disrupt drainage timing.
Verify Water Pressure
Water pressure should be 20 to 120 psi. Use a pressure gauge on an outdoor faucet. If below 20 psi, check for closed valves or plumbing issues.
Test After Repair
Always verify the fix before loading laundry.
Run a Rinse Plus Spin Cycle
Use no detergent or clothes. Observe fill duration, whether the machine pauses after filling which indicates level detection, if spin cycle activates after final drain, and any unusual noises.
Use a Bucket to Monitor Drain Flow
Place under drain hose temporarily. Watch for drain starting only after fill completes, no immediate siphoning, and full pump-out before refill.
Check for Residual Moisture
Run a dry towel through the spin cycle. If still damp, the spin phase may not be engaging. Check the lid switch or motor.
When to Call a Technician
Seek professional help if the pressure switch or control board needs replacement and you are not comfortable wiring it. Also call if you smell burnt electronics or see corrosion, if the machine is under 1 year old as self-repair may void warranty, or if the issue persists after checking hose, fill speed, and sensors.
Warranty Tip: LG, GE, Samsung, and Whirlpool offer 1-year parts and labor coverage. Contact the manufacturer first. Repairs may be free.
Frequently Asked Questions About Washing Machine Keeps Filling and Draining
Why does my washing machine keep filling and draining continuously?
The most common cause is siphoning, where the drain hose creates a vacuum that pulls water out faster than it enters. This prevents the tub from reaching the correct water level, so the control board keeps refilling. Other causes include slow fill due to clogged inlet screens, a disconnected pressure switch hose, or a control board glitch.
How do I stop my washer from siphoning?
Install a high loop in the drain hose at least 30 inches above the washer base. Ensure the hose is inserted no more than 5 inches into the standpipe and leave a 2-inch air gap between the hose end and the drain. If the drain is below 30 inches, install an anti-siphon clip.
Can a clogged inlet valve cause constant filling and draining?
Yes. If the inlet valve or its screen is clogged, water fills too slowly. Most washers have a timeout of 6 to 8 minutes. If the tub does not fill in time, the machine assumes a fault and drains. Cleaning the inlet screens or replacing the valve fixes this.
How do I know if the pressure switch is bad?
Check the pressure hose first. Look for cracks, kinks, disconnections, or moisture inside. Test by blowing air through it while submerged in water. If bubbles appear, replace the hose. If the hose is fine but the problem persists, the pressure switch may need replacement.
Does a power reset fix washing machine fill and-drain issues?
Yes, often. Unplug the washer for 15 seconds to clear the control board memory. This resolves temporary software glitches that can cause the machine to skip cycles or misread sensor data.
Should I call a technician or try to fix this myself?
Start with the drain hose, inlet screens, and pressure hose. These are free or low-cost fixes you can do yourself. If the problem persists after checking these components, or if you are not comfortable replacing the inlet valve or pressure switch, call a technician. If the machine is under warranty, contact the manufacturer first.
Key Takeaways for Stopping the Fill-Drain Loop
A washing machine that keeps filling and draining is usually fixable with basic troubleshooting. Start with the drain hose setup, as it is the most common cause. Then check fill speed and inlet screens, inspect the pressure switch hose, and perform a power reset. Most fixes take less than 30 minutes and cost nothing.
Quick Fix Checklist:
- Drain hose has a high loop at least 30 inches above the base
- Hose is inserted 7 inches into the drain, not sealed
- Air gap of at least 2 inches at discharge point
- Anti-siphon clip installed if drain is below 30 inches
- Fill time is under 6 minutes
- Inlet screens are clean
- Pressure hose is connected and leak-free
- Control board reset with 15-second power cycle
By addressing these points in order, you will resolve the vast majority of fill-and-drain issues without calling a repairman or replacing expensive parts.