How to Clean Siding Without a Pressure Washer
Your home’s siding faces constant exposure to sun, rain, wind, and outdoor debris. Over time, mold, mildew, algae, and grime accumulate, leaving your house looking older and more worn than it actually is. Many homeowners reach for a pressure washer to solve this problem, but high-pressure water can crack vinyl panels, force moisture behind shingles, and damage soffits or flashing.
The good news is that you can clean siding without a pressure washer using proven, low-pressure techniques. This guide covers specialty products like the 30-Second Siding & Roof Cleaner as well as simple DIY solutions made from household ingredients. You will learn step-by-step methods that work on vinyl, aluminum, stucco, masonry, and roof shingles, along with safety tips and best practices to keep your siding looking fresh without expensive equipment.
Why Pressure Washers Can Damage Your Siding
Before exploring alternatives, it helps to understand why so many homeowners are moving away from pressure washing. High-pressure water streams pack enough force to harm even durable siding materials.
Common Risks of Pressure Washing
Pressure washers can create serious problems when used on home exteriors:
- Cracking or warping vinyl siding panels
- Lifting shingles and compromising roof integrity
- Forcing water into attic vents and soffit areas
- Damaging flashing, caulk, and trim seals
- Stripping protective coatings from aluminum surfaces
Why Low-Pressure Methods Work Better
Low-pressure cleaning offers greater control and eliminates most of these risks. You can still achieve professional-quality results while protecting your home’s structural components. The key is choosing the right cleaning solution and applying it with proper technique.
Use a Specialty Siding Cleaner for Fast Results
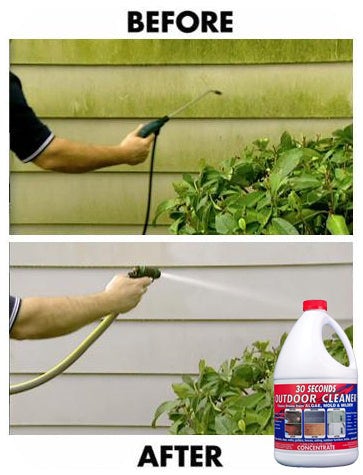
One of the quickest ways to clean siding without a pressure washer is using a product specifically designed for low-pressure application. These specialty cleaners deliver professional results with minimal physical effort.
Apply 30-Second Siding & Roof Cleaner
This ready-to-use cleaner connects directly to a standard garden hose and requires no special tools or skills. It is formulated to kill and lift mold, mildew, algae, and moss on contact without scrubbing.
- Works on vinyl, aluminum, stucco, masonry, and shingles
- Reaches up to 24 feet, ideal for two-story homes
- Costs roughly half as much as leading competitor brands
- Made in the USA with biodegradable ingredients
Set the Nozzle to Clean Mode
The three-position nozzle makes application straightforward:
- Off: Stops flow completely
- Clean: Releases the cleaning solution
- Rinse: Flushes the surface with plain water
Removing the nozzle entirely converts the tool into a standard garden sprayer for spot treatment on stubborn stains.
Spray From Bottom to Top
Start at the lower sections of your siding and work upward to prevent streaking. Let the solution sit for 30 to 60 seconds on standard siding. For heavy buildup, allow 10 to 15 minutes of dwell time.
You will often see mold and mildew visibly loosen and lift even before rinsing, which is a sign the formula is working as intended.
Rinse From Top to Bottom
Switch the nozzle to Rinse mode and wash down from the top. This prevents dirty water from running over already-cleaned areas and ensures debris flows downward and away from the structure.
Reapply for Tough Roof Moss
Roof moss, especially on north-facing slopes with years of accumulation, may need a second pass. Apply the cleaner, let it dwell for 10 to 15 minutes, then rinse gently from top to bottom.
Avoid aggressive rinsing that could lift shingles. Over time, repeated applications will break down stubborn lichen and moss without forcing water underneath roofing materials.
Try a DIY Cleaning Solution With Household Items
If you prefer a budget-friendly approach using items already in your home, a homemade cleaner works surprisingly well for routine annual maintenance.
Mix Mild Soap and Water
Combine one tablespoon of mild dish soap, such as Dawn, per gallon of water in a clean bucket. This gentle formula removes grime without damaging siding surfaces.
For tougher stains, consider these alternatives:
- Add one part white vinegar to three parts water
- Use an oxygen-based cleaner like OxiClean according to package directions
Avoid bleach-based mixtures since they can discolor vinyl siding and harm nearby plants.
Pre-Rinse With a Garden Hose
Before applying any cleaner, lightly rinse the siding with a garden hose. This removes loose dirt and prevents scratching during the scrubbing step.
Use low pressure, just enough to wet the surface without forcing water behind panels.
Scrub With a Soft-Bristle Brush
Dip a soft sponge or brush into the solution and scrub in circular motions. Always start at the bottom and work upward to avoid streaks.
Focus on areas with visible stains, mildew, or grease buildup near kitchen vents and exhaust outlets.
Let the Solution Dwell 10 to 15 Minutes
Allow the cleaner to sit on the surface for at least 10 minutes. This dwell time breaks down organic growth and loosens embedded dirt effectively.
Do not let the solution dry. Reapply if needed and work in shaded areas to slow evaporation.
Rinse Thoroughly From Top Down
After scrubbing, rinse from the top to bottom using your garden hose. Make sure all soap residue is completely removed, especially on porous surfaces like stucco or masonry.
Leftover cleaner can attract dirt or cause discoloration over time, so thorough rinsing matters.
Compare Specialty Cleaners vs. DIY Methods

Not every home needs the same approach. Your choice depends on budget, available time, and the severity of buildup on your siding.
Side-by-Side Comparison
| Feature | Specialty Cleaner | DIY Method |
|---|---|---|
| Time Per Section | 30 to 60 seconds | 10 to 15 minutes |
| Scrubbing Needed | No | Yes |
| Reach | Up to 24 feet | Limited by ladder or hose |
| Cost | Moderate one-time purchase | Low, uses household items |
| Best For | Fast results and roof cleaning | Routine maintenance and small areas |
When to Choose a Specialty Cleaner
A specialty cleaner makes sense in these situations:
- Heavy mold or moss growth on large surfaces
- Two-story homes with hard-to-reach areas
- Roof cleaning near shingles and flashing
- Time-constrained homeowners wanting fast results
When DIY Makes More Sense
The DIY approach works best when:
- You are dealing with light dirt or annual upkeep
- Budget is a primary concern
- You only need to clean small sections
- You want immediate availability without waiting for delivery
Match the Cleaning Method to Your Siding Type
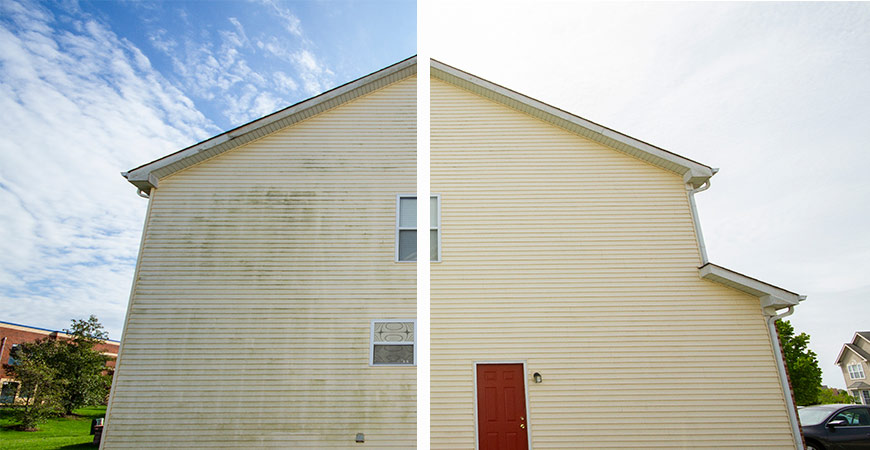
Different materials respond differently to cleaning techniques. Always choose a method that matches your specific surface.
Clean Vinyl Siding Safely
Vinyl is durable but sensitive to high pressure and harsh chemicals. Both specialty and DIY methods work well on this material.
- Avoid bleach, which can cause fading over time
- Rinse thoroughly to prevent film buildup
- Work in shaded conditions when possible
Protect Aluminum Siding
Aluminum resists rust but scratches easily compared to other materials.
- Use only soft brushes or sponges
- Avoid abrasive cleaners and steel wool
- Both cleaning methods are safe when applied correctly
Regular cleaning prevents pitting and keeps the finish looking fresh.
Handle Stucco and Masonry Carefully
These porous surfaces trap dirt and absorb moisture more readily than smooth siding.
- Use oxygen-based cleaners for deep stains
- Rinse thoroughly to flush out residues
- Avoid vinegar on limestone or marble-based finishes
Allow DIY solutions to dwell longer, around 15 minutes or more, for better penetration into porous surfaces.
Clean Roof Shingles Without Damage
Shingles require the gentlest touch of any surface on your home.
- Use specialty cleaner with top-down rinsing only
- Never pressure rinse or scrub aggressively
- Clean from the ground or a ladder rather than walking on the roof
Over time, moss weakens shingles. Early treatment prevents costly repairs down the road.
Best Practices for Cleaning Siding Safely
Even low-pressure cleaning requires proper technique to be effective and safe for your home.
Work in Manageable Sections
Divide your walls into zones of about 4 feet by 8 feet. Clean one section at a time to prevent solutions from drying before you can rinse them.
This approach ensures even coverage and reduces streaks across the entire wall.
Choose Optimal Weather Conditions
Weather plays a significant role in cleaning success:
- For DIY methods, choose cool, overcast days to slow drying
- For specialty cleaners, sunny days work best since heat boosts performance
- Avoid windy conditions, rain, or extreme temperatures
Prevent Streaking With Proper Technique
Always follow this sequence:
- Apply cleaner from bottom to top
- Rinse from top to bottom
- Use consistent overlap patterns across the surface
This controls water flow and keeps your results uniform across every section.
Protect Plants and Surrounding Surfaces
Before spraying any cleaner, take these precautions:
- Cover nearby bushes, flowers, and grass with tarps
- Rinse plants before and after cleaning
- Use vinegar-free solutions near sensitive landscaping
Many cleaners are biodegradable, but concentrated formulas can still burn foliage on contact.
Common Mistakes to Avoid When Cleaning Siding

Even gentle methods can cause problems if basic precautions are ignored. Here are the most frequent errors to watch out for.
Do Not Spray Into Vents or Soffits
Water forced into attic vents or soffit areas can cause:
- Mold growth inside wall cavities
- Wood rot in structural framing
- Electrical hazards near wiring and fixtures
Always aim sprayers downward and away from openings.
Never Use High Hose Pressure
Even without a pressure washer, cranking your garden hose to full blast can:
- Crack vinyl panels along seams
- Force water behind siding
- Damage caulk and trim seals
Use a soft spray setting that provides just enough flow to rinse effectively.
Skip Abrasives and Harsh Chemicals
Avoid these damaging products:
- Bleach, except in diluted spot applications
- Ammonia-based cleaners
- Sandpaper, scouring pads, or steel wool
These materials degrade finishes and significantly shorten siding lifespan.
Maintain Your Siding Year-Round With Simple Habits
Prevention beats correction every time. A little regular upkeep goes a long way toward keeping your siding clean.
Schedule Annual Cleanings
Plan one deep cleaning each year, ideally in spring or early fall. This removes seasonal buildup before it has time to set in permanently.
Inspect for Early Signs of Mold
Check shaded areas, spots near gutters, and sections under decks regularly. Look for:
- Dark streaks running down panels
- Fuzzy black or green patches
- Musty smells near exterior walls
Treat small spots immediately with a spot sprayer before they spread.
Trim Nearby Vegetation
Plants touching siding trap moisture and create ideal conditions for mold growth. Keep shrubs and vines at least 12 inches away from exterior walls.
Clear Gutters on a Regular Schedule
Clogged gutters overflow and direct dirty water down the face of your siding. Clean them at least twice a year to prevent staining and water damage.
Frequently Asked Questions About Cleaning Siding Without a Pressure Washer
Can You Really Clean Siding Without a Pressure Washer?
Yes. Low-pressure methods using specialty cleaners or DIY soap solutions work effectively on vinyl, aluminum, stucco, masonry, and shingles. These approaches reduce the risk of damage while still removing mold, mildew, algae, and dirt.
What Is the Best Homemade Solution for Cleaning Siding?
Mix one tablespoon of mild dish soap per gallon of water as a base solution. For tougher stains, add one part white vinegar to three parts water, or use an oxygen-based cleaner like OxiClean according to package directions.
How Long Does It Take to Clean Siding Without a Pressure Washer?
Timing depends on the method and the size of your home. Specialty cleaners produce visible results in 30 to 60 seconds per section. DIY methods require 10 to 15 minutes of dwell time plus scrubbing, so plan accordingly.
Is It Safe to Use Vinegar on All Types of Siding?
Vinegar works well on vinyl and aluminum but should be avoided on limestone, marble, or other calcium-based masonry finishes. The acid can etch and damage these surfaces permanently.
How Often Should You Clean Your Siding?
Most homes benefit from one annual deep cleaning, ideally in spring or early fall. Homes surrounded by trees or in humid climates may need cleaning twice a year to prevent significant buildup.
Can You Clean Roof Shingles Without a Pressure Washer?
Yes. Use a specialty cleaner with top-down rinsing only. Never scrub aggressively or walk on the roof. For heavy moss, allow 10 to 15 minutes of dwell time and apply a second coat if needed.
Key Takeaways for Cleaning Siding Without a Pressure Washer
Cleaning siding without a pressure washer is both safer and smarter for most homeowners. You gain better control, reduce the risk of property damage, and extend the life of your home’s exterior surfaces.
For fast, no-scrub results on tough jobs like roof moss, the 30-Second Siding & Roof Cleaner delivers professional-grade performance with minimal effort. For affordable, hands-on maintenance, the DIY soap-and-water method works perfectly for yearly touch-ups and small sections.
Regardless of which method you choose, always rinse thoroughly, work safely from ladders or ground level, and prioritize top-down rinsing to prevent streaking. Protect vulnerable areas like vents, soffits, and electrical fixtures throughout the process.
Start by inspecting your siding this weekend and choosing the method that matches your budget, timeline, and the severity of buildup. With these techniques, your home will look cleaner, last longer, and avoid the hidden dangers of pressure washing.