How to Use Maytag Washing Machine: Quick Guide
If you have just brought home a new Maytag washer or are ready to finally master your current model, knowing how to use it properly makes all the difference. A Maytag top-load washing machine delivers powerful cleaning, but only when operated correctly. Using the wrong detergent, overloading the drum, or skipping proper setup can lead to poor wash results, loud noises, or even long-term damage. This guide walks you through each phase, from installation to maintenance, so you get clean, fresh laundry every time while extending your machine’s lifespan.
Install Your Maytag Washer Properly

Proper installation sets the foundation for quiet, efficient operation. Take time to connect water supplies, position the drain hose, and level the unit before washing your first load.
Secure Water Inlet Hoses
Connect both hot and cold braided stainless steel hoses to the corresponding inlet valves on the back of the washer. Hand-tighten first, then use pliers to secure an additional quarter turn. Avoid over-torquing, which damages the threads. High-quality hoses prevent leaks and bursts over time.
Test Water Supply Valves
Before turning on the machine, confirm both house water valves operate smoothly. Open and close each valve fully to ensure free movement. If a valve sticks, apply WD-40 or consider replacement. Closed or restricted valves prevent proper filling and trigger error behavior.
Position the Drain Hose Correctly
Insert the drain hose into a standpipe, utility sink, or floor drain. Keep the hose height between 30 and 96 inches from the floor. Avoid kinks or sharp bends that restrict water flow and cause slow draining.
Level the Washer to Prevent Noise
Adjust the four leveling feet until each touches the floor firmly. On uneven surfaces, use wood shims under the feet. Once stable, tighten the lock nuts to secure the position. An unlevel washer vibrates loudly during spin cycles and can shift across the floor.
Allow Space Around the Unit
Leave at least one inch of clearance on all sides. This prevents vibration contact with walls or dryers and ensures proper airflow for motor cooling and moisture escape.
Sort Laundry Before Washing
Sorting prevents color bleeding, fabric damage, and cleaning inefficiencies. Taking a few minutes to separate loads protects your clothes and improves wash results.
Separate by Color to Prevent Bleeding
Divide clothes into whites, darks, brights, and pastels. New colored garments should be washed separately the first few times to reduce dye transfer. This simple step keeps your whites bright and prevents colors from staining other clothes.
Group by Fabric Type and Weight
Delicates like lace or silk need gentle treatment, while heavy items like jeans and towels require robust cycles. Mixing lightweight and heavyweight fabrics causes imbalance and poor cleaning. Group similar fabrics together for the best results.
Check Pockets and Fasteners
Empty all pockets to avoid damage from forgotten objects like pens or coins. Close zippers, fasten hooks, and tie loose strings to prevent snagging. Turn embellished clothing inside out to protect prints and textures.
Add Detergent and Additives Correctly
Using the right products in the right places directly impacts cleaning performance and machine longevity. Mistakes here cause extra rinse cycles, residue buildup, and unpleasant odors.
Use Only HE Detergent
Never use regular detergent in your Maytag washing machine. HE detergent creates the correct amount of sud
sing for optimal cleaning. Regular detergent creates excess suds that trigger automatic extra rinse cycles, increasing wash time by 15 to 30 minutes and stressing the pump. Always choose High-Efficiency detergent labeled for front and top-load machines.
Apply Detergent to Dispenser Drawer
Pour HE detergent into the main wash compartment of the dispenser drawer. Follow dosage instructions on the packaging. Overfilling leaves residue on clothes and inside the drum.
Place Pods in Drum, Not Dispenser
Put detergent pods directly into the empty drum before adding clothes. Unless specified by the manufacturer, never place pods in the dispenser. Pods may not dissolve fully when placed in the dispenser compartment.
Fill Fabric Softener Compartment
Add liquid fabric softener to the dedicated dispenser, usually on top of the agitator or in the drawer. Do not overfill. Excess can leak and stain fabrics.
Add Bleach Safely
Pour liquid chlorine bleach only into the bleach dispenser. For color-safe bleach, add it directly to the drum before loading clothes. Never mix bleach with ammonia-based cleaners, as this creates toxic fumes.
Include Specialty Additives When Needed
Stain removers, color protectors, or odor eliminators can go directly into the drum before clothes. Always follow product directions to avoid damaging fabrics or the machine.
Load Clothes Evenly and Safely
Proper loading ensures thorough cleaning and prevents the loud banging sounds that come from unbalanced loads. How you place clothes in the drum matters as much as what you wash.
Distribute Bulky Items Around Agitator
Place towels, blankets, or rugs evenly around the center post. Avoid stacking them on one side, which throws off balance and causes loud banging during spin. Distributing bulk items evenly reduces vibration and protects the motor.
Avoid Overloading the Drum
Clothes should fit loosely with room to move. If the lid resists closing, the load is too full. Overloading reduces cleaning efficiency and strains the motor and suspension system. A loosely packed drum cleans better than a stuffed one.
Load Around, Not Over, the Agitator
Place garments around the central agitator or impeller. Do not pile clothes over the top, as this restricts movement and prevents proper washing action. Even distribution around the center allows water and detergent to reach all items.
Select the Right Wash Cycle

Your Maytag washer offers multiple cycles designed for different load types. Choosing the correct cycle optimizes cleaning while protecting fabrics.
Choose Cycle Based on Load Type
Use the cycle knob or digital panel to select the appropriate program. The Normal cycle handles mixed cottons and synthetics. Heavy Duty works best for muddy workwear or heavily soiled items. Whites brightens white fabrics without extra agitation. Towels activates Extra Power for deep cleaning. Delicate provides gentle treatment for silk, lingerie, and lace. Quick Wash handles small, lightly soiled loads in about 30 minutes.
Set Water Temperature Wisely
Match temperature to fabric and soil level. Cold water works best for darks and brights and saves energy. Cool offers balanced cleaning with fabric care. Warm is ideal for moderate soil and synthetics. Hot water tackles whites, sanitizing, and heavy grime. Some models offer Tap Cold, which mixes a touch of warm water to activate detergent.
Adjust Soil Level for Tough Stains
On compatible models, choose from Extra Light to Extra Heavy soil settings. Select Extra Heavy for deep cleaning. This extends wash time and increases agitation intensity for stubborn stains.
Pick Spin Speed Carefully
Use Fast spin for most loads to remove more moisture. Choose Off or low speed for delicate fabrics that may tear or stretch under high centrifugal force.
Use Optional Features When Needed
Maytag washers include features that enhance performance for specific needs. Enable these selectively to avoid unnecessary water and energy use.
Enable Deep Fill for Large Loads
Turn on Deep Fill or Maximum Fill when washing comforters, rugs, or heavy denim. This adds extra water for better saturation and cleaning. Use this feature only for large or bulky items.
Add Extra Rinse for Sensitive Skin
Select Extra Rinse if washing baby clothes, laundry for allergy-prone individuals, or after heavy detergent use. Otherwise, keep it off to save water and time. Extra Rinse adds a full rinse cycle to the program.
Activate Fabric Softener Release
Only enable this setting if you have added fabric softener. It ensures timed release during the final rinse. Enabling it without softener wastes energy.
Schedule with Delay Start
Use Delay Start to begin the cycle up to 24 hours later. This proves ideal for running during off-peak electricity hours or scheduling laundry to finish when you return home.
Silence Alerts with Cycle Signal
Set the end-of-cycle chime to Low or Off in quiet homes or apartments. This prevents loud alerts when the cycle completes.
Connect via Wi-Fi If Equipped
Enable Remote Enable only if using the Maytag app for remote monitoring or control. This feature allows you to start or check cycle status from your phone.
Start, Pause, and Resume the Cycle
Understanding how to operate the controls prevents frustration and ensures proper machine function. The Start-Pause button controls most operations.
Start the Washer Correctly
Close the lid fully. Press and hold the Start-Pause button for one to three seconds. Wait for the lid to lock with a distinct clunk. The Sense light blinks briefly as the machine runs diagnostics for about one minute. This diagnostic checks water pressure, balance, and system integrity. Do not interrupt this process.
Pause to Add Forgotten Items
Press the Start-Pause button once. The lid unlocks. Add or remove clothes, then close the lid and press and hold Start-Pause again to resume. The machine picks up where it left off.
Stop or Drain in an Emergency
Press Stop-Drain once to pause and unlock the lid. Press a second time to drain all water and cancel the cycle. Press Power to shut down completely.
Understand the Wash Cycle Flow
Knowing what happens during each phase helps you recognize normal sounds and identify problems. The wash cycle follows a predictable sequence.
Standard Wash Sequence
The cycle begins with Fill and Soak, where water enters and agitation starts after soaking if selected. The Wash phase activates detergent as clothes tumble. Rinse flushes out dirt and soap. Spin uses high-speed rotation to extract moisture. An unbalanced load creates loud thumping during spin. A balanced load produces a steady rhythm.
Estimate Cycle Duration
Normal loads take approximately 65 minutes. Heavy Duty or Towels cycles run 75 to 90 minutes, longer with added options. Quick Wash completes in about 30 minutes. Excess suds from non-HE detergent can add 15 to 30 minutes due to automatic re-rinsing.
Unload and Care for the Machine
Post-cycle care affects machine longevity and laundry freshness. Taking a few simple steps after each load prevents problems.
Remove Laundry Immediately
Take out clothes right after the cycle ends. Leaving wet laundry inside causes musty odors, mildew, and wrinkles. Prompt removal keeps clothes fresh and prevents odor transfer to the drum.
Shake Out Clothes Before Drying
Give items a quick shake to reduce tangling and minimize wrinkles before transferring to the dryer or hanging. This simple step saves ironing time later.
Leave Lid Open After Use
Prop the lid open to let moisture escape. This prevents mold, mildew, and odor buildup in the drum and rubber gasket. Leave it open for several hours after each load.
Power Down Properly
Press the Power button to turn off. Unplug only for maintenance or extended non-use.
Maintain Your Maytag Washer Monthly
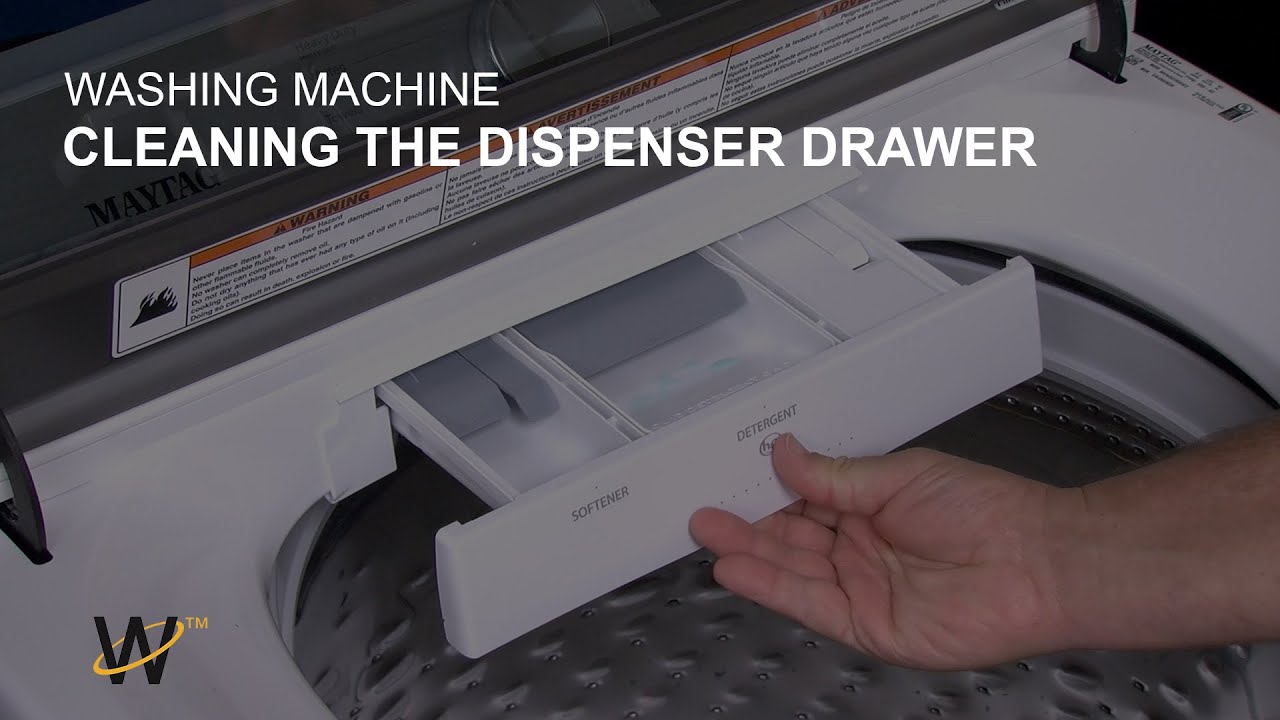
Regular maintenance prevents odors, mold, and mechanical problems. These simple tasks take minutes but extend your machine’s life significantly.
Clean the Detergent Drawer
Remove the dispenser drawer monthly. Rinse under warm water to dissolve detergent buildup and prevent clogs. A clean dispenser ensures proper detergent release.
Wipe Lid and Gasket
Use a dry or slightly damp cloth to clean the lid seal and drum edges after each use. This stops residue and mildew from forming in the rubber gasket.
Run a Cleaning Cycle
Once a month, run the Clean Washer cycle if available with no clothes. Or select Hot Water plus Deep Fill and add either two cups of white vinegar or a commercial washer cleaner. This removes odor-causing bacteria and lime deposits.
Prevent Common Problems
Most washer issues stem from simple causes that are easy to fix. Addressing problems early prevents costly repairs.
Stop Loud Banging During Spin
Redistribute clothes evenly and verify the washer is level. Unbalanced loads or wobbly feet cause the drum to hit the cabinet. Leveling and even distribution eliminate most noise.
Eliminate Excessive Suds
Switch to HE detergent immediately if you have been using regular detergent. Run a rinse-only cycle to remove leftover suds if needed. Excess suds indicate detergent problems.
Fix Machine That Wont Start
Ensure the lid is fully closed. Check the power outlet and circuit breaker. The washer will not start if the cycle knob is not aligned with a valid setting. Verify the control knob points to a cycle.
Resolve Filling Issues
Inspect inlet hoses for kinks. Confirm water valves are fully open. A restricted flow delays or prevents filling. Check both hot and cold connections.
Clear Drain Errors
Check the drain hose for clogs. If accessible, clean the pump filter. Blockages prevent proper drainage and trigger error codes. Ensure the drain hose sits at the correct height.
Remove Musty Smells
Leave the lid open after every use. Run monthly cleaning cycles. Trapped moisture breeds mold and odors. Consistent maintenance eliminates smell problems.
Frequently Asked Questions About Using a Maytag Washing Machine
What type of detergent should I use in my Maytag washing machine?
Use only High-Efficiency detergent specifically labeled for HE washers. Regular detergent creates too many suds and can damage your machine over time. HE detergent optimizes cleaning while protecting the pump and internal components.
How do I know if my Maytag washer is level?
Level the washer by adjusting all four leveling feet until each touches the floor firmly. Place a level on top of the machine to check. On uneven floors, use wood shims under the feet. An unlevel washer vibrates loudly and may move during spin cycles.
Can I add detergent pods to the dispenser drawer?
Place detergent pods directly in the empty drum before adding clothes. Do not put them in the dispenser drawer unless the pod manufacturer specifically instructs this. Pods dissolve better when placed directly in the drum.
How often should I run a cleaning cycle on my Maytag washer?
Run a cleaning cycle once per month. Use either the Clean Washer cycle with no clothes or run a hot water cycle with two cups of white vinegar or a commercial washer cleaner. Monthly cleaning prevents odor buildup and maintains performance.
Why does my Maytag washer make loud banging sounds during spin?
Loud banging usually indicates an unbalanced load or an unlevel machine. Redistribute clothes evenly around the agitator. Check that all four leveling feet touch the floor and tighten the lock nuts. This resolves most noise issues.
What should I do if my Maytag washer wont start?
First, ensure the lid is fully closed. Check that the power cord is plugged into a working outlet. Verify the circuit breaker has not tripped. Make sure the cycle knob is aligned with a valid cycle setting. The machine will not start if the knob is between settings.
Key Takeaways for Using Your Maytag Washing Machine
Proper use of your Maytag washing machine involves correct installation, appropriate detergent selection, and mindful loading techniques. Using only HE detergent prevents excess suds and extends wash cycles. Sorting laundry by color, fabric type, and weight prevents damage and ensures better cleaning results.
Regular maintenance keeps your machine running quietly and efficiently for years. Clean the detergent drawer monthly, leave the lid open after each use, and run cleaning cycles regularly. These simple habits prevent mold, odors, and mechanical problems.
Understanding your washers features helps you customize cycles for different load types. Select the appropriate cycle, temperature, and soil level for each load. Use optional features like Deep Fill only when needed to avoid wasting water and energy. With these practices, your Maytag washer delivers excellent cleaning performance while lasting many years.