How to Set Up a Washing Machine: Easy Steps
You’ve just unboxed your new washing machine, and now you’re ready to get it running. Clean clothes are within reach, but before you toss in a load, proper installation is crucial. How to set up a washing machine correctly affects performance, safety, and longevity. Done wrong, it can lead to leaks, vibration, electrical hazards, or even voided warranties. This guide walks you through every essential step, from unpacking and leveling to connecting water, drain, and power.
By following this guide, you’ll ensure your machine operates efficiently, quietly, and safely for years. Whether you’re replacing an old unit or setting up your first washer, you’ll learn exactly what tools you need, how to avoid common mistakes, and how to test the system before your first wash.
Unpack and Inspect Your New Washer
Begin by carefully removing all packaging materials: plastic wrap, foam inserts, and cardboard. Place the machine on a protective mat to avoid floor scratches. Inspect the exterior for dents, scuffs, or shipping damage, especially around corners and the back panel.
Locate All Included Accessories
Next, find the accessories typically stored inside the drum or in a side compartment. These usually include water inlet hoses, a drain hose, shipping or transit bolts, plastic caps for bolt holes, a supplied wrench or spanner, and the user and installation manuals. Check each item against the list in your manual.
Check for Shipping Damage
Inspect every surface carefully. Look for cracks, dents, or misalignment that could indicate internal damage. If you find significant damage, contact the retailer or manufacturer before proceeding with installation.
Remove Shipping Bolts Before Use
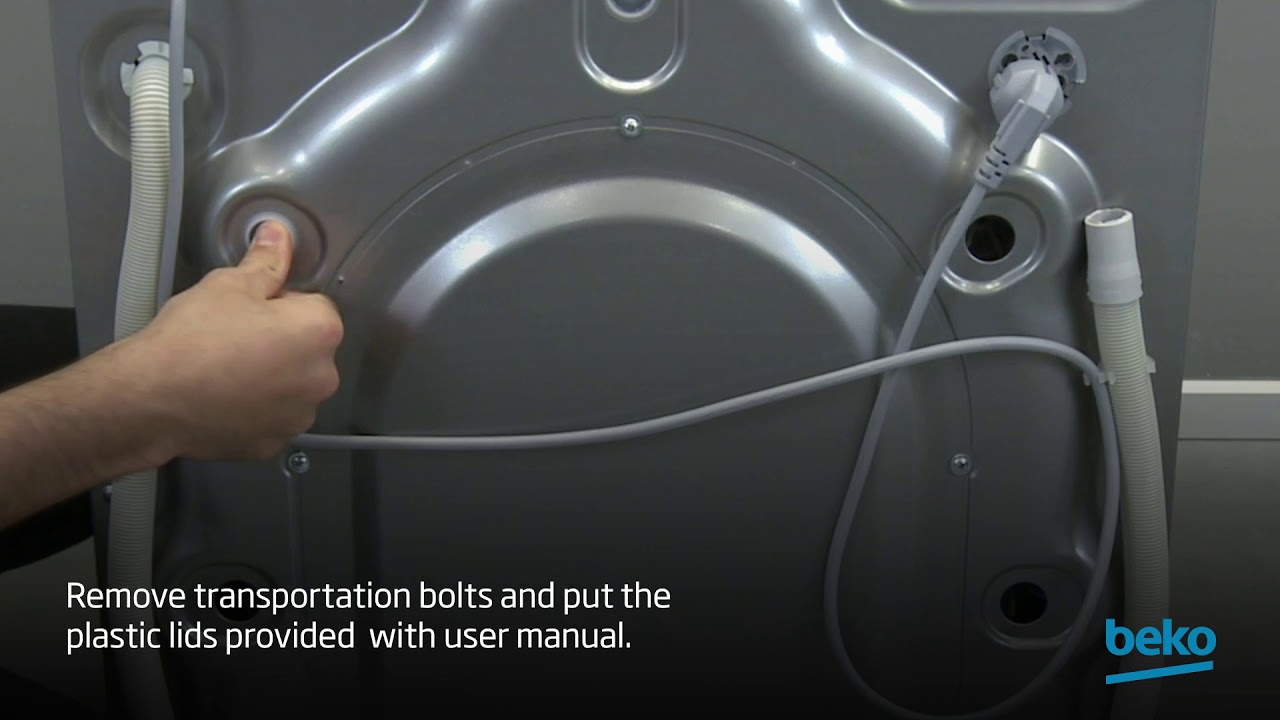
Critical Step: Never skip this. Running the machine with bolts in place can destroy the drum and void your warranty.
Locate the Transit Bolts
Turn the washer around to access the rear panel. You’ll see 3 to 5 large metal bolts, typically positioned at the top corners, bottom corners, and sometimes a center rear position. These secure the drum during transit and must be removed before operation.
Extract the Bolts
Use an adjustable wrench or the included tool to loosen each bolt by turning counterclockwise. Pull them out completely and set them aside in a labeled bag. Store these bolts with your manuals since you’ll need them if you ever move the machine.
Seal the Empty Bolt Holes
Insert the supplied plastic blanking caps into each empty hole. Press firmly until they click into place. This prevents dust, pests, and moisture from entering the cabinet.
Confirm the Drum Moves Freely
Open the door and gently push the drum side to side. It should move slightly and smoothly. If it feels stiff or clunks, recheck for missed bolts. If the drum doesn’t move, do not power on the machine.
Position the Washing Machine
Move the washer into its final location near water valves, drain, and power outlet. Use furniture sliders or a dolly to protect your floor and back. Avoid tilting the machine more than 45 degrees, as this can displace internal components.
Verify Required Clearances
Ensure adequate space for safe and functional operation. The top and sides need 1 to 3 inches for airflow and access. The back requires 2 inches for hoses and ventilation. The front needs at least 21.7 inches for door swing and detergent tray use. Front-load models typically require 90 degrees of door clearance.
Level the Washer Properly
A level machine prevents vibration, noise, and walking during spin cycles.
Adjust the Feet
Most washers have front-adjustable feet. Place a spirit level on top of the machine to check balance. For direct-turn feet, rotate the foot up or down and tighten the locking nut with a screwdriver once level. For nut-loosen style feet, first loosen the locking nut with a wrench, then turn the foot clockwise to raise or counterclockwise to lower before retightening.
Leveling Procedure
Check front-to-back first by adjusting the front feet. Then check side-to-side, which may require lifting the rear slightly with a wooden block to access the back feet. Recheck the level after each adjustment. Ensure all four feet touch the floor with no wobbling.
Reduce Vibration
Place anti-vibration pads under each foot. On tile or concrete, these can cut noise by up to 50 percent. Use rubber or plastic shims if the floor is uneven.
Connect the Cold Water Supply
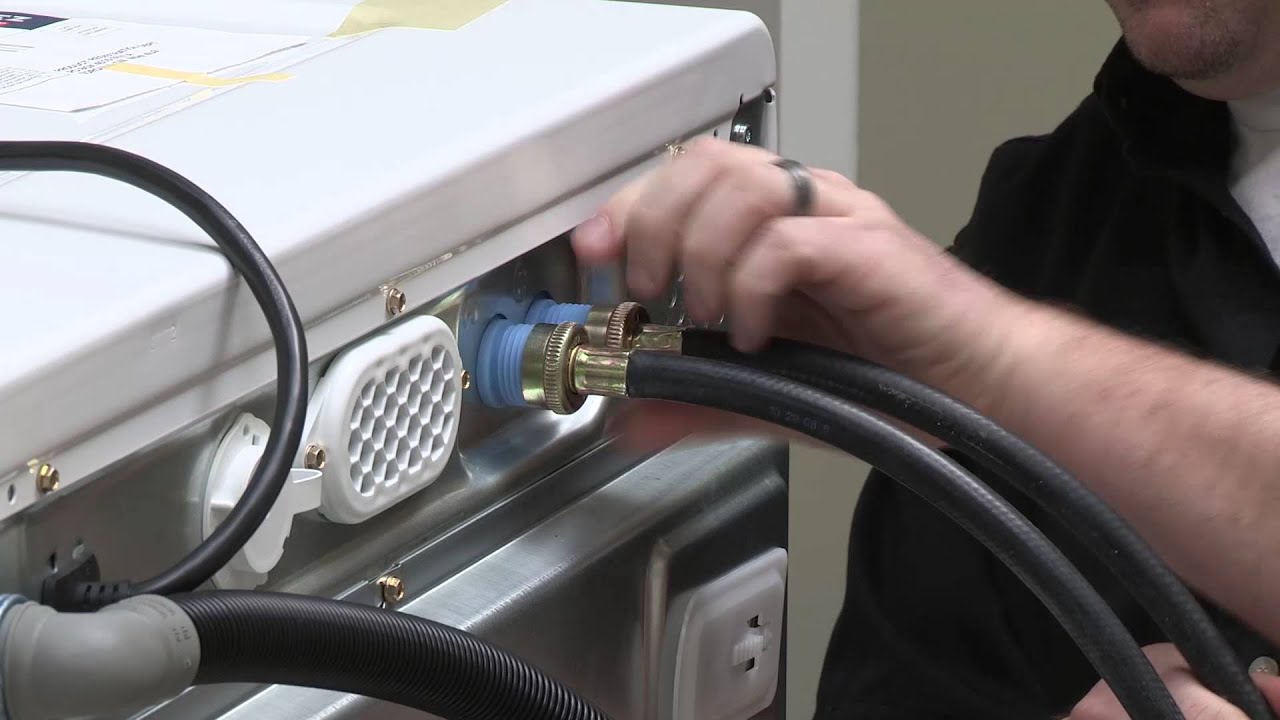
Always use new hoses. Old ones may crack or leak.
Choose the Right Hose
Use braided stainless steel inlet hoses for durability. They resist bursting and last longer than rubber hoses. Most modern washers heat water internally, so a cold-only connection is standard. If your model supports dual inlets, the blue connector is for cold water and red is for hot.
Attach the Hose
First, confirm the cold water valve is off. Take the cold inlet hose with the 90-degree end and attach it to the washer’s back panel. Ensure the rubber O-ring is in place, clean, and undamaged. Hand-tighten only, do not use tools. Connect the straight end to the water valve, then open the valve slowly.
Check for Leaks
Look and feel for drips at both connections. If leaking, tighten slightly by hand. Never overtighten, as this can crack plastic fittings. Place a dry towel under connections during testing to catch minor leaks.
Install the Drain Hose
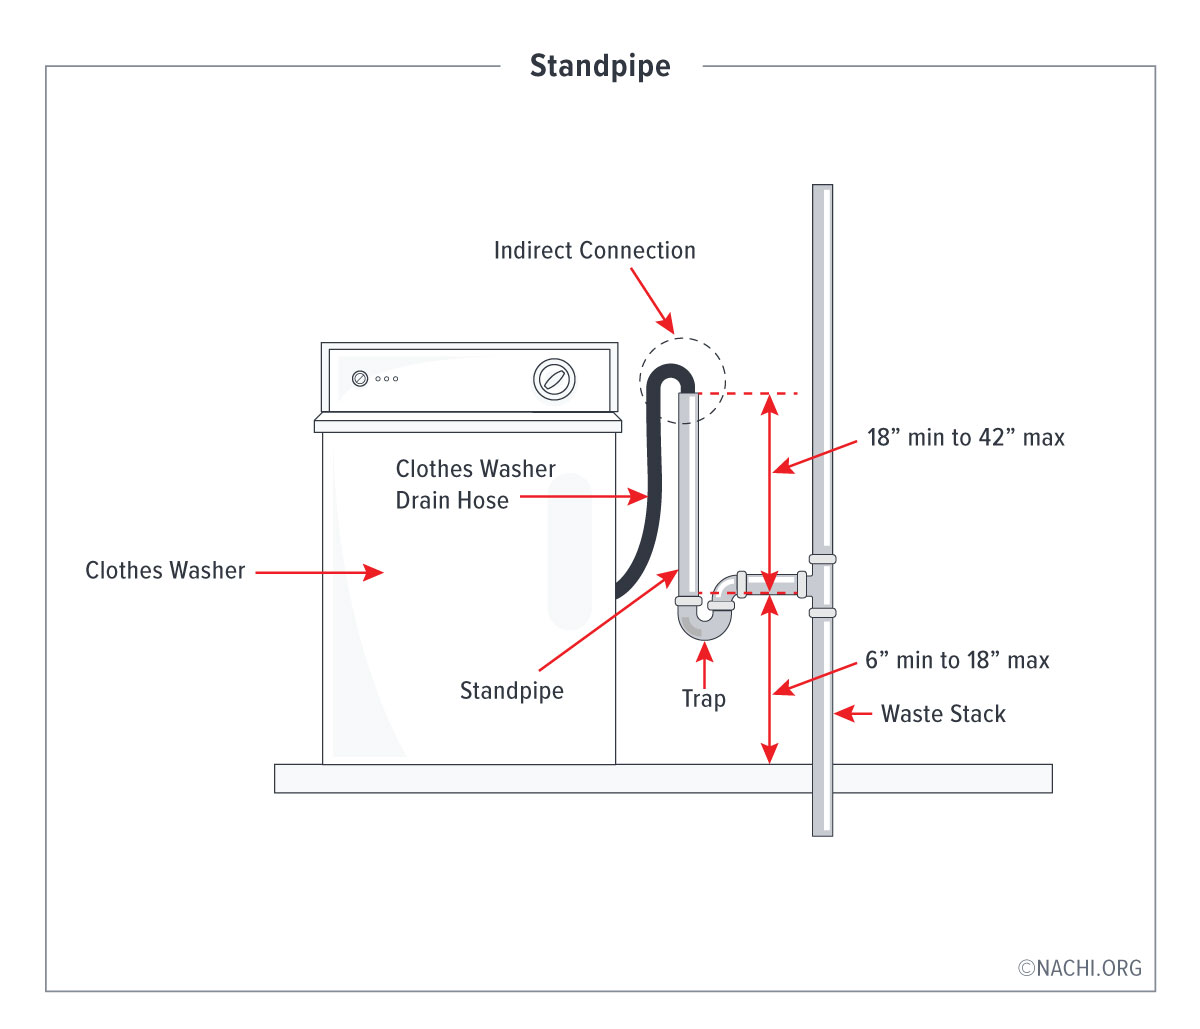
Incorrect drain setup causes siphoning, backflow, or error codes.
Choose Your Drain Method
For a standpipe, insert the hose end into a 1.5 to 2 inch pipe no more than 6 inches deep. The minimum height is 30 inches above the floor, and the maximum is 96 inches. Beyond this height, the pump cannot push water effectively.
For a sink or P-trap outlet, remove any blanking cap from the spigot. Slide a hose clamp onto the pipe, push the drain hose over the outlet, and tighten the clamp with a screwdriver.
Create a High Loop
Route the hose upward and secure it to the side of the washer or wall at 24 to 36 inches above the floor. This prevents wastewater from siphoning back into the drum.
Avoid Common Mistakes
Ensure no kinks, sharp bends, or crushing. Do not exceed the maximum lift height specified in your manual. Leave a small gap at the standpipe, do not seal it airtight, to prevent sewer gas buildup.
Plug Into Power Safely

Electrical safety is non-negotiable.
Confirm Outlet Requirements
Most North American models require 120V and a 15 to 20A circuit with a 3-prong grounded outlet. International models typically need 220 to 240V and a 10 to 16A circuit. Check your model’s specifications before connecting.
Follow Safe Connection Rules
Plug directly into the wall outlet. Never use extension cords, power strips, or surge protectors unless specifically rated for appliances. These can overheat and void your warranty.
Perform Safety Checks
Ensure the outlet is grounded, accessible, and not shared with high-draw appliances. GFCI protection is recommended in damp areas like basements. Do not pinch the cord behind the machine.
Calibrate If Required
Some models need calibration after installation. Check your manual to see if your model requires this step.
Run Calibration Mode
For Samsung models like the WF80F5, WF70F5, WF60F4, WF71F5, WF61F4, WF72F5, WF62F4, WF7AF5, and WF6AF4, press Power, then hold Temp and Delay End plus for 3 seconds. The display shows CB. Press Start/Pause. The drum rotates for up to 3 minutes, ending with 0 and turning off. Many newer models self-calibrate on first power-up.
Test Before First Use
Turn on the water supply fully. Visually inspect inlet hose connections, valve fittings, and drain hose attachments. Look for drips, seepage, or pooling. Stay nearby during the first few cycles and check behind and under the machine.
Run a Test Cycle
Select a short rinse or spin cycle with no clothes or detergent. Observe the filling phase for water flow, the spinning phase for vibration or movement, and the draining phase for smooth water exit. Monitor for any unusual sounds or errors.
Run Initial Drum Clean
New washers contain oils and dust from production. Clean before first use to remove residues.
Eliminate Manufacturing Residues
Run an empty hot cycle at 90 degrees Celsius. Add 2 cups of white vinegar, a dedicated washing machine cleaner, or regular detergent. This sanitizes the drum and removes production residues.
Prevent Mold and Odors
Leave the door slightly ajar after each use. Wipe the rubber gasket on front-loaders weekly to remove moisture and lint.
Troubleshoot Common Issues
Why Is My Washer Leaking
At the inlet, tighten connections by hand or replace the O-ring if damaged. From the back, check the drain hose clamp or standpipe fit and ensure the high loop is secured.
Machine Vibrates or Walks
The cause is usually an unlevel machine or uneven floor. Re-level the washer and add anti-vibration pads under each foot.
No Water Intake
Check that the water valve is open, the hose is not kinked, and water pressure is between 20 and 120 psi.
Excessive Noise
First, check that shipping bolts have been removed. Stop immediately if you hear grinding and re-inspect the back panel.
Maintain for Longevity
Every 6 months, inspect inlet and drain hoses for cracks, bulges, or leaks. Replace rubber hoses every 5 years with braided stainless steel for safety.
Every 3 to 6 months, clean the drain pump filter behind the front bottom panel. Run a hot cleaning cycle with vinegar or dedicated cleaner.
In cold climates, drain and disconnect hoses if the machine will be unused in freezing temperatures. For apartments, use anti-vibration mats to reduce noise complaints.
Avoid Voiding Your Warranty
Manufacturers void warranties for not removing shipping bolts, using extension cords or ungrounded outlets, installing on unstable or raised surfaces, improper plumbing, and water damage from poor connections.
When in doubt, hire a professional, especially if there is no nearby water or drain access, the electrical circuit is inadequate, or you are unsure about codes or connections.
Final Thoughts on Setting Up Your Washing Machine
Setting up a washing machine properly ensures safe, efficient, and quiet operation for years. The most critical steps are removing all shipping bolts, leveling the machine correctly, and making secure water and drain connections. Always use new hoses, test for leaks before your first full load, and run an empty hot cycle to clean the drum before washing clothes.
By following these steps, you protect your investment and avoid costly repairs. Take your time with the installation process, stay nearby during initial cycles, and address any issues immediately. Clean, quiet laundry days start with a properly set up machine.
Frequently Asked Questions About Setting Up a Washing Machine
Can I install a washing machine myself
Yes, most homeowners can install a washing machine themselves with basic tools. However, if you lack nearby water or drain connections, have inadequate electrical circuits, or are uncertain about local codes, hire a professional.
How long does it take to install a washing machine
With all tools and connections ready, installation typically takes 1 to 2 hours. This includes unpacking, removing shipping bolts, positioning, leveling, connecting water and drain, and testing.
Do I need hot water for my washing machine
Most modern washers heat water internally, so a cold-only connection is standard. Some models support dual hot and cold inlets, but this is less common. Check your manual for specific requirements.
What happens if I don’t remove shipping bolts
Running the machine with shipping bolts in place causes excessive vibration, noise, and can destroy the drum suspension. This will likely void your warranty and require expensive repairs.
How do I know if my washing machine is level
Place a spirit level on top of the machine. Check front-to-back and side-to-side. The bubble should be centered in both directions. All four feet should touch the floor with no wobbling.
Should I use extension cords for my washing machine
No. Never use extension cords, power strips, or surge protectors with washing machines. Plug directly into a grounded wall outlet to prevent overheating, electrical hazards, and warranty voiding.