How to Wash Hockey Gear in Washing Machine
Nothing ruins a game night faster than opening your hockey bag and getting hit with a wall of stink. If you’ve ever wondered whether you can toss your gear in the washing machine, the answer is yes for most of it. Washing hockey gear in the washing machine is a fast, effective way to keep gloves, pads, and protectors fresh and bacteria-free. But not all gear belongs in the drum. Doing it wrong can mean damaged equipment or a smelly mess down the line.
This guide breaks down exactly which items are safe, the right cycle settings, how to dry without ruining materials, and when to skip the machine altogether. You will learn how to clean smarter, extend gear life, and step onto the ice with confidence.
Safe Gear for Machine Washing
Not every piece of hockey equipment can survive a spin cycle. Knowing what is safe to wash and what to keep out is the first step to avoiding costly mistakes.
Gloves, Shin Guards, and Pads
Hockey gloves, shin guards, elbow pads, and chest protectors are generally safe for machine washing if they fit inside the drum. These items are built with moisture-wicking liners and durable outer shells that can tolerate a gentle cycle. Breezers also fall into this category, though they may take longer to dry due to thick padding. If you have spare gloves or extra shin guards, wash them at the same time to save a cycle.
Remove any removable inserts like foam knee caps if possible. This helps water reach odor-trapping areas and speeds up drying.
Avoid Washing Helmets and Skates
Never put helmets or skates in the washing machine. Helmets contain delicate padding, liners, and structural components that can degrade from water exposure and agitation. Skates have glued or stitched parts, steel blades, and moisture-sensitive materials in the boot. Washing them can warp the shape, loosen fittings, or promote rust. Clean these by hand with a damp cloth and mild disinfectant instead.
Best Washing Machine Settings

Using the wrong cycle can tear seams, ruin padding, or leave your gear damp and smelly. The key is gentle treatment with targeted cleaning power.
Use Delicates or Activewear Cycle
Always select the delicates or activewear setting on your washing machine. These cycles use slower agitation and lower spin speeds, reducing stress on padding and fabric. Start with delicates if you are unsure. Better safe than sorry. Avoid heavy-duty, regular, or bulky cycles. They are too rough for padded gear and can cause internal damage you will not see until it fails on the ice.
Detergent Dos and Do nots
Add standard liquid laundry detergent. No specialty products needed. Use a regular dose. Do not overfill. Avoid bleach or fabric softeners. Bleach weakens fibers and degrades elastic, while softeners coat moisture-wicking fabrics, reducing breathability. For extra odor control, add ½ cup of white vinegar to the rinse cycle. It naturally kills bacteria and neutralizes smells without damaging materials.
Do not wash gear that is already falling apart. If stitching is frayed or padding is exposed, machine washing will accelerate the damage. Hand wash or retire the item instead.
Drying Hockey Gear the Right Way
Wet gear left in a dark bag is a breeding ground for mold and bacteria. How you dry it matters just as much as how you wash it.
Seal Velcro Before Drying
Before drying, close all Velcro straps on gloves, elbow pads, and shin guards. Open Velcro can snag and tear fabric during tumbling or when stored. It also wears out faster when exposed. Sealing it preserves the fasteners and protects other gear.
Dry Gloves and Elbow Pads in Dryer
Gloves and elbow pads can go in the dryer but only on low heat or delicate setting. High heat melts glue, warps plastic, and shrinks liners. Run for 20 to 30 minutes, then air-dry the rest of the way. This reduces moisture quickly without overheating.
Air-Dry Breezers and Shin Guards
Breezers and shin guards should air-dry only. Their thick padding traps heat, and tumbling creates loud thumping noises while risking seam splits. Lay them flat or hang upright in a well-ventilated area. Avoid direct sunlight. It fades colors and degrades plastic components over time.
If gear still feels damp after 24 hours, flip it or move it to a drier location. Never store until completely dry.
When Hand Washing Is Better
The washing machine is convenient, but it is not always the safest option, especially for older or delicate gear.
Fragile or Worn-Out Gear
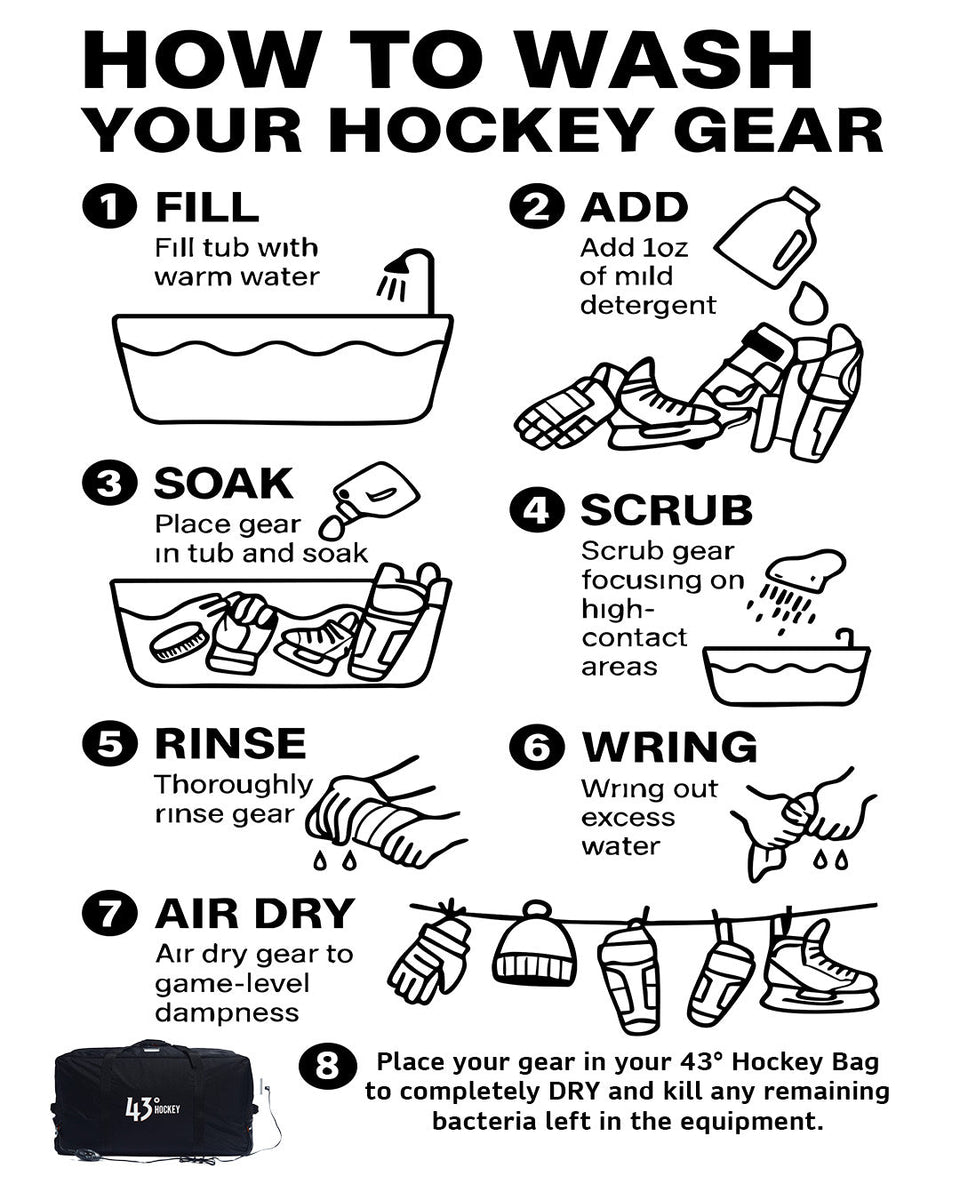
If your gear shows fraying seams, cracked padding, or loose straps, skip the machine. Agitation can tear weak spots apart. Instead, hand wash in a tub with cool water and detergent. Gently scrub soiled areas with a soft brush, then rinse and air-dry thoroughly.
Test One Item First
Before washing your entire set, test one piece like an old glove or spare elbow pad. Run it through the cycle and inspect for damage, shrinkage, or odor retention. If it comes out fine, proceed with the rest. If not, switch to hand washing.
Rotate gear if you have backups. Wash one set while using another. This spreads out wear and keeps you game-ready.
Frequency: How Often to Wash Hockey Gear
Washing too little leads to odor and bacteria buildup. Washing too often can wear out materials. Balance is key.
Wash Every 5 to 10 Uses
Aim to wash hockey gear every 5 to 10 skating sessions, depending on sweat levels and intensity. Weekend warriors might need a wash every few weeks. Tournament players should clean gear after each event. If your gear smells after one use, it is time to wash regardless of the count.
Spot-Clean Between Washes
Extend time between full washes with quick spot-cleaning. Use a mix of water and vinegar in a spray bottle. Mist the inside of gloves, pads, and breezers after use. Let air dry overnight. This reduces bacteria and keeps odors at bay.
Odor Control Beyond Washing
Clean gear can still stink if not stored properly. Eliminate lingering smells with these simple habits.
Use Odor-Absorbing Bags
After drying, toss in a bamboo charcoal or baking soda bag inside each piece. These naturally absorb moisture and neutralize odors between uses. Replace or recharge monthly.
Store Gear Unpacked and Ventilated
Never leave gear crammed in a sealed bag. Unpack everything after use and let it air out for at least a few hours. Hang pads, open gloves, and leave breezers unzipped. This prevents mildew and keeps materials fresh.
Some players freeze gloves overnight to kill odor-causing bacteria. While freezing does not clean dirt, it can reduce smell temporarily. Just do not rely on it as a substitute for washing.
Machine vs. Hand Washing: Which Is Better
Both methods have pros and cons. The best choice depends on gear type, condition, and your schedule.
Machine Washing Pros and Cons
Machine washing is faster and provides more consistent cleaning. It also extracts water better than hand washing in a tub and handles multiple items at once. However, there is a risk of damage if settings are wrong, and it is not suitable for fragile or older gear.
Hand Washing Pros and Cons
Hand washing gives you full control over water and pressure. It is safer for delicate or vintage equipment with no risk of machine-related damage. The downsides are that it is time-consuming and labor-intensive, and it is harder to remove deep moisture from thick padding.
Use the washing machine for routine cleaning of sturdy gear. Switch to hand washing for fragile, older, or high-value items.
Key Takeaways for Washing Hockey Gear in Machine
Washing hockey gear in the washing machine is safe and effective when done correctly. Stick to gloves, pads, and protectors on a delicates cycle. Always avoid helmets and skates. Seal Velcro before drying, and use low heat for gloves and elbow pads while air-drying breezers and shin guards.
Test one item first before washing your entire set. Check gear monthly for loose straps, worn padding, or broken buckles. Repair small issues before they become big problems. With proper care, your gear will stay fresh, functional, and ready for every shift.
Frequently Asked Questions About Washing Hockey Gear in Machine
Can I wash my hockey gloves in the washing machine?
Yes, hockey gloves are generally safe to wash in a washing machine. Use a delicates or activewear cycle with standard detergent. Close all Velcro straps before washing to prevent snagging. Air-dry or use low heat in the dryer.
How often should I wash my hockey gear?
Wash hockey gear every 5 to 10 skating sessions, depending on how much you sweat. Tournament players should clean gear after each event. If gear smells after one use, wash it regardless of the count.
What happens if I wash my hockey helmet in the washing machine?
Never wash a hockey helmet in the washing machine. The padding, liners, and structural components can degrade from water exposure and agitation. Clean helmets by hand with a damp cloth and mild disinfectant instead.
Can I put hockey skates in the washing machine?
No, never put skates in the washing machine. The moisture-sensitive materials, glued parts, and steel blades can warp, loosen, or rust. Clean skates by hand with a damp cloth.
What is the best detergent for washing hockey gear?
Standard liquid laundry detergent works fine for hockey gear. Avoid bleach and fabric softeners. Adding ½ cup of white vinegar to the rinse cycle helps neutralize odors and kill bacteria naturally.
How do I prevent my hockey gear from smelling between washes?
Spray the inside of gloves, pads, and breezers with a water and vinegar mixture after each use. Let them air dry completely before storing. Use bamboo charcoal or baking soda bags in your gear to absorb moisture and odors.