Pressure Washer Nozzle Repair: Quick Steps
A weak spray or leaking connection often ruins a cleaning day, but the culprit is usually a faulty pressure washer nozzle rather than a broken pump. These small components direct high-pressure water, and when they fail, your entire system loses efficiency instantly.
This guide explains how to diagnose clogs, repair spinning mechanisms, and replace seals to restore full power. You will learn specific steps to fix common issues and prevent future failures with simple maintenance routines.
Secure Your Nozzle Connection to Stop Leaks

A loose nozzle creates dangerous leaks and causes immediate pressure loss during operation. The connection between the quick coupler and the nozzle must remain fully locked to withstand extreme hydraulic force.
Lock the Quick Coupler Correctly
Follow this exact sequence to install any pressure washer nozzle safely and effectively.
- Depress the collar on the quick coupler fully to expose the channel.
- Insert the nozzle straight in until it seats completely against the base.
- Release the collar to engage the internal locking mechanism securely.
- Verify the click by tugging lightly to confirm the unit is secure.
A missing or damaged quarter-inch O-ring is frequently the reason for connection failure. This tiny seal sits inside the nozzle base and prevents water from escaping at the joint. If water sprays from the connection point, check this seal first.
Replace the O-Ring Promptly
If the O-ring appears cracked, flattened, or missing, you must replace it immediately to restore function.
- Remove the nozzle and inspect the groove for debris.
- Insert a new 1/4″ O-ring available in most repair kits.
- Reinstall the nozzle and test the connection under low pressure.
Pro Tip: Keep spare O-rings and a small cleaning pick in your pressure washing kit. On-the-spot repairs prevent job delays and protect your equipment from water damage.
Identify Nozzle Size Accurately to Restore Power
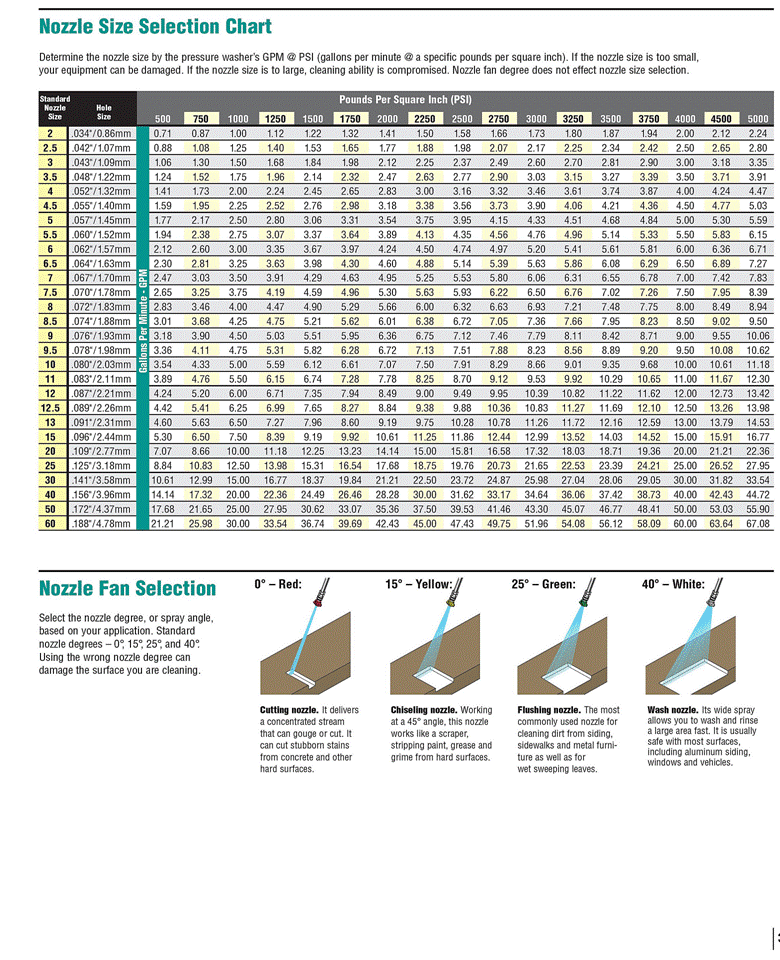
Using the wrong nozzle size mimics pump failure and drastically reduces cleaning performance. Incorrect orifice sizing disrupts the hydraulic balance required for effective operation.
Read the Nozzle Code Properly
Every nozzle features a 4- or 5-digit code stamped clearly on its body. This code indicates the specific spray angle and orifice size for identification.
- First 2 digits represent the spray angle (e.g., “25” equals a 25-degree fan).
- Last 2 digits represent the orifice size (e.g., “5.0” equals a 5.0 flow rating).
Example: A 15050 nozzle delivers a 15-degree fan pattern with a 5.0 orifice size.
Match Specifications to Your Machine
Standard nozzles typically range from size 3 to size 6 in most hardware inventories. Your pressure washer GPM (gallons per minute) and PSI ratings must match the nozzle rating exactly. An oversized orifice drains pressure while an undersized one strains the pump mechanism.
Warning: Never guess the size when replacing parts. Check your manual or consult a dealer to avoid long-term damage to your pump.
Clear Clogged Nozzle Orifices Safely
A misshapen or split spray pattern usually indicates that debris is blocking the nozzle orifice. Sand, grit, or mineral scale often lodges in the tiny opening and disrupts water flow.
Diagnose a Blockage Quickly
Look for these specific signs that indicate a clogged nozzle requiring attention.
- Spray fans unevenly or wanders off course.
- Water pulses or sputters during operation.
- No spray occurs at all due to pressure lockout.
Unclog with Care Using Vinegar
Do not use metal tools aggressively as you can enlarge the hole and ruin the nozzle permanently. Instead, use a gentle chemical and mechanical approach.
- Remove the nozzle after shutting off and depressurizing the unit completely.
- Soak the part in 50% white vinegar and 50% water for at least 1 hour.
- Use a soft wire or nozzle cleaning tool to gently dislodge residue.
- Rinse thoroughly with clean water to remove all debris.
- Test the spray pattern before reattaching to the machine.
Time-Saver: Carry a straightened paper clip for quick field cleaning of minor blockages.
Restore Turbo Nozzle Spin Effectively
A turbo nozzle that sprays a static jet instead of a spinning cone is ineffective and risky for surfaces. This issue affects many rotary nozzles including models like the Craftsman 1900 PSI.
Diagnose Bearing Surface Damage
The spinning action relies on a plastic turbine bearing inside the housing. Waterborne grit scores this surface over time and creates friction that stops rotation.
Key Insight: The nozzle may look fine externally. You must disassemble it to inspect the internal bearing surface.
Repair the Spinning Mechanism
You can fix a non-spinning turbo nozzle for under $20 rather than buying a replacement. This repair addresses surface drag rather than broken parts.
Gather Repair Tools
- 6 mm Allen wrench
- Channel lock pliers
- Dremel with fine polishing bit
- Fine-grit sandpaper (400+ grit)
Disassemble the Turbo Nozzle
- Hold the black housing with pliers to prevent it from turning.
- Insert 6 mm Allen wrench into the hex base of the tip.
- Turn clockwise to loosen the tip.
- ⚠️ Critical: Turbo nozzles use left-hand threads, so clockwise means loosen.
- Remove the tip and lift off the housing to expose the turbo jet, O-ring, and plastic bearing.
Polish the Bearing Surface
- Inspect the bearing face for scratches or grooves carefully.
- Use the Dremel with polishing bit to smooth rough areas gently.
- Goal: Reduce friction without removing significant material.
- Finish with light sanding for a mirror-smooth surface.
- Wipe away all plastic dust to ensure no debris remains.
Reassemble and Test
- Reinstall the O-ring in its groove securely.
- Place the polished bearing back on the shaft.
- Screw the housing back on by turning counter-clockwise to tighten.
- Reattach to pressure washer and test under pressure.
Success Check: The nozzle should spin immediately under pressure to create a rotating cleaning cone.
Prevent Nozzle Failures with Routine Care
Regular maintenance prevents 90% of nozzle issues and extends the life of your equipment significantly. A few simple habits keep your pressure washer running strong.
Soak in Vinegar Monthly
Mineral buildup from hard water clogs nozzles over time and reduces efficiency.
Prevention Routine:
* Mix equal parts vinegar and water in a container.
* Soak all nozzles for 1 hour or longer if scale is heavy.
* Rinse and dry before storage to prevent new deposits.
Why Vinegar? It is non-toxic, cheap, and dissolves limescale without damaging metal or plastic components.
Store Nozzles Properly
- Keep in a labeled case to avoid mixing up sizes.
- Store in a dry place to prevent corrosion.
- Use protective caps if available for your model.
Inspect Before Every Use
- Check for cracks, wear, or O-ring damage.
- Confirm the spray pattern is clean and consistent.
- Verify turbo nozzles spin freely by hand when not under pressure.
Understand How Turbo Nozzles Work
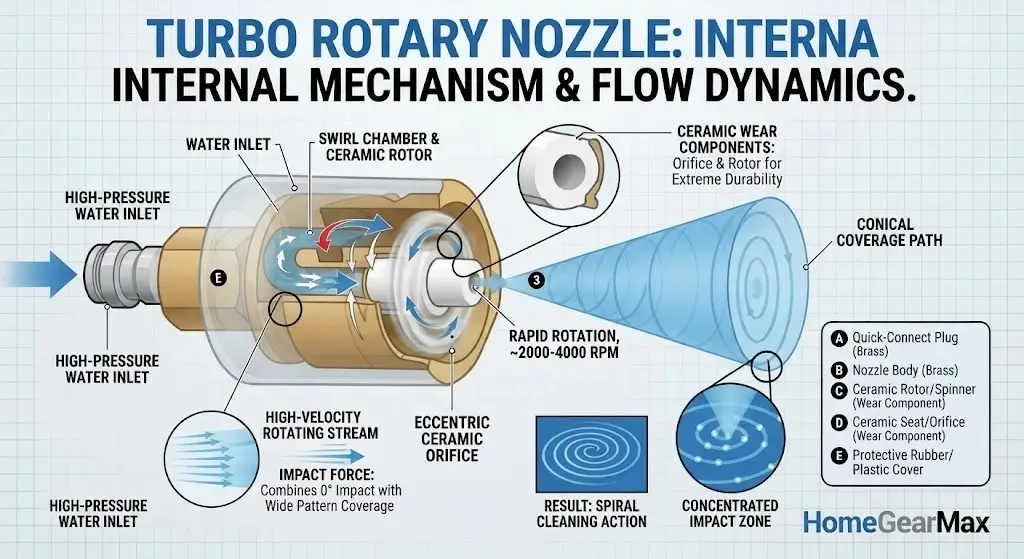
Knowing the mechanics helps you diagnose and fix problems faster with confidence. The system relies on fluid dynamics to generate rotation.
Fluid Dynamics in Action
- High-pressure water enters the nozzle body.
- Water is directed through two angled side ports internally.
- Water exits tangentially to create a vortex or mini-tornado.
- This vortex spins the internal turbine or plastic bearing.
- The spinning motion drives the central tip for a 360° rotating spray.
Why Smooth Bearings Matter
The system relies on low friction to function correctly. Even minor scoring on the bearing increases drag substantially. If drag exceeds the vortex torque, the nozzle stops spinning entirely.
Bottom Line: A polished surface equals reliable spin and maximum cleaning power.
Quick Reference: Nozzle Specs & Fixes
| Issue | Cause | Fix |
|---|---|---|
| Leaking at connection | Missing or damaged O-ring | Replace 1/4″ O-ring |
| Low pressure | Wrong orifice size | Match nozzle code to GPM/PSI |
| Split or weak spray | Clogged orifice | Soak in vinegar and clean gently |
| Turbo nozzle won’t spin | Scored bearing surface | Disassemble, polish, reassemble |
| Nozzle won’t stay attached | Loose coupler | Reinstall with collar fully locked |
| Component | Detail |
|---|---|
| O-Ring Size | 1/4 inch |
| Nozzle Code Format | 15050 = 15° angle, 5.0 orifice |
| Turbo Nozzle Thread | Left-hand (clockwise to loosen) |
| Cleaning Solution | 50% vinegar / 50% water |
| Soak Time | Minimum 1 hour |
| Repair Savings | Up to $20 per nozzle |
Frequently Asked Questions About Pressure Washer Nozzle Repair
Why does my pressure washer nozzle leak at the connection?
A leak at the connection usually means the quarter-inch O-ring is missing, damaged, or improperly seated. Replace the O-ring and ensure the quick coupler collar clicks into place to stop the leak.
How do I know if my nozzle size is wrong?
Check the code on the nozzle body. The first two digits show the angle and the last two show the orifice size. If these do not match your machine’s GPM and PSI ratings, you will experience pressure loss or pump strain.
Can I fix a turbo nozzle that stopped spinning?
Yes, you can often fix it by disassembling the unit and polishing the internal plastic bearing. Scoring on this surface creates drag, and smoothing it out restores the spinning action.
What is the best way to clean a clogged nozzle?
Soak the nozzle in a mixture of 50% white vinegar and 50% water for at least one hour. Use a soft wire or paper clip to gently remove softened debris without enlarging the orifice.
Why do turbo nozzles use left-hand threads?
Turbo nozzles use left-hand threads to prevent the tip from loosening due to the rotational force of the spinning mechanism. Remember to turn clockwise to loosen and counter-clockwise to tighten.
How often should I clean my pressure washer nozzles?
You should inspect nozzles before every use and perform a deep vinegar soak monthly if you have hard water. Regular cleaning prevents mineral buildup that leads to clogs and pressure loss.
Key Takeaways for Pressure Washer Nozzle Repair
Most pressure washer nozzle problems stem from simple issues like clogged orifices, damaged O-rings, or scored turbo bearings. You can restore full power by securing connections, matching nozzle codes to your machine, and polishing internal surfaces.
Regular maintenance with vinegar soaks and proper storage prevents 90% of these failures. Start by checking your O-rings and cleaning any clogged tips today to ensure your next cleaning job runs smoothly.