How to Use a Pressure Washer Surface Cleaner
Scrubbing a driveway with a standard wand often leaves ugly streaks and takes hours of exhausting work. The solution is learning how to use pressure washer surface cleaner attachments to clean large flat areas quickly without damaging the concrete.
This guide explains the exact downhill technique, overlap patterns, and safety steps needed for professional results. You will discover how to prevent swirl marks, choose the right stainless steel model, and troubleshoot common striping issues effectively.
Start at the Top to Clean Downhill
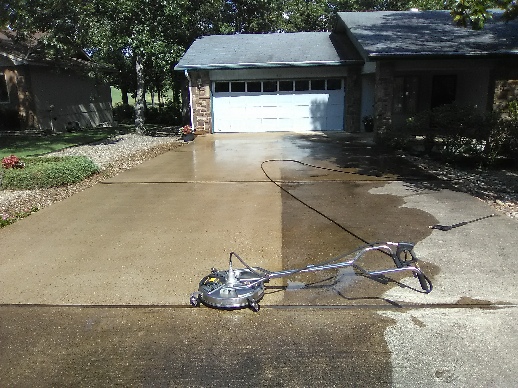
Cleaning from the highest point of your driveway or patio is the single most important technique for success. Many beginners make the mistake of working uphill or dragging the unit back and forth randomly. This error forces dirty water and loose debris back over areas you have already cleaned.
By starting at the top edge and moving steadily downward, you let gravity do the heavy lifting. The dirty runoff flows away from your work zone naturally instead of re-soiling fresh surfaces. You will see visibly dark water flowing away, confirming that contaminants are being removed permanently.
Why Gravity Assists Your Cleaning Effort
Working downhill ensures that every pass of the surface cleaner meets fresh, uncleaned dirt. This method prevents the re-deposition of grime that causes streaks and dull finishes. It also reduces the physical effort required since you are not fighting against the flow of water and debris.
How to Maintain Consistent Downward Progress
Keep your movement organized by working in defined rows similar to mowing a lawn. Complete one full section before shifting to the next adjacent area. Avoid reversing your direction up the slope once you have passed a section to prevent dragging mud back onto clean concrete.
Overlap Each Pass to Prevent Striping
Even with the correct direction, moving too fast or failing to overlap creates visible stripes on your surface. These lines occur when gaps appear between the paths of the spinning nozzles. To avoid this, you must overlap each pass by one-third to 50 percent of the cleaner’s total width.
For a standard 14-inch model, this means overlapping your previous path by 5 to 7 inches. If you are using a larger 21-inch unit, increase your overlap to 7 to 10 inches. This ensures the rotating jets cover every inch of the surface evenly without leaving uncleaned strips.
Adjusting Speed for Electric Pressure Washers
Electric pressure washers typically operate at lower pressures between 2,000 and 2,800 PSI. These units require a slower walking pace and greater overlap to match the cleaning power of gas models. If you notice streaks forming, slow your pace immediately and increase your overlap to 50 percent.
Maintaining Steady Forward Motion
Never stop moving while the trigger is engaged unless you are inspecting a specific obstacle. Continuous forward motion ensures consistent cleaning pressure across the entire area. Stopping or hesitating creates uneven cleaning patterns that are difficult to fix later.
Limit Dwell Time to Avoid Surface Damage
Holding the surface cleaner in one spot for too long can cause serious damage to your property. The concentrated high-pressure jets spinning beneath the dome can etch concrete, pock stone, or strip wood fibers instantly. You must never let the unit sit stationary for more than 2 seconds.
If a stubborn stain remains after your first pass, do not hold the unit in place to scrub it out. Instead, move forward and return for a second or third overlapping pass. This approach removes tough grime safely without risking permanent surface damage.
Safe Methods for Removing Stubborn Stains
Pre-treat heavily soiled areas with a dedicated degreaser or detergent before pressure washing. Let the chemical dwell according to the manufacturer instructions to break down oil and grease. Then use your surface cleaner with normal overlapping passes to rinse the area clean.
When to Switch to a Spot Cleaning Wand
Some localized buildup may require more targeted attention than the surface cleaner provides. Use a standard pressure washer wand with a 0-degree or 15-degree nozzle for specific tough spots. Always keep the wand moving to avoid concentrating pressure on a single point.
Connect and Activate Your Equipment Safely
Proper setup is essential for safe operation and optimal performance of your surface cleaning attachment. Most quality units arrive fully assembled and ready to connect to your existing pressure washer system. Follow these steps to ensure a secure and leak-free connection.
Steps for Secure Hose Attachment
- Turn on your water supply and connect the high-pressure hose to the pressure washer pump.
- Attach the surface cleaner ¼-inch quick-connect plug directly to the end of your pressure washer wand.
- Verify the connection is tight and secure to prevent dangerous high-pressure leaks during operation.
Verifying Pressure and Flow Compatibility
Your pressure washer must deliver sufficient power to spin the nozzles effectively. Most surface cleaners require a minimum of 2,800 PSI and 2.5 GPM for optimal rotation. If your machine lacks this power, the nozzles may stutter or fail to spin, resulting in poor cleaning performance.
Activating the Unit Without Causing Etching
Place the surface cleaner flat against the ground before squeezing the trigger gun. Squeeze the trigger to engage water flow and start the nozzle rotation. Begin moving the unit immediately within one second to prevent the jets from etching the surface beneath.
Shut Down and Release Pressure Properly
Safety protocols require specific steps immediately after you finish cleaning your surface. Failing to follow these steps can damage your equipment or create a hazard during disassembly. Always prioritize pressure release before disconnecting any hoses or attachments.
Releasing Trapped System Pressure
- Turn off the pressure washer engine or switch off the electric unit.
- Squeeze the trigger gun repeatedly to release all trapped pressure in the hose and cleaner.
- Engage the trigger lock to prevent accidental discharge while handling the equipment.
Residual pressure left in the system can damage seals and hoses over time. It also poses a risk of sudden water spray if you attempt to disconnect the unit while pressure remains.
Choose the Right Surface Cleaner Size

Selecting the correct size surface cleaner matches your specific job requirements and machine capabilities. Using a unit that is too large for your pressure washer will result in poor performance. Conversely, a unit that is too small wastes time on large projects.
| Size | Best For | Pressure Requirement |
|---|---|---|
| 14–14.5 inch | Small patios and walkways | 2,800+ PSI, 2.0+ GPM |
| 18 inch | Large driveways and sidewalks | 3,000+ PSI, 2.5+ GPM |
| 21 inch | Commercial lots and big areas | 3,500+ PSI, 3.0+ GPM |
Matching GPM to Cleaner Diameter
Larger diameter units require higher water flow rates to maintain nozzle spin speed. If your pressure washer cannot provide the necessary GPM, the nozzles will stall. This leads to uneven cleaning and potential damage to the internal swivel mechanism.
Benefits of Walk-Behind Models for Large Jobs
Consider a walk-behind 21-inch model for extensive commercial or residential projects. These units feature extended handles and robust wheel systems designed for all-day use. They significantly reduce physical strain compared to handheld models on large surfaces.
Prioritize Stainless Steel Construction

The material of your surface cleaner housing determines its lifespan and reliability. Plastic models are inexpensive but often warp, crack, or lose nozzle alignment within a year of use. Investing in metal construction pays off through durability and consistent performance.
Comparing Stainless Steel vs Plastic Durability
Stainless steel resists rust and corrosion even with frequent exposure to water and chemicals. Aluminum offers good corrosion resistance but is generally less durable than stainless options. Plastic units are prone to cracking under pressure and often fail to maintain proper nozzle height.
Warranty Indicators of Quality
High-quality stainless steel models typically come with a 2-year limited warranty. This coverage reflects the manufacturer’s confidence in the build quality and materials. Cheaper plastic alternatives rarely offer substantial warranty backing due to their short expected lifespan.
Use Models with Wheels and Dual Nozzles
Specific design features dramatically improve the usability and results of your surface cleaning experience. Look for units that include integrated wheels and a dual-nozzle configuration. These features are essential for professional-grade outcomes.
Advantages of Dual Nozzle Design
Units with two opposing nozzles provide balanced rotation and even water distribution. Single-nozzle designs often wobble or leave swirl marks due to uneven force application. Dual nozzles eliminate this issue and ensure full coverage with every pass.
Why Integrated Wheels Are Essential
Wheels allow the unit to glide smoothly over the surface without user fatigue. Without wheels, you must support the full weight of the cleaner plus water resistance. This leads to inconsistent pressure application and uneven cleaning results over time.
Fix Swirling and Striping Issues Fast
Even with good technique, you may encounter swirling patterns or visible stripes on your cleaned surface. These issues usually stem from operator error rather than equipment failure. Identifying the cause allows you to correct the problem immediately.
Correcting Circular Swirl Marks
Circular marks often appear when the operator moves too fast or fails to overlap sufficiently. Slow your walking pace and increase your overlap to 50 percent to eliminate these patterns. Ensure both nozzles are spinning freely and are not obstructed by debris.
Eliminating Visible Clean and Dirty Stripes
Stripes indicate gaps between your cleaning passes or a clogged nozzle. Inspect the rotating jets for blockages and clear them with a pin or needle if necessary. Increase your overlap on the next pass to cover any missed spots effectively.
Stop Immediately After Hitting Obstacles
Surface cleaners are not designed to strike curbs, rocks, or uneven pavement transitions. Hitting an obstacle can cause violent vibration due to misaligned nozzles or bent arms. This vibration can lead to loss of control and potential injury.
Inspecting for Damage After Impact
- Stop using the unit immediately if you feel sudden vibration.
- Inspect the housing and arms for bends, cracks, or misalignment.
- Test the spin manually before reconnecting to high pressure.
Continuing to use a vibrating unit risks mechanical failure and personal safety. When approaching known obstacles, lift the unit slightly to clear the edge gently. Never hold it stationary for more than 2 seconds while crossing gaps.
Maintain Your Equipment for Longevity
Regular maintenance extends the life of your surface cleaner and keeps it performing like new. Simple post-use checks prevent clogs and preserve the integrity of seals and swivels. Proper storage protects your investment from environmental damage.
Post-Use Inspection and Flushing
Inspect nozzles for clogs after every use, especially when cleaning oily or dirty surfaces. Flush the unit with clean water to remove any residual chemicals or debris inside the dome. Release all pressure from the system before storing the attachment.
Proper Storage Practices
Store your surface cleaner in a dry, covered area like a garage or shed. Hang the unit or place it upright to prevent warping of the housing or arms. Avoid prolonged outdoor exposure even if you own a stainless steel model.
Understand the Performance Benefits
Switching from a standard wand to a surface cleaner delivers measurable improvements in efficiency and results. Users report cleaning large flat areas up to 5 times faster than traditional methods. The even coverage eliminates the need for meticulous manual sweeping.
Ergonomic Advantages for Users
The combination of wheels and the downhill cleaning method reduces physical strain significantly. You can stand upright and let the equipment do the work instead of bending and twisting. This makes it suitable for extended cleaning sessions without fatigue.
Safety Improvements Over Standard Wands
Surface cleaners enclose the high-pressure spray within a protective dome. This design prevents direct spray exposure to skin or eyes during operation. It also eliminates spray drift that can damage nearby plants or structures.
Frequently Asked Questions About Surface Cleaners
What PSI do I need to run a surface cleaner effectively?
Most surface cleaners require a minimum of 2,800 PSI and 2.5 GPM to rotate nozzles properly. Lower pressure may cause the nozzles to stall, resulting in poor cleaning performance and potential equipment damage.
Can I use a surface cleaner on wood decks?
You should generally avoid using surface cleaners on wood decks as they can strip soft fibers. The high-pressure spinning jets are designed for hard surfaces like concrete, stone, and pavers, not delicate wood grains.
Why does my surface cleaner leave swirl marks?
Swirl marks usually happen because you are moving too fast or not overlapping your passes enough. Slow your pace and overlap each path by 50 percent to ensure even coverage and eliminate circular patterns.
How do I stop my surface cleaner from vibrating?
Vibration typically occurs after hitting an obstacle like a curb or rock, causing nozzle misalignment. Stop immediately, inspect for damage, and clear any debris blocking the nozzles before resuming use.
Is a stainless steel surface cleaner worth the extra cost?
Yes, stainless steel models last years longer than plastic ones that often crack within a year. The durability, consistent performance, and warranty coverage provide better long-term value for frequent users.
Key Takeaways for Using Your Pressure Washer Surface Cleaner
Mastering how to use pressure washer surface cleaner attachments transforms a tedious chore into a quick, efficient task. Remember to always start at the highest point and work downhill, overlap your passes by 50 percent, and never hold the unit still for more than 2 seconds.
Investing in a stainless steel model with wheels and dual nozzles ensures professional results and long-term durability. Follow these techniques and maintenance tips to keep your concrete, stone, and pavers looking flawless for years to come.