How to Use a Gas Pressure Washer
You just unpacked your new gas pressure washer and want to start tackling grime immediately. Driveways, decks, garage floors, and weathered siding all benefit from the raw cleaning power these machines deliver. Without proper technique, however, you risk damaging surfaces, injuring yourself, or burning out the pump. Learning how to use a gas pressure washer correctly saves time, water, and money on every job.
This guide walks you through setup, startup, nozzle selection, cleaning methods, and shutdown. You’ll discover how to prime the system, avoid costly mistakes, choose the right detergent, and keep your machine running for years. Whether you own a Mi-T-M, Craftsman, or WEN model, these proven steps apply to virtually any gas-powered unit.
Assemble Your Pressure Washer Properly
Correct assembly creates a stable foundation for safe operation.
Build the Frame and Handle
For models like the WEN 30100 PSI, align the upper handle with the upright tubes on the lower frame. Press down until the detent pins snap into place to lock the handle securely. This tool-free design makes setup fast and intuitive.
Mount the Gun Hooks
Both upper and lower gun hooks keep your spray gun and hose organized:
– Upper hook: Reuse the existing bolts and washers from the upper frame
– Lower hook: Fasten with the included M6 screw and lock nut to the side of the frame
These small details prevent damage to your equipment between uses.
Put Together the Spray Gun
Insert the lance into the gun body, then attach the high-pressure hose to the bottom of the handle. Select your nozzle before connecting water. Most models use a collar system: pull back, insert, and release to lock.
Connect Water and Prime the System
A properly primed system prevents dry starts and protects the pump from damage.
Hook Up the Garden Hose
- Connect one end of a garden hose to your outdoor spigot
- Attach the other end to the pressure washer’s inlet
- Confirm the inlet screen and washer are seated correctly to block debris
Turn on the water briefly to flush sediment, then shut it off before final connection.
Attach the High-Pressure Hose
Slide the male end of the high-pressure hose into the pump outlet. On Mi-T-M models, push the plug from the gun onto the hose until the collar snaps securely into place.
Purge Air from the Lines
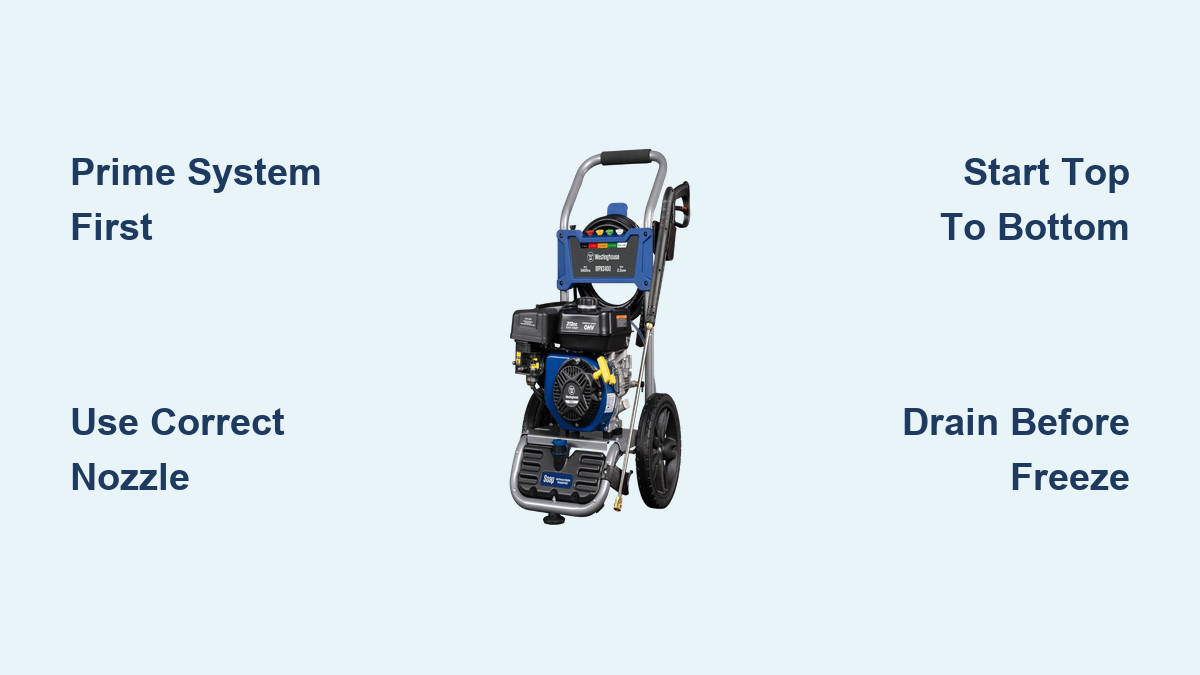
With the engine off, turn on the water supply and squeeze the spray gun trigger several times. Water should flow freely once trapped air escapes. Repeat this step just before starting the engine for smooth pump operation.
Check Oil and Fuel Before Starting
Never start a cold engine without verifying fluid levels first.
Add Engine Oil
Check the dipstick or crankcase hole before first use. For WEN models, pour 17.6 fl oz of four-cycle engine oil into the crankcase. Stop when oil reaches the base of the threads, since overfilling causes leaks and smoke.
Fill the Fuel Tank
Use fresh, unleaded gasoline and fill to about 1.5 inches below the tank neck (roughly 1.5 gallons). Avoid overfilling because gas expands when hot. For long-term storage on Craftsman models, add fuel stabilizer or run the tank dry to prevent gumming.
Start the Engine Safely
Following the correct sequence prevents kickback and ensures reliable ignition.
Set Engine Controls
Prepare the engine for a cold start with these settings:
– Open the fuel valve (slide to “On”)
– Close the choke (set to “Choke”)
– Move the throttle to full position (left)
– Turn the engine switch to “On”
These settings enrich the fuel mix, making ignition easier on a cold engine.
Pull the Recoil Starter
- Point the spray gun in a safe direction
- Squeeze the trigger to release residual pressure
- Pull the starter cord firmly and steadily
On WEN models, repeat if needed. If the engine fails to catch, squeeze the trigger again to relieve pressure before retrying.
Adjust Choke After Ignition
Once the engine starts, immediately move the choke to the open position. Let it run for 1–2 minutes to warm up, then transition to the “Run” setting. Craftsman models with Honda engines often start in one or two pulls thanks to reliable ignition systems.
Choose the Right Nozzle for Each Task
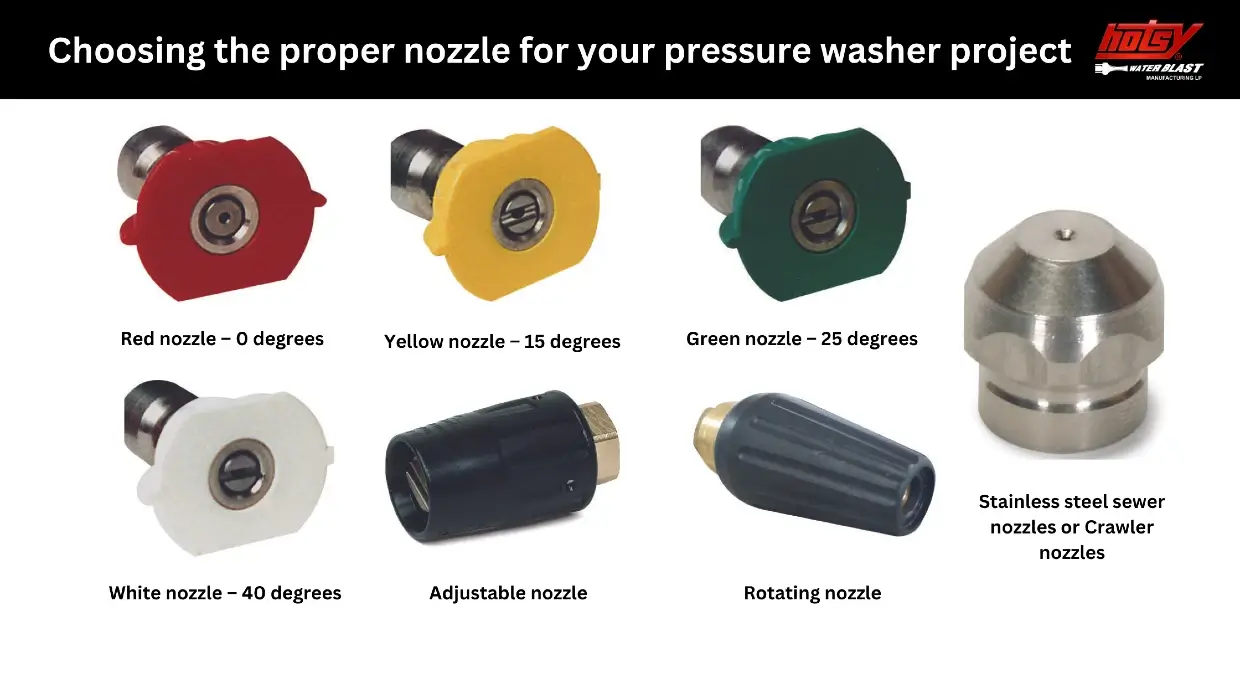
Nozzle selection determines both cleaning power and surface safety.
Insert Nozzles Securely
Pull back the collar on the wand, insert the nozzle, then release to lock. Standard nozzles are universally compatible across most brands, making replacements easy to find.
Match Nozzle to Surface
Craftsman 2,800 PSI options include:
– Black nozzle (0°–15°): Designed for detergent application
– 15° nozzle (2,600 psi): General cleaning tasks
– Wide-angle nozzle (2,400 psi): Soft surfaces
– Red needlepoint (2,800 psi): Stubborn stains like tar or gum
WEN 30100 PSI nozzles include:
– Soap nozzle: Pairs with on-board tank
– 0° nozzle: Heavy-duty spot cleaning
– 15° nozzle: Decks, bricks, and grime
– 25° nozzle: Vehicles and outdoor gear
– 40° nozzle: Gentle rinse with soap
Pro Tip: Always start with a wider angle and move to narrower nozzles only when necessary.
Master Professional Cleaning Techniques
Use proven methods for maximum efficiency without surface damage.
Work Top to Bottom
Start at the roofline or highest point and clean downward. This prevents dirty water from re-soiling areas you just finished.
Adjust Distance Instead of Pressure
The trigger only turns water on and off, while pressure stays fixed by the nozzle. Control intensity by changing distance:
– 6 inches from surface: Maximum force
– 12+ inches: Gentle wash
Move closer gradually if more power is needed.
Clean in Manageable Sections
Focus on 3×3 foot areas using overlapping strokes like mowing a lawn. This approach delivers even coverage across every surface.
Apply Detergent the Right Way

Detergent boosts cleaning power when used correctly.
Use the On-Board Soap Tank (WEN)
- Pour up to 1 quart of pressure washer soap into the side tank
- Attach the soap nozzle
- Spray evenly without letting it dry
Avoid household cleaners because they can damage seals and internal components.
Use an External Soap Siphon (Craftsman)
- Mix detergent in a bucket
- Attach the clear siphon hose to the bucket
- Spray using the black nozzle
The system draws soap into the low-pressure stream automatically.
Let Detergent Soak Properly
Allow 5–10 minutes of dwell time before rinsing. This breaks down oils, mildew, and grime for easier removal.
Clean Different Surfaces Safely
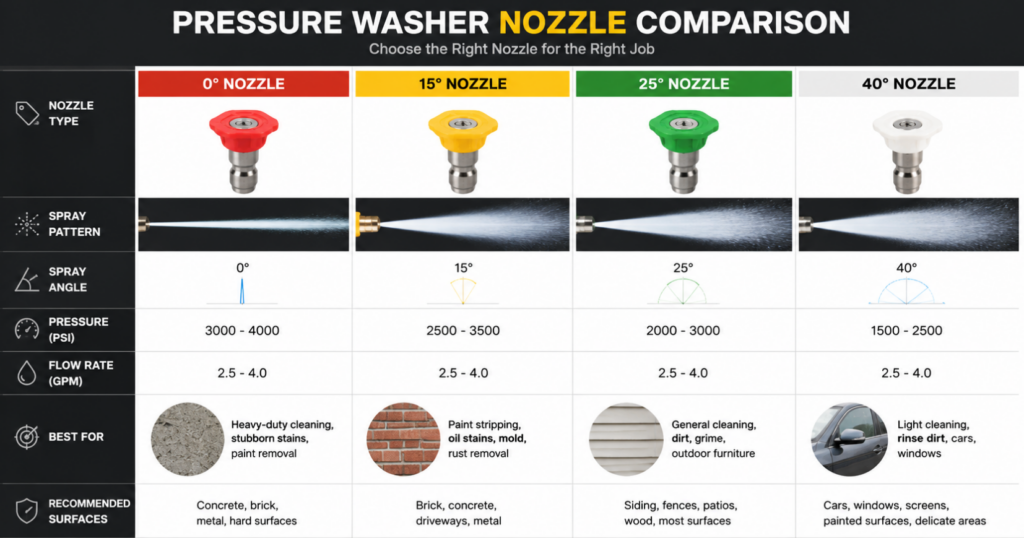
Match your technique to the material to prevent damage.
Driveways and Sidewalks
Use a 25° or 40° nozzle held 6–12 inches away. Move in straight lines to prevent pitting or etching concrete.
Vehicles
Use a 40° nozzle with soap for safe cleaning. Never use 0° or 15° nozzles because they can chip paint or strip wax.
Wood Decks
Use low pressure with a wide-angle nozzle and keep the wand moving to prevent gouging soft wood fibers.
Outdoor Gear and Ropes
Use a 25° nozzle and focus on dirt buildup without lingering in one spot.
Vinyl Fences and Garage Floors
Vinyl fences often clean well with water alone. Garage floors benefit from degreaser for oil stains since pressure alone won’t dissolve grease.
Avoid These Common Mistakes
Even experienced users make these errors that can ruin your machine.
Never Run Without Water
The pump relies on water for cooling and lubrication. Running dry for even 30 seconds can overheat and destroy internal components.
Don’t Idle Without Triggering
Holding the engine at full throttle with the trigger released causes heat buildup. Most units lack cooling bypass systems. Release the trigger every 2 minutes or shut off the engine if idle.
Drain Before Freezing Temperatures
Water left in the pump or hoses can freeze and crack internal components. Always disconnect hoses, drain water from the pump and lines, and follow winterization steps in your manual.
Shut Down and Maintain Your Unit
Proper shutdown and routine care extend your pressure washer’s lifespan.
Follow the Shutdown Sequence
- Turn the engine switch to “Off”
- Squeeze the trigger to release system pressure
- Turn off the water supply
- Remove and store the nozzle
- Disconnect the high-pressure hose and garden hose
- Drain residual water from hoses
Leaving pressure trapped stresses seals and causes leaks over time.
Inspect Hoses and Nozzles Regularly
Check for cracks or bulges in hoses, clogs or wear in nozzles, and loose connections. Replace damaged parts immediately to maintain safe operation.
Service the Engine
Change oil after the first 5 hours, then every 25–50 hours. Clean or replace the air filter regularly and check the spark plug annually. Honda engines require minimal maintenance but still benefit from routine checks.
Winterize Before Storage
If temperatures drop below freezing, run the pump dry and drain all water from hoses and the pump. Store in a dry, covered area. Some manuals recommend running antifreeze through the pump for added protection.
Follow Critical Safety Rules
Your safety depends on discipline and awareness during every use.
Never Aim at People or Pets
Even a 40° spray can cause injury at close range. Always point the gun in a safe direction away from people, structures, and yourself.
Keep Distance from Delicate Surfaces
Windows, siding, and wood can be damaged by high pressure. Use wide nozzles and increase distance to protect these materials.
Wear Protective Gear
Use safety goggles, gloves, and sturdy footwear. Flying debris and high-pressure spray create real hazards that proper equipment prevents.
Maximize Water Efficiency
A gas pressure washer uses up to 80% less water than a garden hose. At 2.4 GPM, it delivers high-impact cleaning with minimal waste, making it ideal for drought-prone areas.
Key Model Specifications
| Model | PSI | GPM | Engine | Notable Features |
|---|---|---|---|---|
| Mi-T-M | Varies | Varies | Gas | Tool-free setup |
| Craftsman | 2,800 | Varies | Honda | Thermal relief valve, four nozzles |
| WEN 30100 | 3,100 | 2.4 | Four-cycle gas | On-board soap tank, five nozzles |
Choose based on your power needs and preferred convenience features.
Frequently Asked Questions About Gas Pressure Washers
How much oil does a gas pressure washer need?
Most four-cycle engines require about 17.6 fl oz of oil for initial fill. Always check the dipstick or crankcase threads and stop filling when oil reaches the base of the threads. Overfilling causes leaks and excessive smoke.
Can you use any soap in a gas pressure washer?
No, only use detergents specifically formulated for pressure washers. Household cleaners can damage seals, void warranties, and harm internal components. Pour up to 1 quart into the on-board tank or dilute in a bucket for siphon systems.
What happens if you run a gas pressure washer without water?
The pump overheats within seconds and internal seals can melt or warp permanently. Always connect your garden hose and turn on the water supply before pulling the recoil starter. Running dry for even 30 seconds can destroy the pump.
How long should detergent sit before rinsing?
Allow 5–10 minutes of dwell time for detergent to break down oils, mildew, and grime. Don’t let soap dry on the surface, since dried residue leaves streaks and requires extra rinsing effort.
Do you need to winterize a gas pressure washer?
Yes, draining the system completely prevents freeze damage. Water expands when frozen and can crack the pump, hoses, and internal lines. Follow your manual’s winterization steps or run antifreeze through the pump before storage.
What nozzle should I use for cleaning a concrete driveway?
Use a 25° or 40° nozzle held 6–12 inches from the surface. Narrower nozzles like 0° or 15° can etch or pit concrete. Move in straight, overlapping lines for even cleaning without damage.
Final Best Practices for Gas Pressure Washer Success
Mastering how to use a gas pressure washer comes down to preparation, technique, and ongoing care. Always connect water before starting the engine, purge air from the lines, and select the correct nozzle for each surface. Work top to bottom, apply detergent with proper dwell time, and never idle with the trigger closed for extended periods. Drain the system completely before freezing temperatures arrive.
With the right approach, your gas pressure washer becomes the most powerful cleaning tool in your arsenal. Start with a small test area on your next cleaning project to build confidence and refine your technique.