How to Fix a Pressure Washer Pump
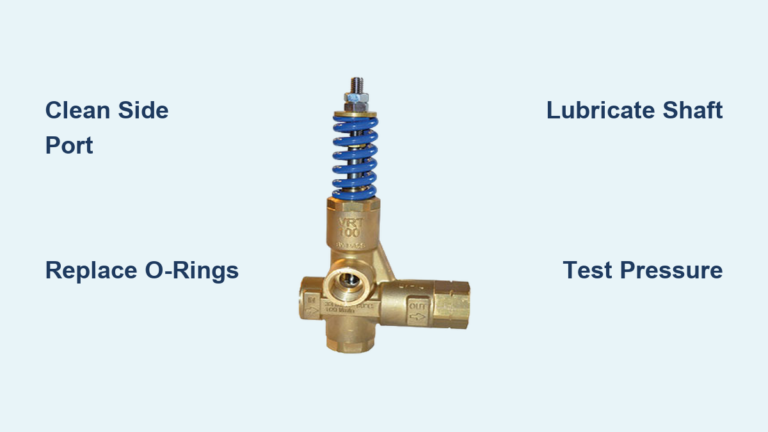
If your pressure washer loses all power the moment you release the trigger, a stuck unloader valve is likely the culprit. This common failure turns a quick cleaning job into a frustrating mess, but you can often fix a pressure washer pump at home with basic tools.
This guide walks you through diagnosing the issue, replacing worn seals, and reassembling your unit for full power. You will learn specific steps to restore your machine without needing professional help.
Diagnose Why Your Pressure Washer Pump Fails
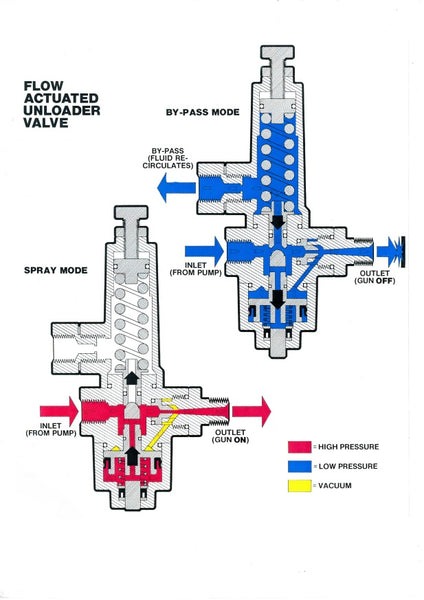
Accurate diagnosis saves time and prevents unnecessary part replacements. Your machine gives clear signals about what is wrong inside the pump housing before you even pick up a wrench.
Identify Zero Pressure on Trigger Release
When the washer starts strong but pressure drops to nothing when you pull the trigger, the unloader valve is almost certainly stuck. This valve redirects water flow when the gun is closed, and corrosion often prevents it from cycling correctly. This specific symptom is a known weak point in many consumer pumps, especially older Craftsman and General Electric models.
Test for Low or No Pressure Issues
Low pressure differs from total pressure loss and often points to clogged inlet filters or worn piston seals. Run the machine with the inlet hose submerged in a bucket of water to see if it primes properly. If it works with the bucket but not the tap, you likely have a suction leak or inadequate water supply.
Look for Leaks and Contaminated Oil
Inspect the pump housing and connections for any dripping, which indicates a failed seal or gasket. Open the oil fill cap immediately if you suspect internal issues, as milky or gray oil means water has entered the crankcase. Continued use with contaminated oil can destroy bearings and pistons permanently.
Listen for Unusual Noises
Grinding, knocking, or loud pulsing sounds suggest serious mechanical damage like a worn wobble plate or broken springs. Cavitation creates a high-pitched whine meaning the pump is not getting enough water to operate safely. Shut down the machine immediately if you hear metal-on-metal sounds to prevent catastrophic failure.
Safety and Prep Steps Before Repair
Skipping preparation steps risks personal injury and can cause further damage to your equipment. Follow these protocols strictly before touching any tools to ensure a safe working environment.
Disconnect Power and Release Pressure
For gas models, turn off the fuel supply and remove the spark plug wire to prevent accidental starts. Electric units must be unplugged completely before you begin any work on the system. Squeeze the trigger gun to release all built-up pressure, as you should never open a pressurized system.
Gather Essential Tools for the Job
You will need a 9/16-inch wrench for mounting bolts and an 8 mm Allen key to remove the shaft set screw. A Torx 30 screwdriver is required for the unloader valve housing, while needle-nose pliers help extract small valves and keepers. Have nitrile gloves ready to protect your hands from oil and grime during the process.
Drain and Remove the Pump Safely
Disconnect the high-pressure hose and detergent line, cutting the tubing if the fitting is stuck. Remove the four pump mounting bolts but leave them slightly loose at first to maintain stability. Rotate the engine shaft until the set screw appears in the access hole, then remove it along with the key as you slide the pump off.
Disassemble the Pump Without Damage
Taking the pump apart carefully prevents losing small parts and ensures you can reassemble it correctly. Follow the logical order of operations to access internal components safely.
Separate the Pump Housings Carefully
Loosen the four long housing bolts diagonally to release spring tension evenly across the unit. Tip the pump to drain the oil before fully separating the sections to avoid a mess. Hold the wobble plate in place as you open the housing so pistons and springs do not fly out unexpectedly.
Remove the Unloader Valve Assembly
Pry off the outer cap with a flathead screwdriver and remove the small metal shield underneath. Unscrew the two Torx 30 screws holding the white plastic housing, then lift it while keeping track of the tiny spring. Use needle-nose pliers to grip the valve stem, twist slightly, and pull it out for inspection.
Extract Internal Components for Cleaning
Remove plastic keepers and valve seats with pliers to access the deeper internal parts. Pull out rubber seals from piston chambers and flip the housing to remove the valve cover plate. Extract all valve plugs, pistons, and springs to ensure every part is accessible for cleaning.
Clean, Inspect, and Replace Worn Parts

A clean pump is a reliable pump, and replacing worn parts prevents repeat failures. Thorough inspection ensures you do not miss critical damage that could cause another breakdown soon.
Clean All Components Thoroughly
Wipe out old oil and sludge from the crankcase using a clean rag or brush. Soak valves and seats in a descaling solution if mineral buildup is present, then flush all water passages with clean water. Use a soft brush to remove grime, but avoid steel wool which can scratch sensitive surfaces.
Inspect Critical Parts for Damage
The unloader valve must move freely, so replace it if you see any bend or corrosion on the shaft. Check seals and O-rings for cracks or brittleness, and swap them all even if they look okay. Examine pistons and cylinders for scoring, as deep grooves mean the pump body may need replacement.
Replace with Correct Parts
Order replacements by your specific model number, such as the AP31046D unloader valve for Craftsman K2400HH units. Match shaft size and keyway dimensions for Mi-T-M, Cat 66 DX, or GE 4040G models. Avoid cheap knockoffs and choose genuine or OEM-equivalent parts for longer life.
Reassemble the Pump Correctly
Reassembly is the reverse of disassembly, but lubrication and alignment are critical for success. Proper technique here ensures your repair lasts and the pump operates smoothly.
Lubricate the Crankshaft and Key
Apply high-temperature anti-seize to the entire crankshaft before reinstalling the pump. Coat the keyway and extend the lubricant three-quarters around the shaft to prevent future seizing. Insert the key into the shaft groove, letting it protrude slightly to guide alignment during installation.
Mount the Pump to the Engine
Align the pump keyway with the shaft and key, ensuring the inlet faces forward. Slide the pump on gently without forcing it, repositioning slightly if it binds. Reinstall the four mounting bolts and tighten them a quarter to half turn past snug to resist vibration.
Reinstall the Set Screw Securely
Rotate the shaft to expose the access hole and insert the 8 mm set screw. Tighten it securely, as friction holds it in place without needing thread locker. This step locks the pump to the engine shaft for proper power transfer.
Rebuild the Pump Head Internals
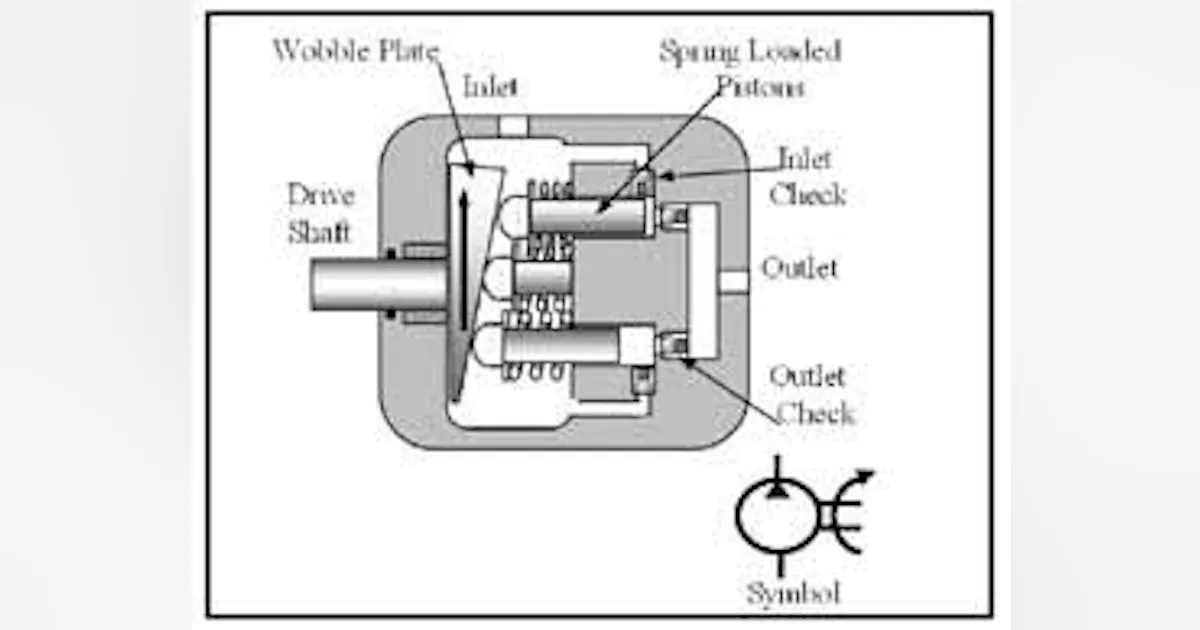
Now you must reassemble the internal components with precision to restore pressure capabilities. Careful handling of seals and springs ensures proper function.
Insert Pistons and Valves
Place each piston into its chamber with a fresh seal to ensure a tight fit. Add springs and ensure valves seat properly before proceeding to the next step. Reinstall the wobble plate, making sure it is flat and aligned correctly.
Torque Housing Bolts Evenly
Insert the four housing bolts and tighten them diagonally in stages to avoid warping. Start hand-tight, then add a quarter turn at a time until snug. Do not over-tighten, as aluminum housings can crack under excessive pressure.
Reinstall the Unloader Valve
Insert the new or cleaned valve stem, then add the spring and white housing. Secure with the two Torx 30 screws and replace the outer cap and metal shield. Reconnect the detergent hose, using new tubing if you cut the old one earlier.
Prime, Test, and Maintain Your Pump
Never start a dry pump, as this causes immediate damage. Follow these final steps to bring your repaired machine back to life safely.
Prime the Pump Before Starting
Connect the garden hose to the inlet and turn on the water supply. Squeeze the trigger gun until water flows steadily to fill the pump and remove air. This step is critical to prevent overheating and seal damage during the first run.
Start and Test Operation
Reconnect power or fuel, then start the engine to begin testing. Squeeze the trigger and observe for steady pressure, proper drop when released, and no leaks. Listen for strange noises, and if pressure is weak, check for clogged nozzles or inlet filters.
Prevent Future Pump Failures
Regular maintenance extends the life of your pressure washer and prevents costly repairs. Simple habits keep your pump running at peak performance for years.
Use an Inlet Water Filter
Always install a mesh filter on the garden hose to catch debris before it enters the pump. Debris is a leading cause of valve and seal damage, so this simple step protects internal components.
Never Run the Pump Dry
Even 30 seconds without water can overheat and destroy seals permanently. Always prime the system first and ensure water is flowing before engaging the motor.
Change Pump Oil Regularly
Check oil every 50 hours or seasonally to monitor its condition. Milky oil means you must replace seals immediately to prevent further internal damage.
Store Properly for Longevity
Run pump saver fluid through the system for long-term storage to protect seals. This fluid prevents seals from drying out and stops corrosion during idle months.
Frequently Asked Questions About Pressure Washer Pump Repair
Why does my pressure washer lose pressure when I release the trigger?
This issue usually indicates a stuck or corroded unloader valve that fails to redirect water flow correctly. The inner shaft may be bent or pitted, preventing the valve from cycling as designed. Replacing the unloader valve typically resolves this specific symptom.
Can I fix a pressure washer pump with milky oil?
Milky oil means water has breached the internal seals, requiring immediate seal replacement. You must disassemble the pump, clean all components, and install a new seal kit to fix the leak. Continuing to run the pump with water in the oil will destroy bearings.
What tools do I need to remove a pressure washer pump?
You typically need a 9/16-inch wrench, an 8 mm Allen key, and a Torx 30 screwdriver. Needle-nose pliers are essential for extracting small valves, and nitrile gloves protect your hands. Having these tools ready before starting makes the job much smoother.
How often should I change the oil in my pressure washer pump?
Check the oil every 50 hours of use or at the start of each season. Change it immediately if it looks milky or gray, which indicates water intrusion. Regular oil changes significantly extend the life of your pump components.
Is it worth repairing an old pressure washer pump?
Repair is often cost-effective if the housing is intact and only seals or valves are worn. Replacing the unloader valve and seals can restore full power for a fraction of a new unit cost. However, severe scoring on pistons or cracks in the housing may require full replacement.
Key Takeaways for Fixing Your Pressure Washer Pump
Fixing a pressure washer pump involves diagnosing the unloader valve, replacing worn seals, and reassembling with care. Most failures stem from corrosion or dry running, both of which are preventable with proper maintenance. By following these steps, you can restore your machine’s power and extend its lifespan significantly.
Start by checking your oil and inspecting the unloader valve, as these are the most common failure points. Gather your tools and replacement parts before beginning to ensure a smooth repair process. With patience and attention to detail, your pressure washer will be ready for your next cleaning project.