How to Wash Car With Pressure Washer
Caked-on mud and road grime often resist standard garden hoses, tempting many owners to grab a pressure washer. Using the wrong technique or equipment can chip paint, crack trim, and force water into sensitive engine components.
This guide details exactly how to wash car with pressure washer tools while protecting your finish. You will learn the correct PSI limits, safe nozzle choices, and why you must still use the two-bucket hand wash method.
Select the Correct Electric Pressure Washer Specifications

Choosing the right machine is your first defense against permanent vehicle damage. Gasoline models often exceed safe power limits, making them dangerous for automotive finishes.
Why Electric Models Beat Gas Units
You should always opt for an electric pressure washer for cleaning vehicles. These units typically operate between 1,200 and 1,900 PSI, which provides enough force to remove dirt without stripping paint. Gas models frequently exceed 3,000 PSI, creating a high risk of etching clear coats and damaging seals.
Balance PSI and GPM Ratings
While PSI measures pressure, GPM (gallons per minute) determines rinsing efficiency. Many units have high pressure but low water volume, making soap removal difficult. Look for a balanced unit with at least 1.5 GPM to ensure you can rinse detergent effectively without leaving residue.
Choose Safe Nozzles to Protect Paint
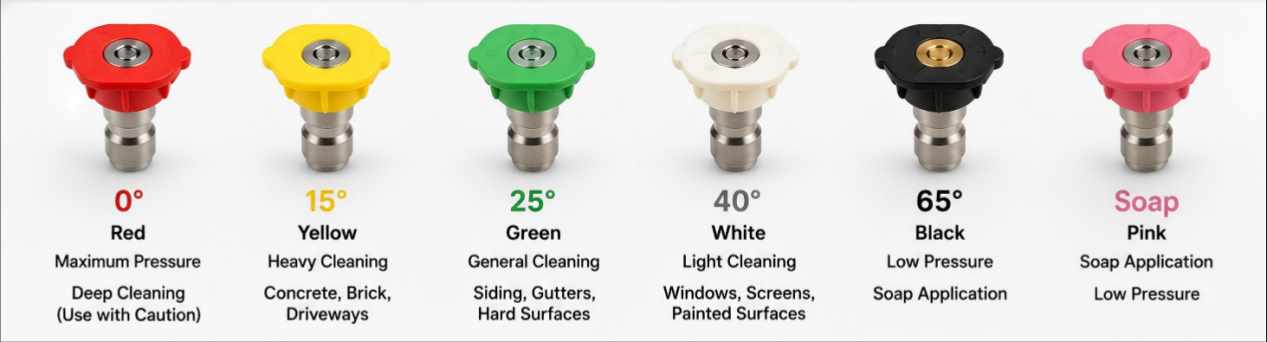
Selecting the correct spray tip is critical for balancing cleaning power with safety. Using the wrong color nozzle can instantly destroy your car’s finish.
Use the White 40-Degree Nozzle
The white 40-degree nozzle is your primary tool for washing painted surfaces. This wide-angle tip spreads water over a broad area, reducing impact force to prevent swirls. It is safe for use on paint, glass, and plastic trim during 90% of the washing process.
Reserve Green Tips for Wheels Only
The green 25-degree nozzle delivers concentrated pressure ideal for wheels, wheel wells, and undercarriages. These areas collect heavy brake dust and mud that require stronger force. Never use this tip on body panels unless absolutely necessary, and always maintain a distance of at least 18 inches.
Avoid Red and Yellow Nozzles Entirely
Never use 0-degree (red) or 15-degree (yellow) nozzles on any part of your vehicle. These create a laser-like jet capable of cutting through clear coat and cracking lenses. They are designed for industrial stripping and will force water past weather seals instantly.
Prepare Your Workspace and Vehicle Properly
Proper preparation prevents accidents and ensures a smooth cleaning process from start to finish. Skipping these steps can lead to scratched paint or water damage.
Park on Hard Flat Surfaces
Always wash your car on concrete or asphalt rather than gravel or dirt. A pressure washer can kick up loose stones, turning them into projectiles that chip paint or crack windshields. A flat surface also ensures even water runoff and prevents pooling around tires.
Avoid Direct Sunlight Exposure
Washing in direct sunlight causes soap and water to dry too quickly, leading to water spots and streaks. If possible, wash in the shade or during cooler parts of the day. If you must wash in the sun, work on one panel at a time and rinse immediately after applying soap.
Secure All Openings Tightly
Ensure all windows, sunroofs, doors, and trunks are fully closed before starting. Modern cars are water-resistant, not waterproof, so high-pressure spray can seep past seals. Double-check door handles and fuel caps to prevent water intrusion into the interior.
Prime the Wand Before Spraying the Car
The first burst of water from a pressure washer often exceeds its rated PSI rating. This initial surge can strip paint or crack lenses if directed at the vehicle immediately.
Release Initial Pressure Surge
Point the wand away from the car and pull the trigger briefly before starting your wash. This action releases the initial pressure spike and stabilizes the water flow. Never aim the wand at your vehicle the exact moment you turn the machine on.
Execute a Safe Pre-Rinse Strategy
The goal of the pre-rinse is to remove loose debris and soften contaminants without touching the paint. Proper technique here reduces the risk of scratching during the hand wash.
Start Three Feet Away From Paint
Begin your rinse from about 3 feet away to gently wet the surface and dislodge loose debris. Once the car is wet, you can move closer but never closer than 12 inches from the paint. Holding the nozzle too close increases pressure exponentially and can damage the finish.
Wash From Top to Bottom
Always work from the roof down to the wheels to prevent recontamination. Start with the roof, then hood, trunk, upper panels, lower panels, and finally wheels. Gravity helps keep your progress clean by ensuring dirty water flows away from cleaned areas.
Clean Front Grille and Wheel Wells Carefully
Specific areas require unique angles and tools to avoid mechanical damage while removing heavy grime.
Angle Spray to Protect Radiator
Never blast water straight into the front grille of your vehicle. High-pressure streams can penetrate radiator fins or the cooling system, potentially causing overheating. Instead, angle the spray downward at 45 degrees to clean the surface without forcing water inside.
Blast Wheel Wells with Higher Pressure
Switch to the green 25-degree nozzle to clean wheel wells, brake calipers, and undercarriage. These areas collect road salt and mud that need higher pressure to remove. Focus on crevices but avoid direct spray on ABS sensors, wiring harnesses, or rubber boots.
Apply Soap Using a Foam Lance System

Most built-in soap injectors produce sudsy water rather than thick, clinging foam. A dedicated system ensures the soap stays on the car long enough to work.
Use a Dedicated Foam Lance
Invest in a dedicated foam lance like the MTM Hydro model for real results. These attachments use pressure to mix air and soap, creating dense foam that sticks to vertical panels. This allows the chemicals to break down grime effectively during the dwell time.
Allow Proper Dwell Time
Fill the foam lance bottle with car shampoo diluted at the manufacturer’s ratio. Apply foam from top to bottom and let it sit for at least 5 minutes. Do not let it dry, especially in sunlight, as this can cause staining.
Agitate Surface With Two-Bucket Method

A pressure washer loosens dirt but does not replace the need for physical contact cleaning. You must use the two-bucket method to safely remove bonded particles.
Why Physical Agitation Is Required
Pressure washing alone leaves embedded particles that cause scratches. Use two buckets: one with car wash soap and one with clean rinse water. Place grit guards in both to trap dirt at the bottom and prevent it from returning to your mitt.
Wash One Panel at a Time
Dip a soft microfiber wash mitt into the soap bucket and wash one panel. Rinse the mitt in the clean bucket before reloading with soap. This prevents grit from being dragged across the paint, significantly reducing swirl marks.
Rinse Thoroughly With Wide Nozzle Settings
Effective rinsing removes all soap and suspended dirt to prevent streaking and residue buildup.
Switch Back to 40-Degree Tip
Return to the white 40-degree nozzle for the final rinse. Never rinse with a narrow tip or soap setting. Use a top-down approach again, rinsing each section 2–3 times to ensure all soap is flushed away.
Watch for Soap Residue
Pressure washers may leave behind soap film due to lower water volume. If you see suds lingering, make additional passes. Leftover soap dries into streaks and attracts dirt, so some users switch to a garden hose for the final rinse to increase water volume.
Dry Vehicle Immediately to Prevent Spots
Drying is the final critical step to prevent water spots and mineral deposits from forming on your paint.
Use Plush Microfiber Towels
Immediately dry the car with a clean, absorbent microfiber towel or chamois. Gently glide or blot the surface without rubbing aggressively. Use a waffle-weave drying towel for maximum water pickup and safety.
Avoid Air Drying in Hard Water
If you live in a region with hard water, air drying will leave mineral deposits and water spots. These can etch into the clear coat over time. Always towel dry or use a water blade for large, flat surfaces like hoods and trunks.
Prevent Water Spots With Filtration Systems

Water spots are a common complaint caused by minerals in tap water left behind after evaporation.
Install a Sediment Filter
Attach a carbon/sediment filter to your hose before it enters the pressure washer. This removes chlorine, sediment, and some minerals to improve rinse quality. For spot-free results, consider a deionizing (DI) filter, though it is pricier and better suited for professional detailers.
Handle Special Areas With Extra Care
Certain parts of your vehicle require specific techniques to avoid damage while ensuring a deep clean.
Clean Around Emblems and Trim
Pressure washers excel at flushing dirt from crevices, emblems, and trim lines. Use the water stream at an angle to clean around these areas rather than blasting them head-on. This prevents lifting adhesive or cracking plastic components.
Do Not Blast Bugs or Tar
Trying to power-wash off bugs or tar will damage the clear coat. Apply a dedicated bug and tar remover, let it dwell, then rinse gently. For stubborn residue, follow up with a clay bar instead of increasing pressure.
Avoid Common Mistakes and Risks
Understanding what not to do is just as important as knowing the correct steps for safety.
Don’t Use Narrow Nozzles on Paint
Red (0°) and yellow (15°) tips are dangerous for cars. They can etch paint, crack lenses, and damage rubber seals. Reserve these for concrete or brick cleaning only.
Don’t Hold Nozzle Too Close
Getting within 6 inches of the paint dramatically increases pressure beyond safe levels. Always maintain at least 12 inches of distance, even on wheels. Let the detergent and agitation do the work, not brute force.
Don’t Skip the Hand Wash Step
Using only a pressure washer leads to swirls and scratches because dirt remains embedded. Always follow up with the two-bucket method for safe, thorough cleaning.
Frequently Asked Questions About Washing Cars With Pressure Washers
What PSI is safe for washing a car?
You should use an electric pressure washer rated between 1,200 and 1,900 PSI. Anything above 2,000 PSI, especially gas models over 3,000 PSI, poses a high risk of stripping paint and damaging seals.
Can I use a pressure washer to remove bugs?
No, you should never blast bugs off with high pressure as it damages the clear coat. Instead, apply a dedicated bug remover, let it dwell, and gently rinse or use a clay bar for removal.
How far should I hold the pressure washer nozzle?
Start your rinse from 3 feet away and never get closer than 12 inches to painted surfaces. Holding the nozzle closer increases pressure exponentially and can cause immediate paint damage.
Do I still need to hand wash after pressure rinsing?
Yes, a pressure washer only loosens dirt and does not replace physical agitation. You must use the two-bucket hand wash method to safely remove bonded contaminants without scratching the paint.
Which nozzle color is safest for car paint?
The white 40-degree nozzle is the safest and most effective tip for painted surfaces, glass, and trim. Avoid red and yellow tips entirely, and reserve the green 25-degree tip for wheels only.
Key Takeaways for Washing Your Car With a Pressure Washer
Washing your car with a pressure washer requires strict adherence to safety guidelines to avoid costly damage. Always use an electric unit under 1,900 PSI, stick to the white 40-degree nozzle for paint, and maintain a minimum distance of 12 inches.
Remember that this tool is for pre-rinsing and rinsing, not replacing the hand wash. Integrate the two-bucket method for agitation to ensure a swirl-free, showroom-quality finish every time.