Washing Machine Timer Repair Guide
Is your washing machine stuck on one cycle? It fills with water but won’t agitate, drain, or spin, and the timer knob isn’t moving. You’re not alone. A washing machine timer repair can often solve this frustrating problem, especially in older top-loading models from Whirlpool, Kenmore, Maytag, or GE. While modern machines rely on digital control boards, many durable units still use mechanical timers, and the good news is they’re repairable.
The timer controls every phase of the wash cycle: fill, agitate, rinse, drain, and spin. When it fails, the machine stalls. But before you call a technician or replace the entire unit, check this guide. You might save $200 or more with a simple fix. In fact, most timer-related issues aren’t even the timer is fault. Problems like a failed lid switch or clogged pressure hose mimic timer failure. This step-by-step guide shows you how to diagnose, clean, repair, or replace your washing machine timer the right way.
Identify Timer Failure Symptoms
Washer Fills But Won’t Agitate or Spin
If your washing machine fills with water but then stops, with no agitation, no drain, and no spin, the timer may not be advancing. This is one of the most common signs of a faulty timer or related component. However, don’t assume the timer is dead yet. Other parts like the lid switch or pressure switch can cause identical behavior.
Start by listening carefully to your machine. Does the motor hum briefly after filling? Is there any clicking from the control panel? Does the timer knob remain motionless even when the machine seems powered? On some models, a small yellow tab inside the timer dial should rotate during active cycles. If it’s stationary after filling, the timer isn’t advancing, which is a strong indicator of failure.
Timer Knob Stuck or Slipping
A stiff, hard-to-turn knob may mean internal mechanical wear. Conversely, if the knob turns freely but the shaft doesn’t move, the plastic gear inside may be stripped. This is common in older Whirlpool and Kenmore direct-drive models over 15 years old.
Check for visible signs of damage. Look for cracks in the knob base and loss of grip on the metal insert. If the knob spins without engaging the timer shaft, it needs replacement. But if the internal mechanism won’t advance even when manually rotated, the issue lies deeper, possibly in the gear train or electrical contacts.
Rule Out Common False Failures
Test the Lid Switch First
Before touching the timer, test the lid switch. It’s the most common cause of cycle advancement failure. This safety device cuts power to the motor and timer unless the lid is fully closed.
To test the lid switch, unplug the washer and remove the top panel, usually two screws at the back. Locate the lid switch near the door latch. Use a multimeter set to Rx1 resistance. Press the switch button and check for continuity. A reading of zero ohms means it’s working. Any other value, especially infinite resistance, means it’s faulty.
Pro Tip: Some switches work when tested alone but fail under load. If everything else checks out, replace the lid switch anyway. It’s only about $10.
In one documented case, a washer stalled after draining. The timer appeared dead, but replacing the lid switch fixed it completely.
Check the Pressure Switch and Hose
The water level control, also called the pressure switch, tells the timer when the tub has reached the correct water level. If it fails, the timer won’t receive the signal to advance.
To inspect the pressure switch, unplug the machine. Find the small air hose running from the tub to the switch, usually on the control panel. Disconnect it and blow through the hose. Look for bubbles, which mean the hose is leaking. Check for kinks, cracks, or blockages. If the hose is intact but the machine still won’t advance, suspect a failed pressure switch. Replace it, typically costing $30 to $60.
Inspect Drain Pump and Inlet Valve
A clogged or failed drain pump can prevent the cycle from moving past the drain phase. Similarly, a stuck water inlet valve can stop the machine from filling, making it seem like the timer isn’t working.
For the drain pump, remove the front panel. Check for leaks, clogs, or seized impellers. Listen for buzzing during drain attempts. For the inlet valve, ensure water hoses are open and screens are clean. Test solenoid continuity with a multimeter. Infinite resistance means it’s dead, and it needs replacement.
Only after ruling out these components should you focus on the timer itself.
Locate and Access the Timer

Find the Timer on the Control Panel
The washing machine timer is almost always located on the control panel, either at the top front or back edge of the machine. It has a shaft that extends through the panel, allowing the knob to be attached.
On most top-loading models, the timer sits behind the knob on the console. It connects to multiple wires via spade terminals. It may be held in place by clips or mounting nuts. To access it, unplug the washer. Remove rear cabinet screws, one per side on Whirlpool models. Slide the top panel backward and lift it off. Locate the timer and surrounding wiring. Take a photo of the wire layout before disconnecting anything.
Tools You Will Need for Repair
Essential Tools for Timer Work
You will need specific tools to work on a washing machine timer repair. Having the right tools makes the job faster and safer. A multimeter is non-negotiable. You will need it to test switches and verify continuity.
Gather these tools before starting. Use a flat putty knife to release timer cover clips. Use screwdrivers, both Phillips and flat, to remove panels and screws. Use a nut driver or wrench to loosen mounting hardware. Use a multimeter to test continuity and voltage. Use a razor blade or thin pry tool to open timer housing. Use cotton swabs and rubbing alcohol to clean electrical contacts. Use a fine file or metal scraper to smooth pitted contacts. Use needle-nose pliers to handle small connectors. Use a camera or smartphone to document your wiring setup. Wear safety gloves and goggles to protect against electrical risks.
Warning: Always unplug the machine before starting. Never work on live circuits.
Disassemble the Timer Safely
Remove Timer Cover and Knob
Start by removing the timer cover. Insert a flat putty knife between the control panel and the cover to release the retaining clips. Gently pull upward to detach.
Next, remove the timer knob. Pull straight off the shaft. Some knobs have a hidden set screw or retaining clip. Check under a cap or in a small slot. Use a flat-head screwdriver in the rear slot if needed. Avoid breaking the small plastic tabs that hold it in place. Once the knob is off, you will see the timer body mounted in the panel.
Extract the Timer Body
Locate a small tab underneath the timer. Lift it and slide the unit forward to release it from the housing. It will disconnect from the control shaft and electrical connector. Set it aside for inspection. If you are replacing it, note the part number, usually printed on the housing.
Inspect and Clean Internal Contacts
Spot Pitted or Corroded Contacts
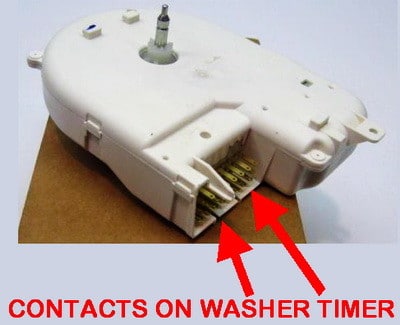
Open the timer housing by pressing the side tabs or carefully cutting a security seal if present. Inside, you will see a series of electrical contacts activated by a cam mechanism.
Look for dark spots or pitting. These are signs of arcing. Look for white corrosion or oxidation. This reduces conductivity. Look for burnt or melted areas. These indicate overheating. These defects prevent proper electrical flow and stop the timer from sending signals to the motor or valves.
Clean Contacts With Alcohol and File
To restore function, use a fine file or metal scraper to gently smooth pitted areas. Wipe all surfaces with rubbing alcohol and a cotton swab. Repeat until contacts are shiny and residue-free. Ensure angled contacts align with their actuators upon reassembly.
This simple cleaning fixes many dead timers. In fact, surface oxidation accounts for a large percentage of perceived timer failures. Clean both top and bottom contact layers. Lift upper sections carefully to access hidden surfaces.
Repair Stripped Timer Gears
Diagnose Gear Train Wear
In older Whirlpool and Kenmore models from the 1980s to 2000s, the most common timer failure is mechanical, not electrical. The inner-shaft gear wears down over time, especially after 15 or more years of use.
To check the gear train, open the timer housing. Rotate the shaft manually. Watch the gear train. Does it turn smoothly? Inspect the small plastic gear on the shaft. Is it bald or stripped? If the motor runs but the cam does not turn, the gear is likely stripped.
Fix With Epoxy or Replace Base
You have two options for repairing stripped gears.
Option one is epoxy rebuild, which is a budget fix. Apply epoxy adhesive to the shaft. Reattach the gear and let cure for 24 hours. This works well for personal use. It is low cost, under $5, and has medium durability.
Option two is replacing the timer base, which is a permanent fix. Use a donor timer from a compatible model. Transfer your original wiring and contacts. Drill pilot holes and secure with small screws. This offers long-term reliability and is ideal for repair professionals. Many technicians prefer the base-swap method for lasting results.
Test Timer With Multimeter
Check for Continuity Across Terminals
Testing the timer confirms whether it is electrically functional.
Set your multimeter to Rx1, which is resistance times one. Refer to the wiring diagram, usually inside the cabinet or on the timer. Touch probes to terminals that control the motor and water valve. Rotate the timer knob slowly through the cycle.
Look for zero or near-zero ohms. This means good continuity. Look for infinite resistance. This means open circuit and a faulty timer. Test multiple terminal pairs, especially those active during wash, rinse, and spin.
Expert Note: Some timers have internal cams that open and close contacts at precise times. Mechanical failure here can prevent advancement even if continuity seems okay.
If no continuity is detected where expected, replace the timer.
Install a New Timer Correctly
Match Part Number Exactly
Replacement timers must match the exact model and part number. Aftermarket units may look identical but have different terminal layouts. Always cross-reference with your machine’s manual or a reliable parts database. OEM timers cost more but are more reliable than generic brands.
Reconnect Wires Precisely
Use your photo or diagram to reconnect each wire. Push spade connectors firmly onto terminals until they click. Double-check every connection. One miswired terminal can prevent operation or damage components.
Common terminal labels include L for line power, T for timer motor, M for motor, P for pump, and W for water valve. Secure the timer in place and reassemble the control panel.
Reassemble and Test the Washer
Reattach Knob and Cover
Before powering on, slide the timer back into the panel until it clicks. Reconnect the electrical plug. Reinstall the knob. Press firmly until seated. Snap the cover back into place. Replace any removed panels. Manually rotate the knob. It should turn smoothly without binding.
Run a Full Cycle Test
Plug in the washer and set it to a regular cycle. Watch for proper fill, agitate, drain, and spin sequence. Watch for automatic advancement without user input. Watch for movement of the yellow tab if your model has one.
If the machine stalls again, recheck the lid switch functionality. Recheck wire connections. Recheck drain pump operation. A burning smell or smoke means immediate power disconnection. This likely means a short from crossed wires.
Troubleshoot Post-Repair Issues
Washer Won’t Start After Replacement
Most often this is caused by incorrect wiring. Recheck all connections against the wiring diagram. Verify that the timer motor and main power are correctly connected. Also confirm the lid switch is working, the power outlet is live, and the breaker has not tripped.
Knob Hard to Turn or Slips
If the knob won’t turn, the shaft may be misaligned. Remove and reinsert it, ensuring the flat edge matches the divot in the housing. If it slips, the knob is worn. Replace it. Avoid forcing the knob. Always turn gently.
Machine Fills But Does Nothing Else
This usually means the timer is not sending power to the motor. Retest the M terminal for continuity. Also check the drive belt condition. Check the motor winding resistance. Check the grounding and voltage supply. A failed lid switch can also block motor activation, even if the timer is good.
Timer vs. Electronic Control Boards
Why Mechanical Timers Are Easier to Fix
Mechanical timers are more repairable than digital control boards. Replacement costs for mechanical timers range from $30 to $80, while electronic boards cost $100 to $250. Diagnostic methods differ. Mechanical timers use visual inspection and multimeter testing. Electronic boards require error codes and tech mode. Mechanical timers last 5 to 10 years. Electronic boards last 7 to 12 years but are prone to sudden failure. Parts for mechanical timers are widely available. Electronic boards are model-specific and may be discontinued.
Insight: While digital boards offer more features, mechanical timers win on repairability and cost.
This makes older machines with timers a smart long-term choice, especially if you are willing to do your own maintenance.
Prevent Future Timer Problems
Maintain Control Panel Dry
Moisture causes corrosion on timer contacts. Keep the control panel dry. Avoid spraying cleaners directly on it. Wipe with a damp cloth instead.
Avoid Forcing the Knob
Never yank or force the timer knob. Always turn it gently to the nearest cycle setting. Forcing it can strip gears or damage internal switches.
Inspect Wires Annually
Once a year, unplug the washer and check for loose or corroded wire connections. Check for discoloration or melting at terminals. Check for frayed insulation. Tighten any loose spade connectors and replace damaged wires.
When to Replace vs. Repair the Timer
Repair If Contacts Are Only Oxidized
If contacts are only oxidized, they are cleanable. If a single gear is stripped, it is epoxy fixable. If the housing is intact and there are no burn marks, repair is viable.
Replace If Internal Circuitry Is Burned Out
If internal circuitry is burned out, replace the timer. If multiple gears are destroyed, replace it. If the case is cracked, replace it. If there is no continuity across key terminals, replace it.
A new timer costs $80 to $150 but lasts 5 to 10 years. For heavily damaged units, replacement is safer and more reliable.
Final Tip: Save the old timer. It may have usable parts for future repairs.
Final Thoughts on Washing Machine Timer Repair
Most washing machine timer issues are misdiagnosed. The real culprit is often the lid switch, pressure hose, or inlet valve. Always test auxiliary components first. With a multimeter, some alcohol, and a few basic tools, you can clean, repair, or replace a timer in under two hours, saving hundreds in service fees. By mastering this repair, you extend the life of a reliable appliance and gain confidence in tackling future fixes.
Frequently Asked Questions About Washing Machine Timer Repair
How Do I Know If My Washing Machine Timer Is Bad?
Signs of a bad timer include the machine filling with water but not agitating or spinning. The timer knob may remain stationary during the cycle. The washer may stall after draining and fail to advance to the next phase. A humming motor without movement can also indicate timer failure.
Can I Repair a Washing Machine Timer Myself?
Yes, you can repair a washing machine timer yourself with basic tools. You need a multimeter, screwdrivers, and cleaning supplies. Many timer issues are caused by dirty contacts, which you can clean with rubbing alcohol. Mechanical failures like stripped gears can sometimes be repaired with epoxy.
How Much Does a Washing Machine Timer Repair Cost?
DIY repair costs range from $0 to $80, depending on whether you clean contacts or replace parts. Professional repair typically costs $150 to $300, including labor. A new timer replacement part costs $30 to $80 for mechanical timers.
What Is the Most Common Cause of Timer Failure?
The most common cause of timer failure is dirty or corroded electrical contacts. Oxidation prevents proper electrical flow. In older Whirlpool and Kenmore models, stripped gears are also common. The lid switch is often mistaken for timer failure, so test it first.
How Long Does a Washing Machine Timer Last?
A mechanical washing machine timer typically lasts 5 to 10 years with regular use. Factors that affect lifespan include frequency of use, environmental humidity, and water quality. Timers in older models from the 1980s to 2000s often last 15 to 20 years with proper maintenance.
Do I Need to Replace the Timer or Just Clean the Contacts?
Start by cleaning the contacts. If the timer still does not advance after cleaning, test it with a multimeter. If there is no continuity across key terminals, replace the timer. If the gear is stripped, repair it with epoxy or replace the base.