Washing Machine Transmission Repair: Quick Fix Guide
If your washing machine runs but the tub won’t spin or agitate, the culprit is likely a failed transmission, especially in Whirlpool, Maytag, or Kenmore top-load models. The washing machine transmission acts as the mechanical heart, switching between agitation and high-speed spin using internal gears, pawls, and clutches. Unlike front-loaders that use direct-drive motors, many top-loaders rely on serviceable gearboxes that can be rebuilt rather than replaced. With the right tools and knowledge, you can save hundreds compared to professional repair or replacement costs. This guide covers everything from diagnosing failure signs to step-by-step rebuild procedures, clutch upgrades, and cost-effective repair decisions.
Recognize These Transmission Failure Signs
Washer Won’t Spin But Motor Runs
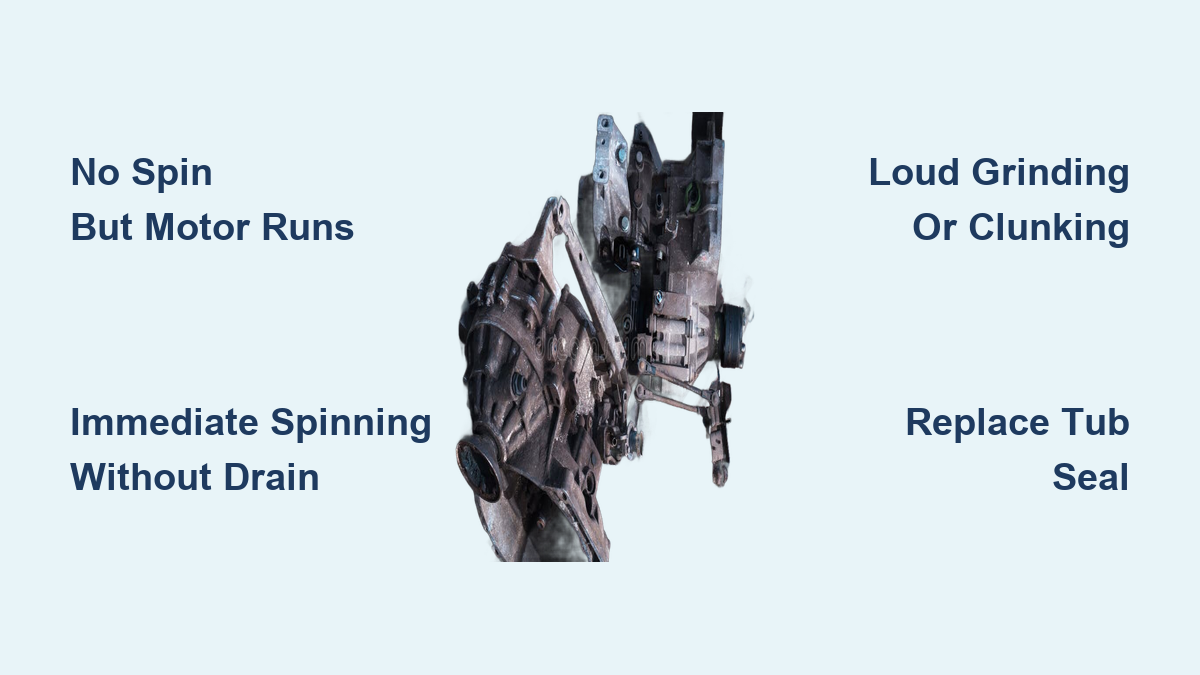
If the motor hums and the input shaft turns but the basket stays still, power is not transferring through the transmission. This points to internal failure, and common causes include broken shoulder pawl studs, failed neutral drain kits, missing hockey-puck discs, and worn clutch assemblies.
Quick Test: Manually rotate the spin gear. It should turn freely clockwise for agitation mode and lock counterclockwise for spin engagement. If it spins both ways, the locking mechanism has failed.
Immediate Spinning Without Draining
When the washer jumps straight into spin without pausing to drain water, the neutral drain function is compromised. This typically means degraded plastic neutral gear, misaligned base plates, or lost spring tension in the shift mechanism. This symptom often fools users into thinking the timer or pump is faulty, when in fact the transmission is not disengaging properly.
Loud Grinding or Clunking Noises
Unusual sounds during agitation or spin indicate mechanical wear. Grinding means worn bearings or chipped gears. Clunking means broken pawls or loose shifting fork. Whirring means failed clutch or slipping components. Inspect oil for metal shavings, which is a sure sign of internal damage.
Identify Your Transmission Model

Whirlpool 3360629 and 388253 Systems
These are the most common direct-drive transmissions found in Whirlpool, Amana, and some Kenmore top-loaders. Key features include no solenoid or electronic shifter, shifts based on motor rotation direction, serviceable internals including gears, clutch, and neutral drain pack, and uses SAE 8W90 gear oil.
Always verify compatibility using your full model number, which is usually located under the lid or on the back panel.
Maytag and Whirlpool Cabrio Gearboxes
Models like W11393685 and W11454734 use shift actuators controlled by motor direction or electronic signals. They share internal designs with Whirlpool but are more prone to bearing wear, fork misalignment, and actuator failure. Despite added complexity, these units are rebuildable with proper kits.
Kenmore Maytag-Based Units
Kenmore models such as WH03X33729 and WH03X34378 often mirror Maytag designs. They are fully serviceable and benefit from the same upgrade parts.
Important: Transmissions are not cross-compatible, even within brands. Always match by full model number.
Diagnose Transmission Problems Before Opening the Gear Case
Rule Out False Positives
Before diving into transmission repair, eliminate simpler issues. Lid switch failure prevents spin cycle, so test with a multimeter. Mud buildup between inner basket and outer tub creates drag, so clean thoroughly. Motor coupling break is common in older models and allows motor to run but no power transfer. Failed pump causes poor drainage, mimicking neutral drain issues.
One machine with intermittent spin issues was fixed by removing caked mud between the basket and tub, with no transmission work needed.
Oil Leak Inspection
Find oil pooled under the washer? Check the transmission cover seal for leaks due to loose screws or failed sealant. Check the tub seal for allowing water into the gear case. Look for milky-brown oil, which signals water contamination. Clear oil means healthy. Milky oil means replace tub seal and rebuild transmission.
Collect Tools for Washing Machine Transmission Repair
You will need precision tools to avoid damage during the repair process.
Required repair kit includes a 7/16 inch socket for removing the agitator bolt, a 5/16 inch socket or wrench for transmission mounting bolts, a 5/32 inch Allen wrench for the neutral drain kit plate, retaining-ring pliers for snap rings on the shaft, a flat-blade screwdriver for panel clips and cover removal, a putty knife for console release, and a 2 by 4 wooden block to support transmission during disassembly.
Optional but helpful tools include an arbour press for extracting broken studs, Varsol or degreaser for cleaning components, and an SOS pad for prepping sealing surfaces.
Pro Tip: Wear vinyl mechanic’s gloves because gear oil stains are hard to remove and edges inside the cabinet can cut hands.
Safely Remove Your Washer Transmission
Disconnect Power and Water
Unplug the washer. Shut off hot and cold water valves. Disconnect inlet hoses and drain line. Run a spin cycle to empty water if possible.
Access Internal Components
Remove the rear panel by unscrewing two screws and lifting up. Flip the console forward by using a putty knife to release clips without straining wires. Lift the outer cabinet by releasing side clips or screws.
Pull off the agitator by removing the cap and O-ring, using a 7/16 inch socket on the center bolt, and lifting straight up while rocking gently if stuck.
Remove the inner basket by using a spanner wrench on the large retaining nut and lifting carefully off the hub.
Detach the motor and outer tub by disconnecting suspension rods, hoses, and wiring, then unbolting the motor from the transmission.
Extract the transmission by supporting it with a 2 by 4 block, removing the five 5/16 inch frame bolts, and lowering the assembly slowly.
Inspect the Gear Case for Damage
Drain and Evaluate Oil
Drain oil into a clean jar. Clear oil is reusable if filtered. Milky-brown oil means water intrusion, so replace the tub seal and clean thoroughly.
Refill later with SAE 8W90 gear oil, about 1 to 2 cups depending on the model.
Remove the Top Cover
Unscrew all lid screws. Gently pry with a flat-blade screwdriver. Remove the snap ring from the shaft using retaining-ring pliers.
Expose internal components carefully because small parts can fall out during removal.
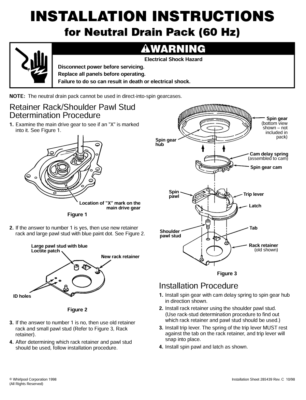
Replace the Neutral Drain Kit
Why This Kit Fails
The neutral drain system allows the washer to pause between wash and spin. Over time, plastic gears degrade, spring tension weakens, and studs break from stress or thread locker.
Installation Steps
Use a 5/32 inch Allen wrench to remove the mounting plate. The kit includes a new neutral gear, two base plates matching the original hole count, spring-loaded parts, and replacement studs.
Ensure all parts marked up face upward. Seat the spring so it engages the square catch; it should not move when pressed. Slide the final piece in and gently turn the gear until plastic pops into alignment.
Critical: Neutral gear fits only one way, so align the hole correctly.
Fix a Broken Shoulder Pawl Stud
The Hidden Weak Point
The shoulder pawl stud acts as a pivot for the rack retainer. Factory thread locker often causes the stud to snap under stress, leaving threads embedded in the main gear.
Extraction Process
Drill a pilot hole into the broken stud. Use an Easy-Out tool with an arbour press for clean removal. Avoid damaging surrounding threads.
One repair technician broke a drill bit during extraction but succeeded with a borrowed arbour press and confirmed Loctite was present on the broken stud.
Replace with a new stud from the neutral drain kit.
Upgrade the Clutch for Longevity

Why Replace It
Even if the clutch appears intact, pads wear over time. Symptoms include slippage during spin, reduced basket speed, and burning smell. A worn clutch mimics transmission failure.
Install Commercial 6-Pad Clutch
Part number 8299642 is thicker and more durable than the OEM 3-pad version. It is rated for 10 to 20 years of use and is ideal for heavy laundry loads.
Installation tips include starting the retaining ring in one spot and then seating it fully with a flat-blade screwdriver. Install the C-clip and cover. Never apply grease to clutch pads because it causes slippage. Clean the shaft and apply a thin oil coat before reassembly.
Reassemble With Precision
Seal Without a Gasket
Most transmissions use no gasket and instead rely on sealant. Clean mating surfaces with alcohol pads. Apply a thin bead of 3M red sealant around the edge. Press the cover on firmly because excess sealant can contaminate oil.
Reinstall Key Components
Replace the spacer or washer and retaining ring. Secure with five 5/16 inch bolts. Use blue Loctite on the new hex nut, not pink, because they are chemically incompatible. Never reuse an old nut because Loctite ensures long-term hold.
Apply thread locker to the Allen-key screw to prevent vibration loosening.
Test Before Final Reassembly
Manual Rotation Check
With power off, turn the output gear clockwise. It should spin freely for agitation mode. Turn it counterclockwise. It should lock for spin engagement. If it locks the wrong way, disassemble and check gear orientation.
Temporary Motor Test
Reconnect the motor temporarily. Run a spin cycle dry and empty. Confirm smooth engagement, neutral drain pause, full-speed spin, and no grinding or resistance. Failures here mean internal misalignment, so disassemble and recheck.
Refill With Correct Gear Oil
Use SAE 8W90 or SAE 90 weight gear oil, standard in most rebuild kits, costing about $6. Alternative is SAE 90 weight gear oil from auto parts stores. Fill after full reassembly with 1 to 2 cups depending on the model.
Reuse drained oil only if it is clean and clear, never if milky. Ensure oil covers internal gears and bearing surfaces.
Reinstall and Run Final Test
Reverse Assembly Order
Mount the transmission and secure bolts. Reconnect motor, wiring, and hoses. Reinstall inner basket and spanner nut. Replace agitator and bolt. Refit cabinet, console, and back panel. Reconnect water and drain lines. Plug in and restore water supply.
Perform Full Cycle Test
Run an empty wash cycle and watch for strong agitation. Listen for neutral drain pause. Confirm high-speed spin. Check for leaks under the machine. Note any abnormal noise.
After rebuild and oil refill, all test units operated flawlessly.
Decide: Repair or Replace
Cost Comparison
The total DIY cost is approximately $73, including a neutral drain kit for $17 plus $6 shipping, a 6-pad clutch upgrade for about $40, gear oil for $6, and 3M red sealant for $10. Professional labor costs $75 to $150 per hour, making total professional repair $350 to $700 or more. A new washer costs $600 to $900.
One technician fixed a 15-year-old Whirlpool for $23, saving over $300 compared to professional repair.
Apply the 50 Percent Rule
If repair cost exceeds 50 percent of a new washer’s price, consider replacement. Machines over 10 years old may not justify major repairs. But if you are DIY-capable, rebuilding extends life at minimal cost.
Prevent Future Failures
Maintain your washer by avoiding overloading, which reduces strain on gears and clutch. Balance loads to prevent violent shaking and bearing wear. Check pockets to stop foreign objects from jamming the pump or transmission. Use correct cycles to prevent unnecessary mechanical stress. Clean the tub monthly to reduce mud buildup between baskets. Address leaks early to prevent water damage to gear oil and seals.
Thick or dirty oil can immobilize a mechanically sound transmission, so cleanliness matters.
Know When to Rebuild or Replace
Rebuild If
The transmission has serviceable housing. Internal parts are reusable. Failure is due to missing or worn components. Parts cost far less than a new unit.
Replace If
The unit is sealed with no serviceable parts. The housing is cracked or shaft is broken. There are repeated failures after rebuild. Bearing failure cannot be isolated.
Combine functional parts from donor units. Salvage gears, bearings, and forks to build one working transmission.
Do Not Skip the Tub Seal
When installing a new or rebuilt transmission, replace the tub seal where the shaft enters the tub. Removal often damages the old seal. Skipping this risks water leaks into the chassis and motor area. It is a small part with big consequences.
Frequently Asked Questions About Washing Machine Transmission Repair
How Do I Know If My Washing Machine Transmission Is Bad
Signs of a bad transmission include the washer not spinning despite the motor running, immediate spinning without draining water first, loud grinding or clunking noises during operation, and oil leaks under the machine. Manually rotating the spin gear helps diagnose the issue: it should spin freely clockwise but lock counterclockwise.
Can I Repair a Washing Machine Transmission Myself
Yes, you can repair the transmission yourself if you have basic mechanical skills and the right tools. The process involves removing the transmission, replacing the neutral drain kit and clutch, cleaning internal components, and refilling with gear oil. DIY repair costs around $73 compared to $350 to $700 for professional service.
What Oil Goes in a Washing Machine Transmission
Use SAE 8W90 gear oil or SAE 90 weight gear oil. Most rebuild kits include a small bottle, or you can purchase it from auto parts stores for about $6. Fill with 1 to 2 cups depending on your model. Only reuse old oil if it is clean and clear, never if it appears milky or contaminated.
How Long Does a Washing Machine Transmission Last
A properly rebuilt transmission with a 6-pad clutch upgrade can last 10 to 20 years. Regular maintenance, avoiding overloading, and addressing leaks promptly extend the lifespan significantly.
What Is a Neutral Drain Kit and Why Does It Fail
The neutral drain kit allows the washer to pause between wash and spin cycles so water can drain. It fails because plastic gears degrade over time, spring tension weakens, and studs break from stress or factory thread locker. This is the most common transmission failure in top-load washers.
Should I Replace the Transmission or Buy a New Washer
Apply the 50 percent rule: if repair costs exceed 50 percent of a new washer price, consider replacement. Also factor in the machine age. Washers over 10 years old may not justify major repairs. However, DIY repair is often worthwhile because it costs under $100 versus $600 to $900 for a new unit.
Key Takeaways for Washing Machine Transmission Repair
Neutral drain failure is the hallmark symptom of transmission problems. Always use SAE 8W90 gear oil and reuse it only if clean. All parts marked up must face upward during installation. Apply blue Loctite on the new hex nut and never reuse the old nut. Seal the cover with 3M red sealant, not a gasket. Upgrade to a 6-pad clutch for durability lasting 10 to 20 years. Test manually and electrically before full reassembly. The hockey-puck disc is critical, and its absence kills spin function. Cleanliness prevents failure because dirty oil immobilizes good mechanics. Reuse functional parts from donor units to cut costs. Replace the tub seal with every transmission job. Apply thread locker to the Allen screw to resist vibration. Always verify model compatibility because transmissions are not interchangeable across brands or models.
With the right approach, washing machine transmission repair is not just feasible. It is empowering. Whether you are saving money or extending appliance life sustainably, this repair puts control back in your hands.