How to Fix Pressure Washer Unloader Valve
If your pressure washer engine locks up or stalls the moment you connect the water supply, a faulty unloader valve is likely the culprit. This critical component regulates internal pressure, and when it fails, trapped water prevents the engine from turning over.
This guide explains how to diagnose the issue, identify your specific valve type, and perform repairs using basic tools. You will learn to clean clogged ports, replace worn O-rings, and reassemble your unit to restore full power without expensive professional help.
Identify Specific Failure Symptoms
Confirming the unloader valve is the root cause prevents unnecessary disassembly of other engine parts. Specific symptoms point directly to this component rather than fuel or ignition issues.
Common Signs of Valve Failure
Look for these distinct indicators before gathering your tools:
* The engine refuses to start while the water supply is connected.
* The motor stalls immediately as pressure begins to build.
* Internal shafts feel stiff or frozen when manually tested.
* Visible water leaks appear around the valve body or housing.
* Spray pressure fluctuates wildly during operation.
If the engine starts smoothly with the water off but locks up when connected, the unloader valve is almost certainly preventing proper water bypass.
Determine Your Valve Type
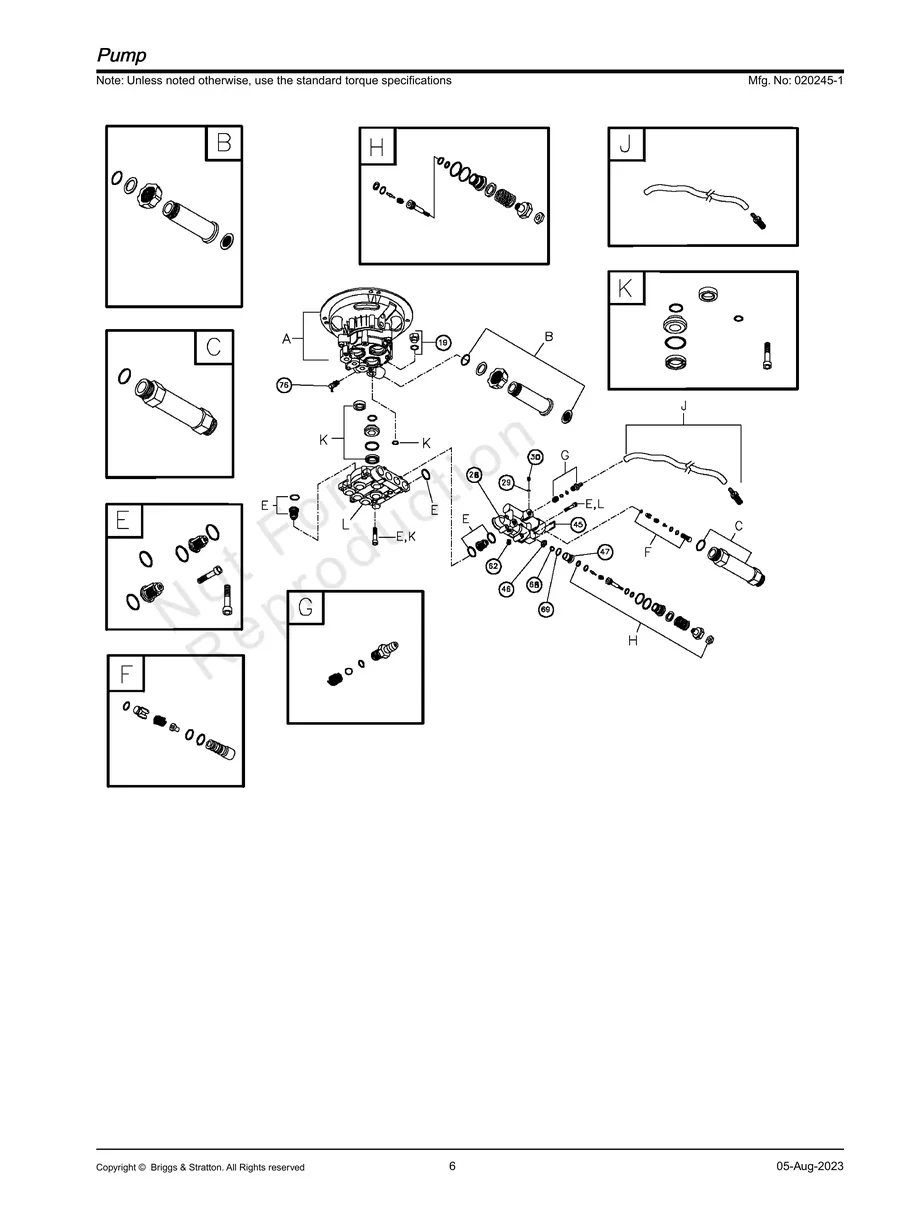
Repair methods vary significantly based on how the valve secures to the pump head. Identifying your model ensures you use the correct extraction technique.
Retaining Pin Style Valves
These units use a small metal pin to hold the assembly in place. You will see a U-shaped or straight pin crossing the valve base. Removal requires prying out this pin rather than unscrewing a large nut.
Threaded Nut Adjustable Valves
Common on older units and brands like Troybuilt 2700 PSI, these feature a large hexagonal nut on top. An Allen screw in the center often allows for pressure adjustment. A 21 mm wrench is typically required for removal.
Ball-and-Seat Configurations
Found on specific models like the 90037 pump series, these use a steel ball and rubber seat system. A metal clip secures the handle, and removing it exposes the seat for unscrewing.
Gather Tools and Parts
Having the correct inventory ready prevents interruptions during the repair process. Most fixes require only common hand tools and a few specific consumables.
Essential Tools Required
- 21 mm wrench for threaded valve nuts
- 22 mm wrench for 90037 style valves
- Allen wrench set for adjustment screws
- Flathead screwdriver for pins and clips
- Pick tool or needle-nose pliers
- Thin wire or safety pin for port cleaning
- Fine steel wool or SOS pad
- Soft mallet for seating components
Replacement Parts Inventory
- Universal O-ring kit with 10 mm and 11 mm sizes
- Penetrating oil like PB Blaster
- Silicone grease or food-grade Vaseline
- Replacement steel ball and seat if needed
- Heavy-duty spring matching your PSI rating
Free a Seized Unloader Valve
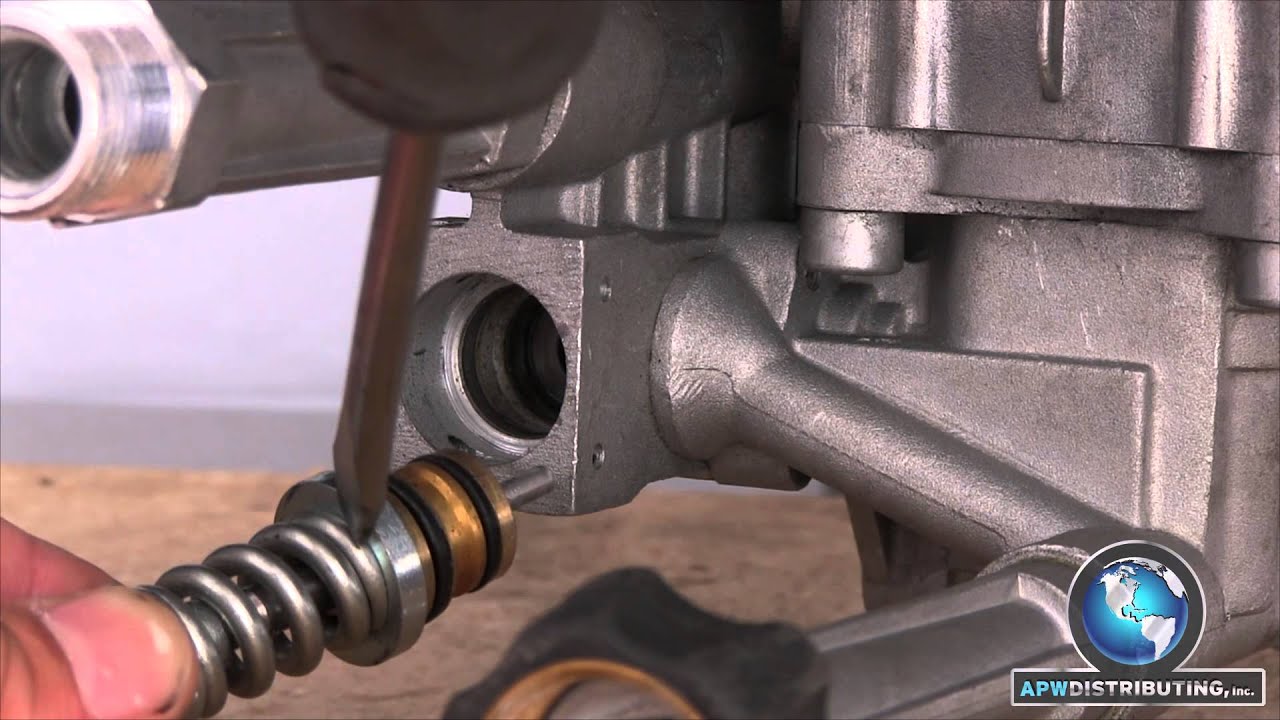
Valves often seize after long storage periods due to corrosion or mineral buildup. Freeing the mechanism is the first step in any repair.
Remove the Retaining Pin
Locate the metal pin securing the valve body. Slide a flathead screwdriver under one end and gently pry it outward until it slides free. Set this pin aside safely for reassembly. Apply penetrating oil if the pin feels corroded.
Extract the Valve Assembly
Place a screwdriver behind the internal spring and apply steady upward pressure. The entire unit should pop out of the housing. Never hammer the valve out as this can crack the brass pump housing. Inspect the shaft movement once removed to confirm it was seized.
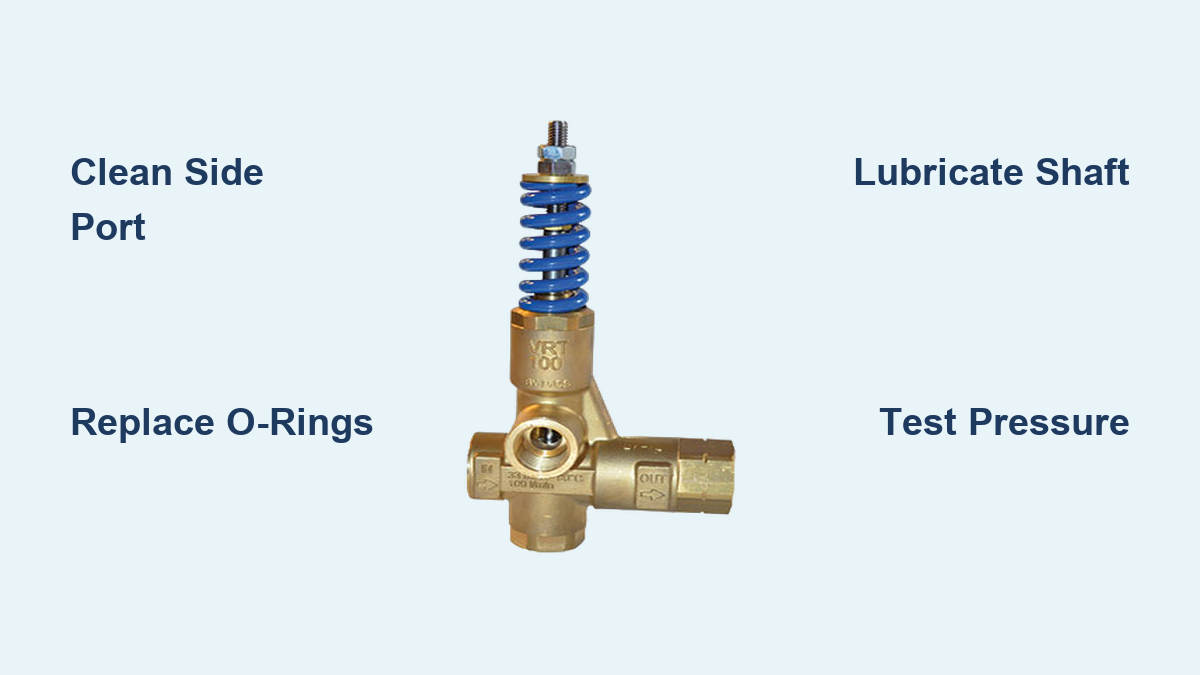
Clean the Critical Side Port
Debris blocking the small side port is a leading cause of pressure lockup. This port allows water to recirculate when the trigger is released.
Locate and Clear the Blockage
Find the small drilled hole on the side of the valve body. Insert a thin pick, safety pin, or paperclip into the port. Work the tool back and forth to break up calcium deposits, sediment, or rubber fragments.
Warning: Do not use a drill bit to clean this port. Enlarging the hole will ruin pressure regulation capabilities. Flush the valve with water afterward to verify clear flow through the channel.
Rebuild an Adjustable Valve

Units with a large top nut allow for complete disassembly and internal polishing. This method works best for Troybuilt 2700 PSI models and similar adjustable valves.
Remove the 21 mm Nut
Use a 21 mm wrench to loosen the large top nut counter-clockwise. Hold the spring steady as tension releases when the nut comes off. Lift the brass cap to expose the central shaft, spring, and adjustment screw.
Replace Worn O-Rings
Pull the central shaft from the housing. Inspect the center groove for two specific O-rings. You need an 11 mm ring for the outer seal and a 10 mm ring for the inner seal. Replace any that appear cracked, flattened, or missing. Use a pick to seat new rings gently without cutting them.
Polish the Internal Bore
Insert fine steel wool or an SOS pad into the valve housing bore. Rotate it vigorously to polish the interior surface. This removes corrosion and old rubber residue that cause sticking. Wipe out all metal shavings before proceeding.
Lubricate Before Reassembly
Dry rubber seals lead to immediate leaks and premature failure. Proper lubrication is essential for smooth operation and longevity.
Apply Silicone Grease or Vaseline
Coat all new O-rings and the central shaft with silicone grease or food-grade Vaseline. This prevents corrosion, stops leaks, and ensures smooth linear movement. Avoid petroleum-based greases that degrade rubber components over time.
Test Shaft Movement
Reinsert the shaft into the housing and push it in and out with an Allen wrench. It must move freely with absolutely no binding. If it sticks, repolish the bore or check for misaligned seals before tightening the nut.
Install and Torque the Valve
Proper installation torque prevents cracks in the brass housing while ensuring a watertight seal.
Slide Valve Back In
Align the unloader valve assembly and press it into the pump housing. Tap it gently with a soft mallet until fully seated. Do not force it if you feel resistance, as this indicates debris or misalignment.
Reattach the Top Nut
Screw the large nut back on by hand first to ensure proper threading. Tighten it with a wrench to 20–25 ft-lbs. Over-tightening can crack the brass housing, so stop once you feel firm resistance. Use a torque wrench if available for precision.
Replace Ball-and-Seat Valves
Pumps using the 90037 design require replacing the seat and steel ball rather than just cleaning ports.
Remove the Handle Clip and Seat
Use a pick tool to pop out the metal clip holding the handle. Insert an oversized flathead screwdriver into the seat slots and turn counter-clockwise to loosen. Tip the seat back to access the cavity and remove the old steel ball, seat, and O-ring.
Install New Components
Grease the O-ring on the new seat and screw it into the pump body. Tighten it by hand plus a quarter turn. Drop the new steel ball into the center of the seat ensuring it sits perfectly aligned. Grease the O-rings on the new valve assembly and push it fully into the housing. Tighten with a 22 mm wrench just enough to seal.
Test the Repair Safely
Never skip the testing phase to ensure the repair was successful and safe.
Flush the System
Reconnect the water supply and run water through the pump for 10–15 seconds without the high-pressure hose attached. This flushes out grease, metal shavings, and loose debris. Point the outlet away from people and equipment during this step.
Perform Operational Check
Reconnect the high-pressure hose and wand. Start the engine with the trigger closed. The engine should start easily and run without stalling as pressure builds. Inspect around the valve housing for any dripping water which indicates a loose fitting or unseated O-ring.
Adjust Pressure If Applicable
Only perform this step if your valve has a center adjustment screw. Incorrect settings can damage hoses or seals.
Calibrate Pressure Settings
Turn the Allen screw clockwise in small increments to increase pressure. Turn it counter-clockwise to decrease pressure. Test the output after each adjustment. Never exceed the rated PSI of your pump, such as 2700 PSI for residential models.
Prevent Future Failures
Regular maintenance extends the life of your unloader valve and prevents costly replacements.
Maintenance Best Practices
- Run clean water through the system for 30 seconds after each use.
- Drain all water in cold climates to prevent freezing cracks.
- Run the unit monthly during long storage periods to prevent seizing.
- Keep a spare O-ring kit and spring on hand for emergency repairs.
When to Replace Versus Rebuild
Not every valve can be saved through cleaning and seal replacement. Some damage requires full component replacement.
Replace If Housing Is Cracked
Inspect the valve body for hairline fractures, especially if the unit froze during winter. Cracked housings cannot be repaired and will leak under pressure. Replace the unit if the spring is deformed or if the internal bore is pitted beyond polishing. Persistent leaks after a rebuild also indicate internal damage requiring a new assembly.
Final Thoughts on Fixing Your Unloader Valve
Fixing an unloader valve on a pressure washer is a manageable task that saves money and restores machine functionality. Most issues stem from clogged side ports, dried-out O-rings, or seized shafts, all of which respond well to cleaning and lubrication. By identifying your valve type and following the correct disassembly steps, you can resolve pressure lockup issues in under an hour.
Keep spare O-rings and grease on hand for future maintenance to prevent recurrence. If your housing is cracked or internal damage is severe, replacing the entire valve assembly is a cost-effective solution compared to buying a new pump.
Frequently Asked Questions About Unloader Valves
Why won’t my pressure washer start with the water on?
High pressure is likely trapped in the pump because the unloader valve is not bypassing water correctly. This lockup prevents the engine from turning over until the pressure is released or the valve is fixed.
How often should I replace unloader valve O-rings?
Replace O-rings whenever you disassemble the valve or if you notice leaks and pressure loss. Regular users should inspect them annually, while seasonal users should check them at the start of each cleaning season.
Can I use regular grease on unloader valve O-rings?
No, petroleum-based grease can degrade rubber O-rings over time. Use silicone grease or food-grade Vaseline to lubricate seals and ensure long-term durability without chemical damage.
What causes the unloader valve to seize?
Lack of use, mineral buildup from hard water, and corrosion typically cause seizing. Running the unit monthly during storage and flushing it with clean water helps prevent internal components from sticking.
Is it better to rebuild or replace a faulty unloader valve?
Rebuilding is cost-effective if the housing is intact and only seals or springs are worn. Replace the entire valve if the brass housing is cracked, the bore is deeply pitted, or the spring has lost its tension permanently.