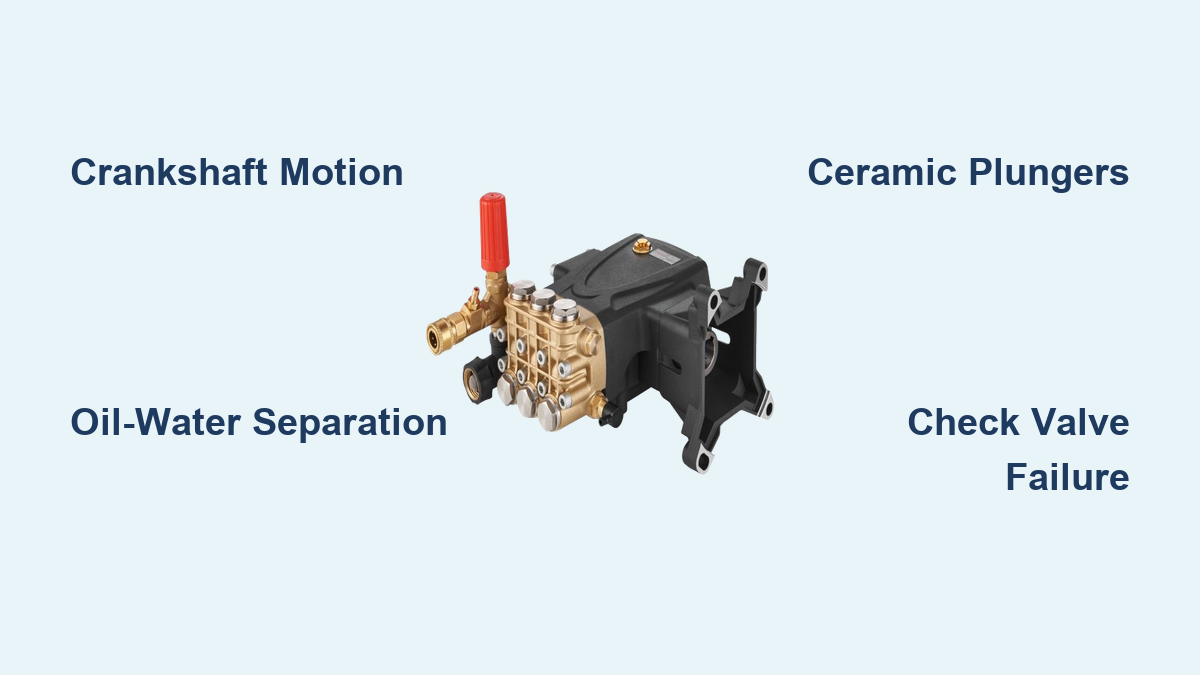
How Pressure Washer Pumps Work
If your pressure washer suddenly loses power or sprays erratically, the issue almost always lies within the pump mechanism. You might wonder how does a pressure washer pump work to generate such intense cleaning force from a standard garden hose. The answer involves a precise mechanical process that converts rotational energy into high-pressure water flow.
This guide explains the internal components like ceramic plungers and check valves that drive this system. You will learn how the crankshaft creates reciprocating motion and why separating oil from water is critical for longevity. Understanding these mechanics helps you diagnose problems early and extend the life of your equipment.
Crankshaft Converts Rotation to Linear Motion
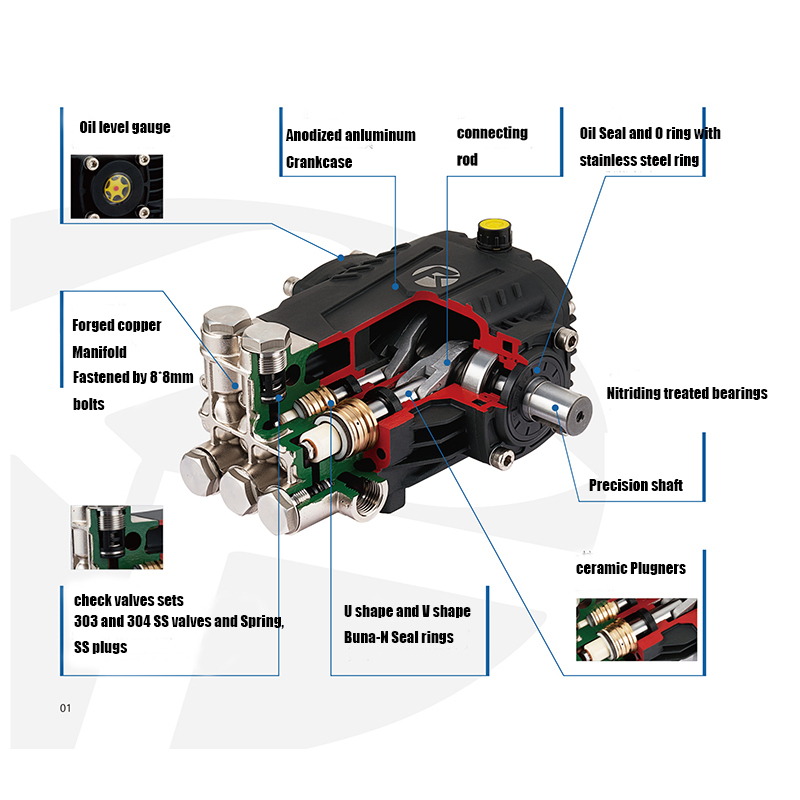
The heart of every pressure washer pump is a robust crankshaft similar to those found in car engines. This component connects directly to your engine or electric motor to drive the entire system. As the motor spins, the offset journals on the crankshaft transform this rotational energy into linear back-and-forth movement.
How Reciprocating Action Creates Pressure
Three connecting rods attach to the crankshaft journals and drive ceramic plungers inside sealed cylinders. When the crankshaft rotates, it pulls one plunger back while pushing another forward in a timed sequence. This staggered movement ensures that water is constantly being drawn in and expelled.
- The crankshaft typically spins between 3,000 and 3,600 RPM for optimal efficiency.
- Connecting rods transfer force from the rotating shaft to the linear plungers.
- Continuous motion creates a steady stream rather than a pulsing spray.
Importance of Proper Lubrication
The crankcase remains filled with oil to lubricate bearings and reduce friction during high-speed operation. A sight window on the pump allows you to monitor oil condition without disassembly. Clear oil indicates healthy operation while milky fluid signals water intrusion.
- Check oil levels before every major use to prevent bearing failure.
- Look for metal flakes in the oil which indicate internal scoring or wear.
- Replace oil regularly according to manufacturer specifications for your model.
Oil Side and Wet Side Separation
Pressure washer pumps feature a strict division between the mechanical drive section and the water handling section. The lower oil side houses the crankshaft while the upper wet side contains the water chambers. Maintaining this barrier is essential for preventing catastrophic mechanical failure.
Crankcase Protects Internal Mechanics
The oil side operates as a sealed environment where moving metal parts glide smoothly on an oil film. This section includes the main bearings and connecting rod ends that endure significant stress. Any breach in this sealed area allows water to mix with oil and destroy lubrication properties.
- The crankcase is typically made of durable aluminum or alloy for heat dissipation.
- Main caps secure the crankshaft bearings to handle high torque loads.
- A rear shaft seal prevents water from traveling down the drive shaft into the oil.
Seals Prevent Cross Contamination
Specialized seals act as the gatekeepers between the wet and dry zones of the pump. On the wet side, sealing packings surround each ceramic plunger to keep water contained within the cylinder. If these packings wear out, a dedicated bleed port directs leaking water outside the unit instead of into the crankcase.
- Bleed ports provide an early warning sign of packing wear before oil contamination occurs.
- Main shaft seals function like trailer wheel hubs to allow rotation while blocking water entry.
- O-rings support the main seal assembly to ensure a tight fit around the drive shaft.
Ceramic Plungers Enable High Pressure
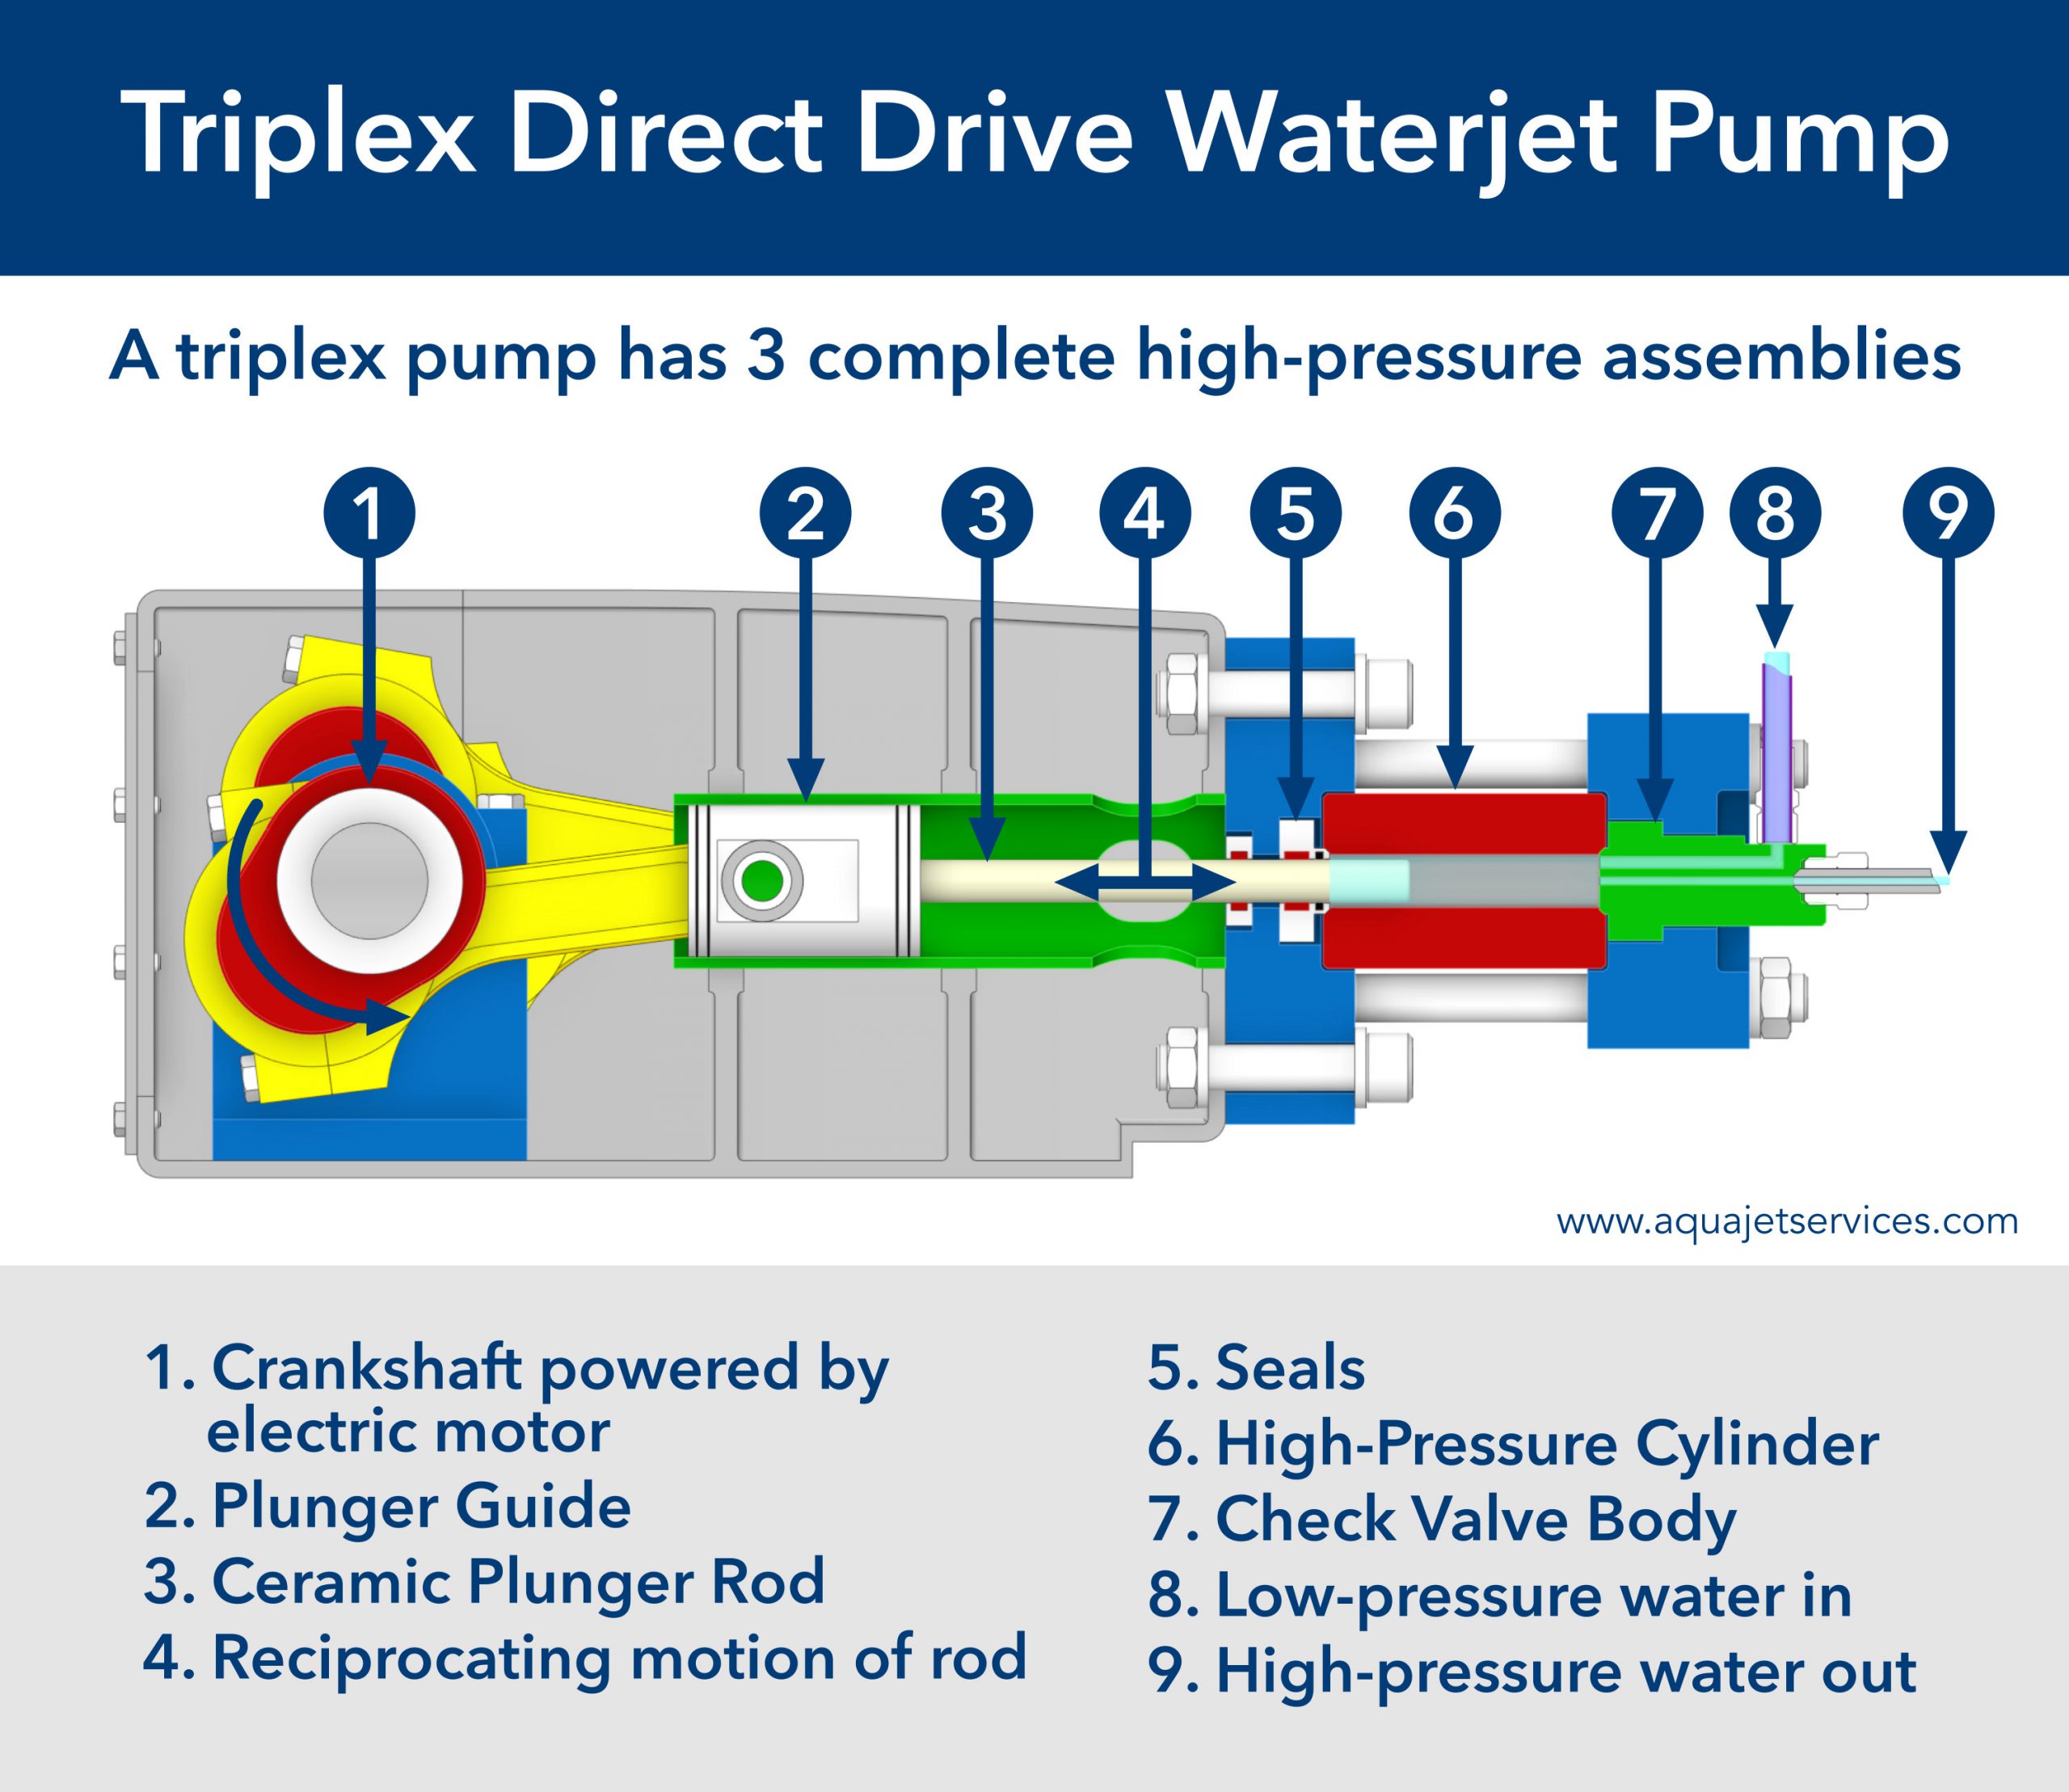
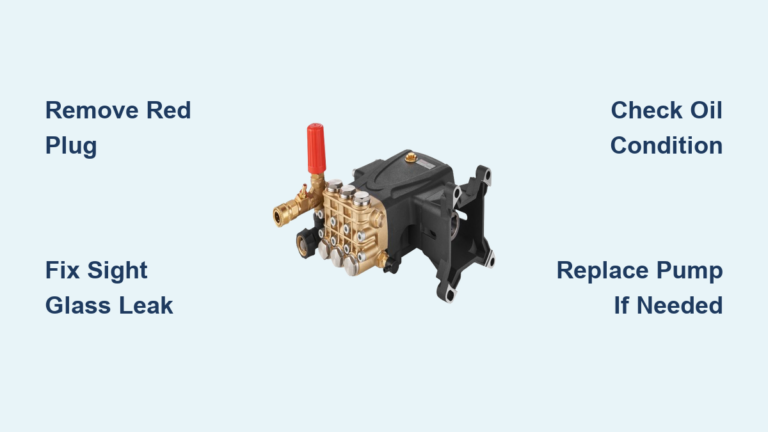
Three ceramic plungers sit atop the connecting rods and move inside brass cylinders to pressurize water. Manufacturers choose ceramic for these components because of its extreme hardness and resistance to corrosion. Unlike steel, ceramic does not rust or pit easily even after thousands of hours of use.
Durability of Ceramic Components
The smooth surface of ceramic plungers reduces friction against the sealing packings during operation. This low-friction interface generates less heat and extends the life of the seals significantly. However, ceramic is brittle and can crack if the pump runs dry or experiences severe misalignment.
- Ceramic maintains its shape better than metal under high-pressure cycles.
- Smooth surfaces minimize wear on the dynamic sealing packings.
- Cracked or scored plungers must be replaced immediately to prevent further damage.
Packings Seal Against Leakage
Special polymer packings wrap tightly around each plunger where it exits the cylinder bore. These dynamic seals must withstand thousands of PSI while allowing the plunger to move freely. Proper installation torque on the pump head bolts ensures these packings compress correctly.
- Eight head bolts secure the pump head without using traditional gaskets.
- Thread sealant like Loctite prevents bolts from loosening due to vibration.
- Worn packings allow water to escape through the bleed port rather than the crankcase.
Intake and Discharge Valve Cycle

The pumping action relies on a continuous cycle of intake and discharge strokes driven by the crankshaft. As plungers move back and forth, they create alternating vacuum and pressure zones within the cylinders. This cycle repeats dozens of times per second to maintain a constant flow.
Intake Stroke Draws Water In
During the backward movement of the plunger, the cylinder volume increases and creates a vacuum. This suction force opens the intake check valve and pulls water from the supply line into the chamber. At this exact moment, the discharge valve remains tightly closed to prevent backflow.
- Water enters through the low-pressure inlet typically located at the bottom of the pump.
- Intake valves open only when cylinder pressure drops below supply line pressure.
- The vacuum ensures the cylinder fills completely before the compression stroke begins.
Compression Forces Water Out
As the crankshaft pushes the plunger forward, the trapped water gets compressed rapidly. Since water cannot be compressed like air, the pressure builds instantly inside the cylinder. Once this pressure exceeds the spring force of the discharge valve, the valve opens and forces water into the outlet manifold.
- Discharge valves open only when internal pressure exceeds the output line pressure.
- The incompressible nature of water allows immediate pressure buildup.
- High-pressure water exits through the top outlet toward the hose and spray gun.
Check Valves Control Flow Direction
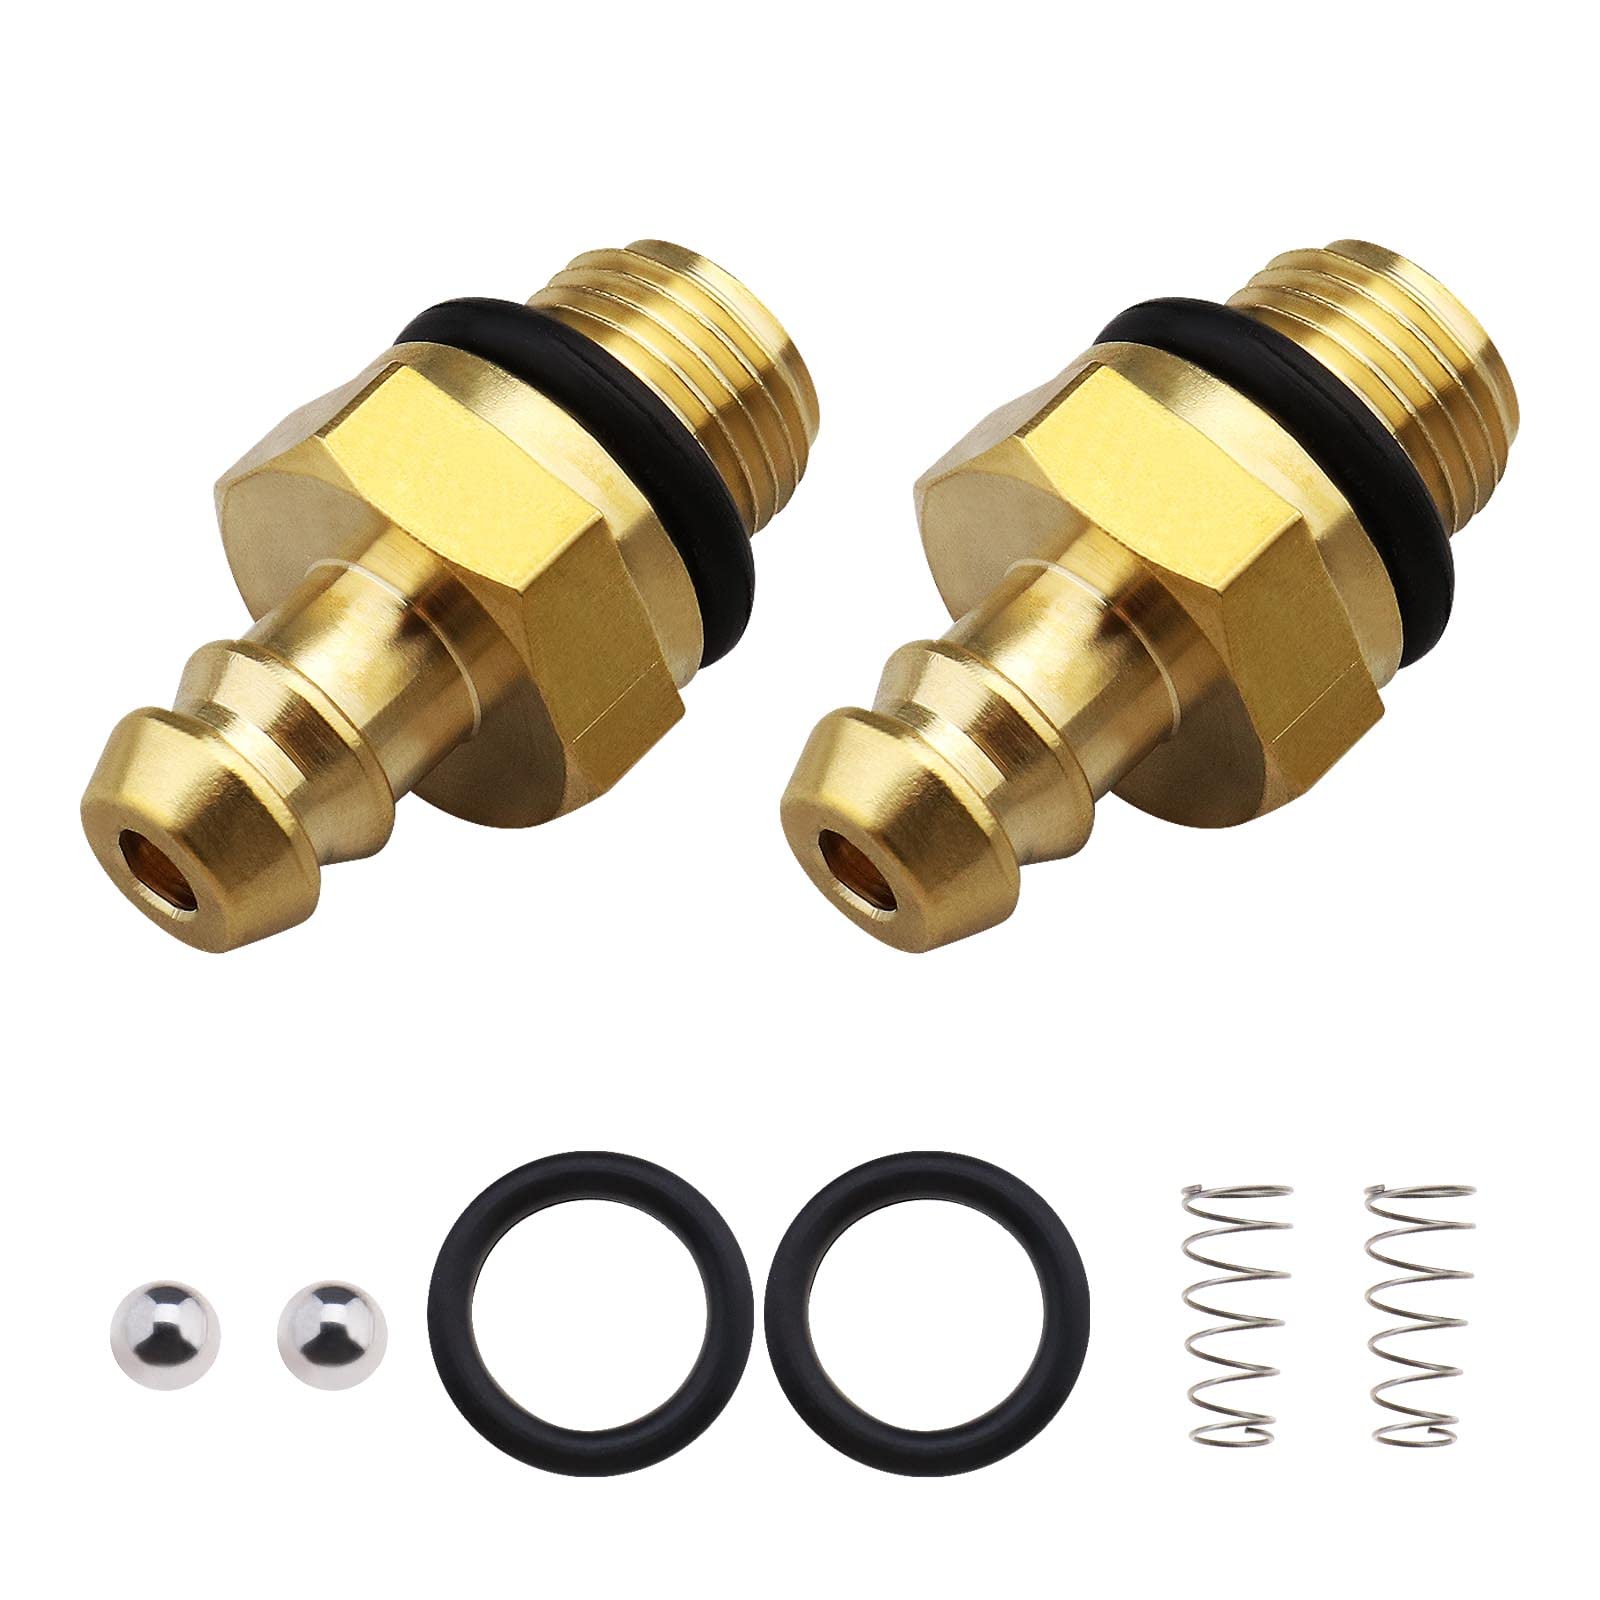
Each of the three cylinders contains two brass check valves that regulate water movement. These spring-loaded components ensure water flows in only one direction through the pump system. Their precise timing is critical for maintaining consistent pressure and flow rates.
Two Valves Per Cylinder
The intake valve allows water entry during the suction phase while the discharge valve allows exit during compression. Brass nuts secure these valves in place and feature alignment grooves to keep stems positioned correctly. Any debris or wear on these valves causes significant performance drops.
- Intake valves prevent high-pressure water from flowing back to the source.
- Discharge valves stop water from returning to the cylinder after expulsion.
- Spring tension determines the exact moment each valve opens or closes.
High Pressure O Rings Are Failure Points
Tiny O-rings located at the base of the check valve channels endure extreme stress cycles. These components are the most common cause of pressure loss or erratic spraying in older pumps. Grit in the water or running the pump dry can nick or deform these rings quickly.
- Symptoms of failure include pulsation, pressure loss, and water weeping from bleed ports.
- Replacement is inexpensive and should be part of routine maintenance schedules.
- Flushing the system before startup removes debris that could damage new O-rings.
Drive Systems Match Engine to Pump
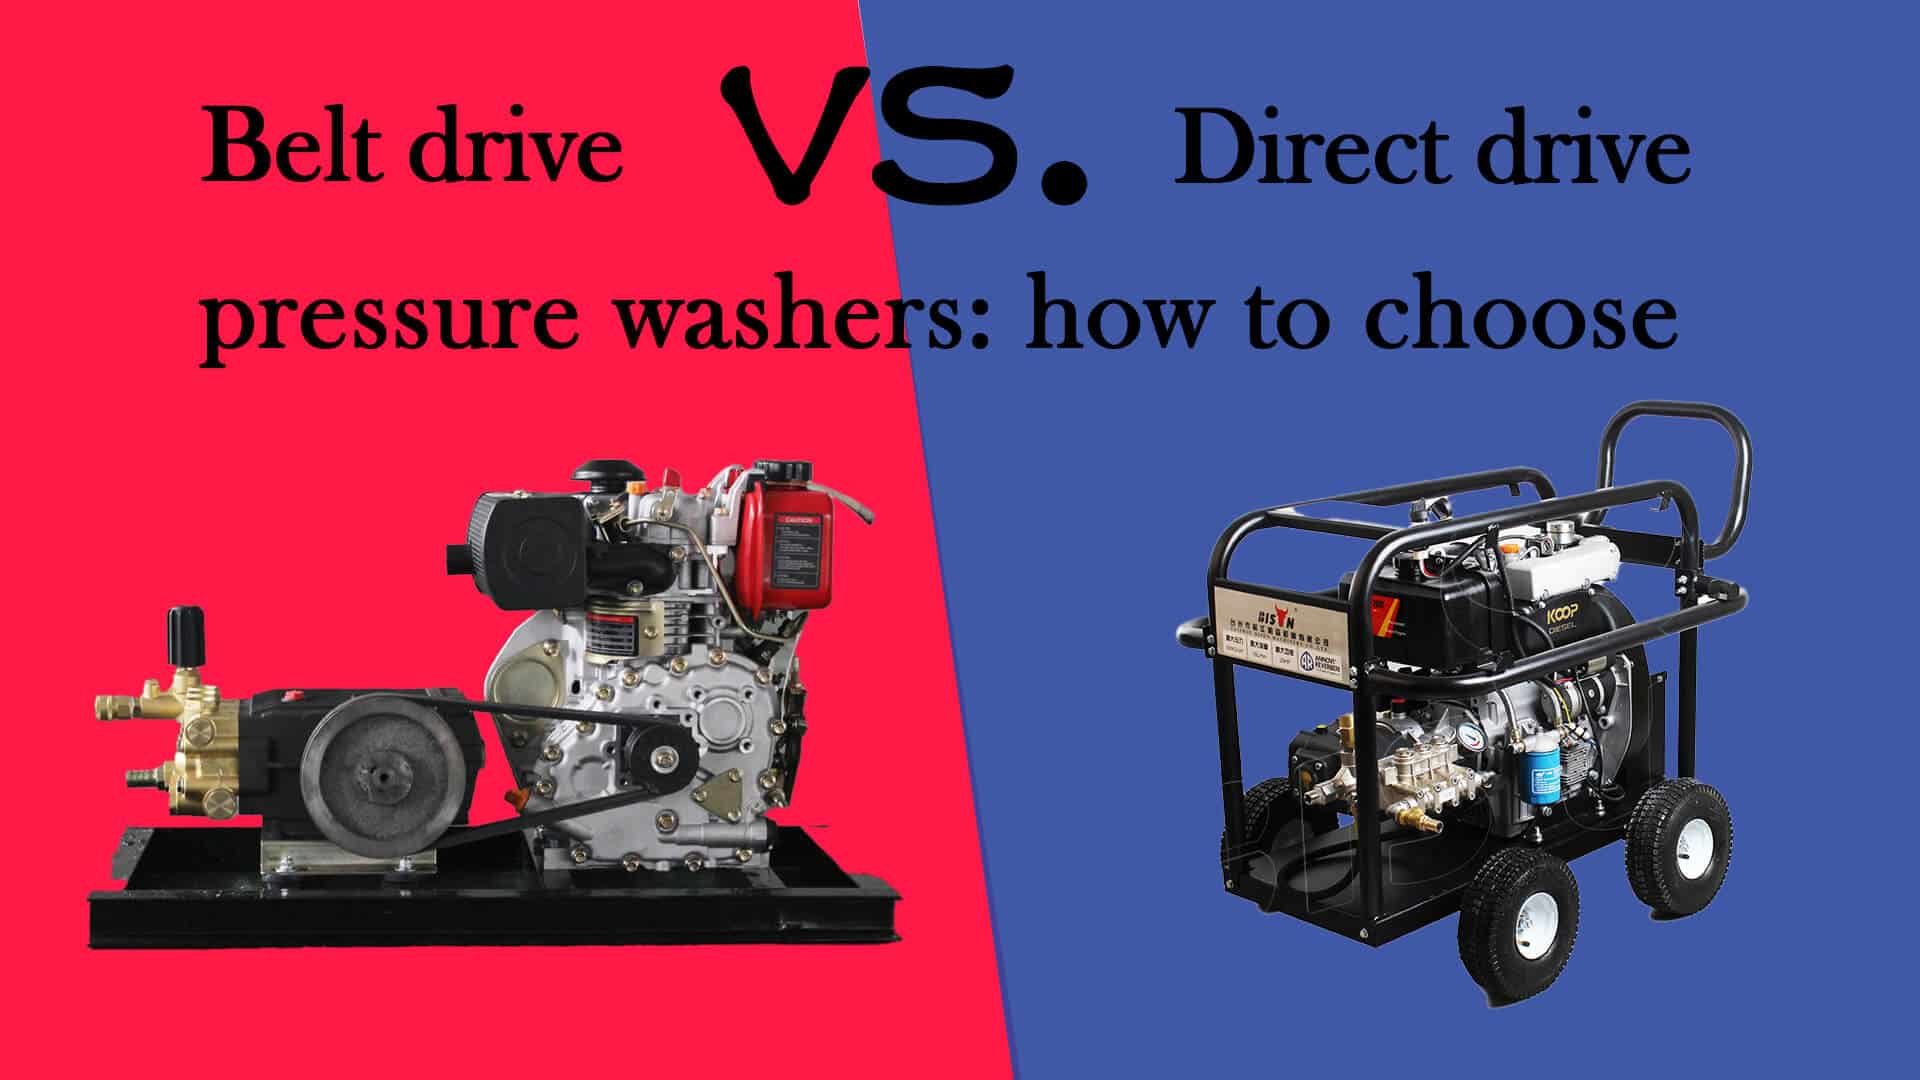
Different applications require different methods of transferring power from the engine to the pump crankshaft. The drive system determines the rotational speed and vibration levels the pump experiences during operation. Choosing the right drive type affects both performance and component lifespan.
Direct Drive for Compact Units
Direct drive systems connect the engine shaft straight to the pump crankshaft using a keyway coupling. This configuration is common in residential machines because it is compact and cost-effective. However, the pump spins at full engine speed which generates more heat and vibration.
- Ideal for occasional home use where portability matters most.
- Higher RPM operation can shorten seal and bearing life over time.
- Simple design means fewer parts to maintain or replace.
Belt Drive Reduces Wear
Belt-driven setups use pulleys to reduce the pump speed relative to the engine speed. This reduction lowers the operating temperature and minimizes vibration stress on internal components. Commercial users prefer this system for its durability and smoother operation during long shifts.
- Lower RPM operation significantly extends the life of seals and plungers.
- Belt isolation reduces vibration transfer from the engine to the pump.
- Periodic belt tension checks are required to maintain efficient power transfer.
Reduction Gearboxes for Heavy Duty
Industrial units sometimes employ gear reduction boxes between the engine and pump for maximum torque. These systems allow large diesel engines to drive pumps at optimal speeds efficiently. They are highly reliable but involve more complex maintenance procedures.
- Gearboxes enable the use of low-RPM high-torque engines.
- Common in hot water pressure washers and trailer-mounted systems.
- Left-hand or right-hand rotation options are available for specific setups.
Integrated Valves Manage Pressure
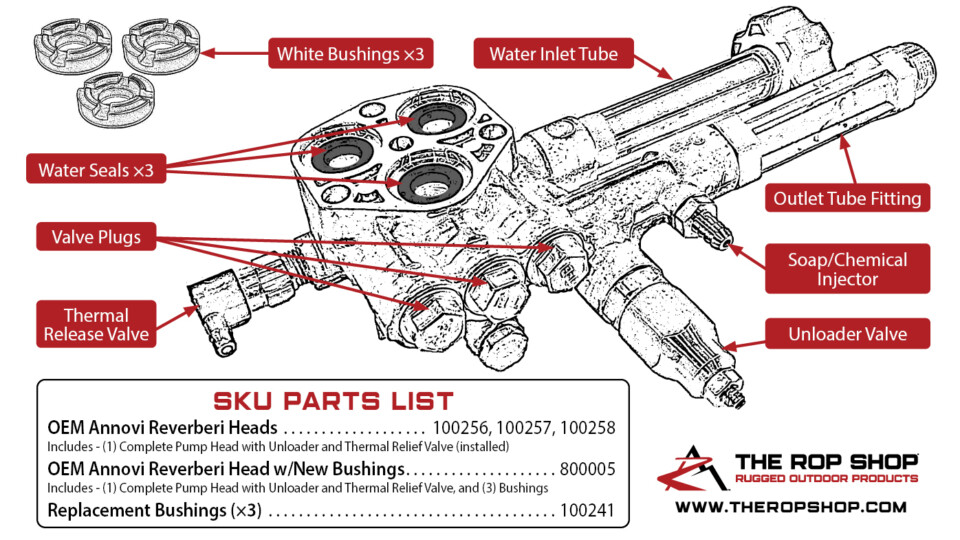
Modern pumps often include built-in valves that regulate pressure and protect the system when the trigger is released. These integrated components manage flow redirection to prevent overheating and over-pressurization. Understanding their function helps you troubleshoot pressure issues effectively.
Unloader Valves Prevent Overpressure
When you release the spray gun trigger, water flow stops but the pump continues running. An unloader valve redirects this water back to the inlet or a bypass line to relieve pressure. Without this mechanism, the pump would quickly overheat or damage hoses and seals.
- Integrated unloader valves are molded into the pump head for compactness.
- Failure often requires replacing the entire pump head rather than just the valve.
- External unloader valves are easier to service and replace individually.
Thermal Relief Adds Safety
Stagnant water inside a running pump can reach dangerous temperatures rapidly. A thermal relief valve automatically opens to dump hot water if temperatures exceed safe limits. This feature protects internal seals and components from heat damage during idle periods.
- Recommended for operations involving long idle times or recirculation.
- Prevents seal degradation caused by excessive heat buildup.
- Adds a potential leak point but provides critical safety protection.
Maintenance Prevents Premature Failure
Regular inspection and timely repairs are the keys to maximizing the lifespan of your pressure washer pump. Simple checks can reveal small problems before they turn into expensive failures. Knowing what to look for helps you decide between rebuilding and replacing the unit.
Check Oil and Bleed Port Regularly
Inspecting the oil sight window should be your first step in any maintenance routine. Clear oil means the seals are intact while cloudy or milky oil indicates water intrusion. Additionally, monitor the bleed port under the pump for any steady dripping.
- Clear oil indicates healthy internal conditions and proper lubrication.
- Milky oil signals a failed shaft seal allowing water into the crankcase.
- Dripping bleed ports show that packing seals are wearing and need replacement.
Rebuild vs Replace Decision
Commercial grade pumps from brands like CAT or General are designed for multiple rebuilds over their lifetime. Consumer models often feature non-serviceable designs where replacement is more economical than repair. Evaluate the extent of internal damage before deciding on a course of action.
- Rebuild if only seals, O-rings, or valves are damaged.
- Replace if the crankshaft is scored or connecting rods are bent.
- Commercial pumps can last 10 to 20 years with proper rebuilding.
Watch for Warning Signs
| Symptom | Likely Cause |
|---|---|
| Low pressure | Worn check valves or leaking O-rings |
| Pulsation | Stuck intake valve or air in line |
| Oil contamination | Failed shaft seal or packing |
| Overheating | Running without water or failed unloader |
| Metal in oil | Misaligned plunger or bearing failure |
Diagnostic Access and Repair
Accessing internal components requires careful disassembly following specific safety protocols. Removing the pump head exposes the cylinders and plungers for detailed inspection. Diagnostic ports allow you to test pressure output directly at the source.
Open the Pump Head for Inspection
Start by shutting off the machine and relieving all system pressure completely. Remove the check valve nuts and unbolt the eight head bolts securing the assembly. Lift off the pump head carefully to reveal the condition of the plungers and cylinders.
- Disconnect power and relieve pressure from the system.
- Remove brass plugs and check valve nuts from the pump head.
- Unfasten the eight head bolts using the correct socket size.
- Lift the head to inspect cylinders for scoring or debris.
Use Diagnostic Ports for Testing
Brass plugs on the front of the pump head serve as access points for gauges. Installing a pressure gauge here lets you measure output directly from the pump. This helps isolate whether pressure loss comes from the pump itself or downstream components.
- Test pressure under load to get accurate performance readings.
- Compare readings against manufacturer specifications for your model.
- Identify if the issue lies with the pump or the spray gun and hose.
Frequently Asked Questions About Pressure Washer Pumps
Why is my pressure washer pump leaking oil?
Oil leaks usually indicate a failed shaft seal allowing oil to escape or water to enter. Check the sight window for milky oil which confirms water contamination. Replace the main shaft seal and O-rings immediately to prevent bearing damage.
How often should I change the pump oil?
Change the oil after the first 50 hours of use and then every 300 to 500 hours thereafter. Regular oil changes remove contaminants and maintain proper lubrication for the crankshaft. Always check the oil level before starting the machine.
Can I run my pressure washer without water?
Never run a pressure washer pump without water supply connected and flowing. Water acts as a lubricant for the plungers and seals, and running dry causes instant overheating. Even a few seconds of dry running can destroy internal components permanently.
What causes a pressure washer to lose pressure suddenly?
Sudden pressure loss often stems from worn check valves, stuck valves, or damaged O-rings. Debris in the water supply can prevent valves from seating properly. Inspect and clean the check valves and replace worn seals to restore pressure.
Are ceramic plungers better than metal ones?
Ceramic plungers offer superior durability and corrosion resistance compared to metal alternatives. They generate less friction and heat which extends the life of sealing packings. However, they are brittle and can crack if the pump runs dry or misaligns.
How do I know if my pump needs rebuilding?
Signs your pump needs rebuilding include persistent pressure loss, oil contamination, or excessive vibration. If replacing seals and valves does not fix the issue, internal damage may require a full rebuild. Commercial pumps are designed for multiple rebuild cycles.
Key Takeaways for Understanding Pressure Washer Pumps
Understanding how does a pressure washer pump work empowers you to maintain your equipment effectively and avoid costly repairs. The crankshaft-driven reciprocating system converts simple rotation into powerful cleaning force through precise mechanical timing. Keeping the oil and water sides separated ensures long-term reliability and performance.
Regular maintenance checks on oil quality and seal condition prevent most common failures before they occur. Replace worn O-rings and packings promptly to protect the internal mechanics from damage. With proper care, your pressure washer pump can deliver consistent high-pressure performance for years.