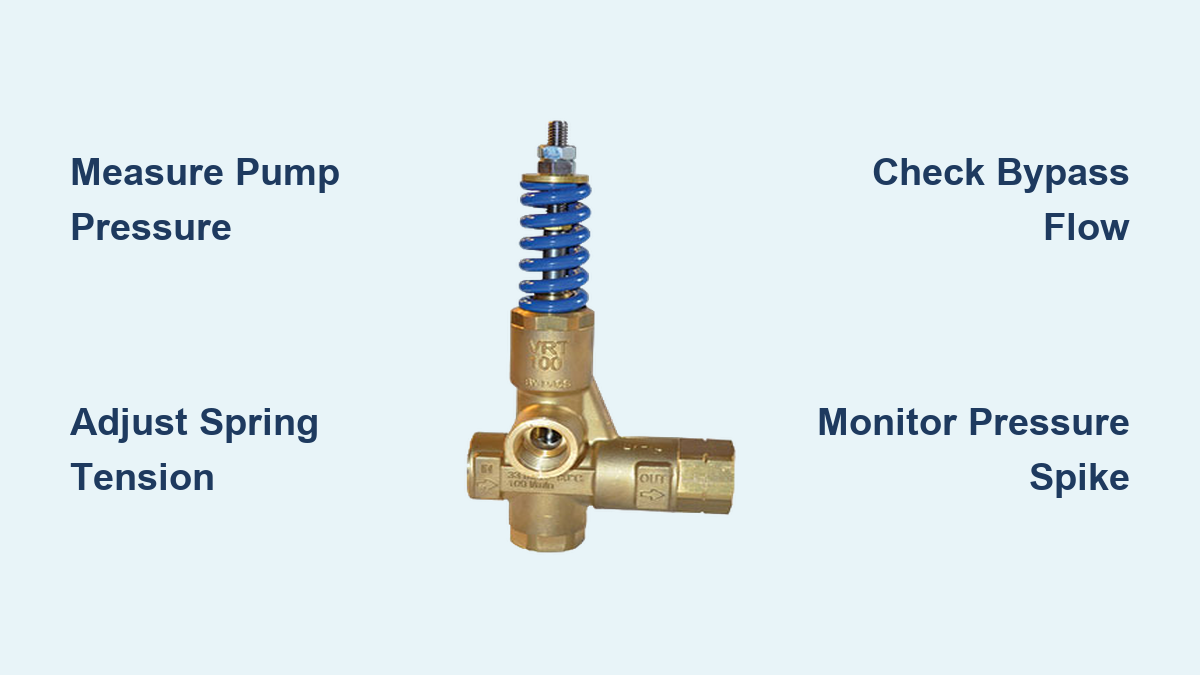
How to Adjust Pressure Washer Unloader Valve
Does your pressure washer overheat when you release the trigger or deliver weak cleaning power despite a running engine? These symptoms often point to a misaligned unloader valve that fails to manage system pressure correctly.
This guide explains exactly how to adjust pressure washer unloader valve settings on both flow and pressure-actuated models. You will learn to measure head pressure accurately, tune spring tension safely, and troubleshoot common spike issues to protect your pump.
Identify Your Unloader Valve Type Before Adjustment
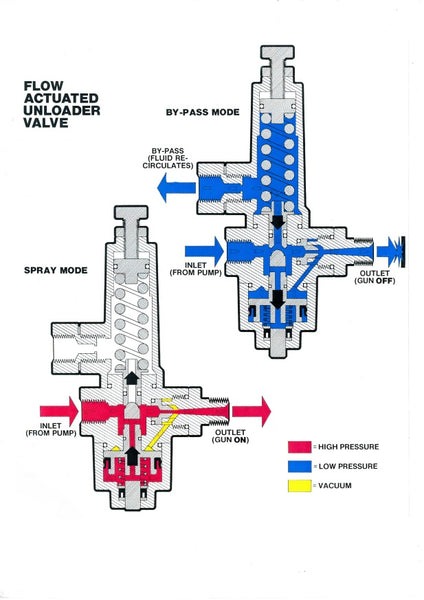
Determining whether your machine uses a flow-actuated or pressure-actuated valve is the first critical step. The internal mechanism differs significantly between the two, requiring distinct adjustment techniques to avoid damage.
Distinguish Between Flow and Pressure Actuation
Flow-actuated valves sense water movement changes rather than pure pressure spikes. When you close the trigger, reduced flow shifts the valve to bypass mode smoothly.
* Common Models: Pulsar VB 80/280, CAT FlowSense, E-Spec Quantum Z.
* Behavior: Pressure rises gradually when pulling the trigger.
Pressure-actuated valves respond directly to pressure buildup within the pump head. Closing the trigger causes a momentary pressure spike before the valve redirects water flow.
* Common Models: MG-4000 series, BRV series.
* Behavior: Pressure jumps sharply upon trigger release.
Verify Model Compatibility and Spring Ratings
Using the wrong spring or valve type leads to poor performance or catastrophic failure. Always check the color code on your internal spring.
* Blue Spring: Rated for 4,000 PSI systems (standard in MG-4000).
* Black Spring: Rated for 4,500 PSI industrial applications.
* BRV Series: Known for high sensitivity to pressure spikes.
Measure System Pressure at the Pump Head Accurately
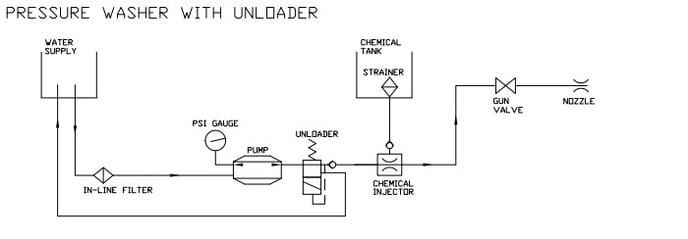
You cannot adjust what you do not measure correctly. Placing your gauge at the wrong location yields false readings that lead to dangerous over-pressurization.
Install Gauge Directly on Unloader Outlet
Attach your test gauge to the unloader outlet or pump discharge port for a true reading of head pressure.
* Gauge Rating: Use a gauge rated at least 20% above your pump’s maximum pressure.
* Example: A 5,000 PSI gauge is required for a 4,000 PSI system.
* Warning: Never rely on readings taken at the spray gun for system adjustments.
Account for Hose Length and Friction Loss
Pressure drops as water travels through the hose due to friction. Ignoring this causes users to over-adjust the unloader unnecessarily.
* Straight Hose: Loses approximately 1 PSI per foot.
* 50-Foot Run: Results in roughly 50 PSI loss.
* Coiled Hoses: Add 50 to 200 PSI of resistance due to tight bends.
* Short Hoses: Under 25 feet show negligible loss (0–5 PSI).
Monitor Bypass Flow Rate During Testing
Observe the water returning to the tank while the trigger is closed. The bypass line must maintain at least 5% of the total pump flow.
* Insufficient Flow: Indicates nozzle mismatch or over-pressurization.
* Risk: Low bypass flow causes rapid overheating and cavitation damage.
Tune Pressure-Actuated Unloader Settings Precisely
These valves require balancing the working pressure with a safe pressure spike. Incorrect tuning leads to hose bursts or seal failure.
Set Operating Pressure First
Start the pressure washer and pull the trigger to engage active flow mode. Turn the adjustment knob clockwise to increase tension until the gauge shows your target operating pressure.
* Safety Limit: Do not exceed the rated limit of your pump or unloader.
* Procedure: Make small adjustments and test frequently.
Analyze the Pressure Spike Behavior
Release the trigger quickly and watch the gauge needle. The pressure will spike momentarily before settling into bypass mode.
* Ideal Spike: Approximately 10% above operating pressure.
* Example: A 3,000 PSI operating pressure should spike to 3,300 PSI.
* Maximum Allowable: No more than 400 PSI above operating pressure.
Adjust Spring Tension in Small Increments
If the spike exceeds 500 PSI, the system is under excessive stress. Turn the adjustment counter-clockwise slightly to reduce tension.
* Increment Size: Adjust by 1/8 to 1/4 turn at a time.
* Test Cycle: Pull and release the trigger after every adjustment.
* Diagnosis: Persistent high spikes indicate worn seals or air in the system.
Calibrate Flow-Actuated Unloader Valves Correctly
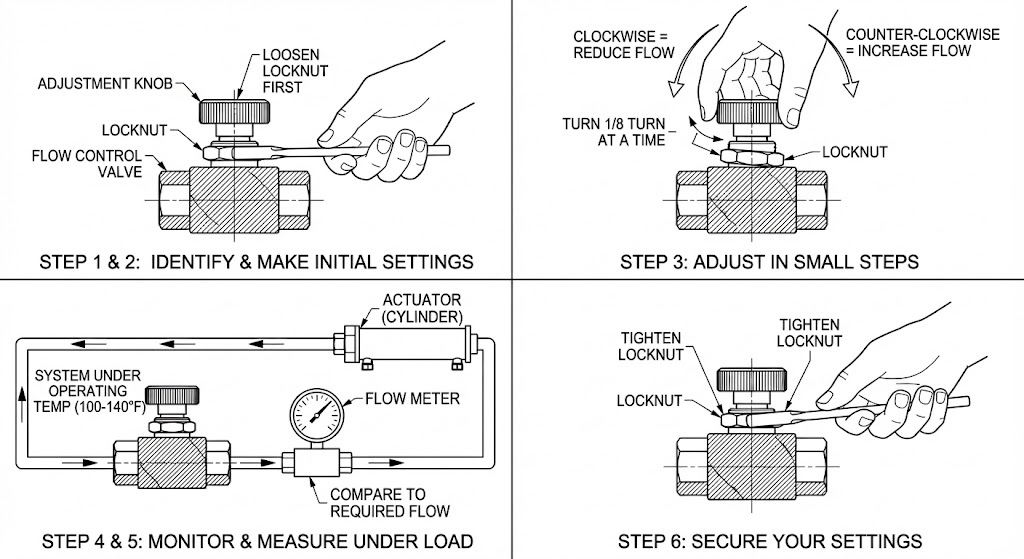
Flow-actuated models need a different approach focused on incremental increases and strict bypass monitoring.
Start from Minimum Pressure Setting
Back the adjustment nut fully counter-clockwise before starting the engine. This ensures you begin at the lowest possible pressure setting.
* Baseline: Record the initial pressure with the trigger pulled.
* Safety: Prevents accidental over-pressurization during startup.
Apply Quarter-Turn Adjustments Only
Increase pressure slowly by turning the adjustment nut clockwise in 90-degree increments.
1. Release the trigger to engage bypass.
2. Turn the nut one quarter turn clockwise.
3. Pull the trigger and read the new pressure.
4. Repeat until target pressure is reached.
Stop If Bypass Flow Drops Below Threshold
Check the return line constantly. If flow decreases significantly, your nozzles are too large for the desired pressure.
* Critical Limit: Stop immediately if bypass flow drops below 5%.
* Consequence: Continuing forces the pump to work against a closed system.
* Solution: Install smaller orifice nozzles instead of forcing higher pressure.
Reassemble Internal Components Properly
If adjustment fails to stabilize pressure, the internal components may be worn or assembled incorrectly.
Rebuild BRV and MG Series Valves
Disassemble the unit if pressure fluctuates wildly or spikes become erratic. Clean all internal passages with a mild solvent.
* Pin Placement: Slide the pin into the body carefully.
* Nut Position: Set the double nut about ½ inch from the bottom.
* Spring Installation: Ensure the top plate centers the spring to prevent lateral wobble.
* Final Step: Tighten the locking nut securely to prevent vibration drift.
Understand Adjustment Direction Logic
Remember the basic rule of spring tension for all manual adjustments.
* Clockwise: Increases tension and raises activation pressure.
* Counter-Clockwise: Decreases tension and lowers activation pressure.
* Pro Tip: A slightly looser setting reduces pump strain during idle periods.
Troubleshoot Common Pressure Problems
Even with correct adjustment, external factors can cause performance issues. Use these diagnostics to identify the root cause.
Resolve Excessive Pressure Spikes
A spike over 500 PSI indicates a mechanical issue rather than a setting error.
* Check for Air: Bleed the pump inlet and outlet thoroughly.
* Inspect Seals: Look for damaged O-rings or poor valve seating.
* Replace Valve: Test with a known-good unloader if the problem persists.
Fix Low or Inconsistent Pressure
Fluctuating pressure often stems from worn nozzles rather than the unloader itself.
* Nozzle Wear: Eroded orifices increase flow and drop pressure.
* Mistake: Do not crank up the unloader to compensate for worn nozzles.
* Action: Replace all nozzles as a matched set immediately.
Address Poor Bypass Flow
Little to no water returning to the tank signals a nozzle configuration mismatch.
* Cause: Too much open nozzle area prevents the valve from closing fully.
* Fix: Reduce the number of open nozzles or use narrower tips.
* Requirement: Maintain greater than 5% bypass flow at all times.
Maintain Long-Term Valve Performance
Proper initial setup is only the beginning. Regular maintenance ensures your unloader protects the pump for years.
Secure Locking Nuts Against Vibration
Vibration during operation can slowly loosen adjustment nuts on flow-actuated models.
* Procedure: Tighten the top locking nut firmly after final tuning.
* Enhancement: Apply thread locker in high-vibration environments.
* Schedule: Recheck settings weekly under heavy commercial use.
Inspect System Components Monthly
Create a routine to check for leaks around ports and verify gauge accuracy.
* Visual Check: Look for water leaks or corrosion.
* Performance Test: Verify spike consistency and bypass volume.
* Prevention: Early detection prevents catastrophic pump failure.
Respect Maximum System Limits
Never push your equipment beyond its rated specifications.
* Pressure Rating: Adhere strictly to pump and unloader limits.
* Temperature: Avoid prolonged recirculation which heats the water.
* Warranty: Over-pressurizing voids warranties and shortens seal life.
Optimize Setup for Multi-Wand Applications
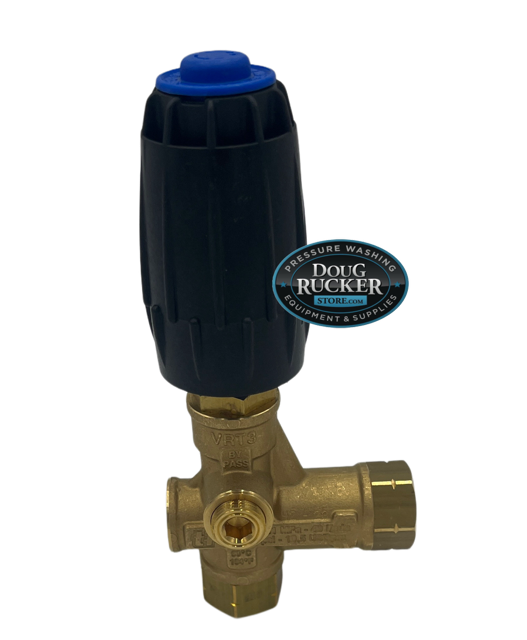
Your choice of unloader affects versatility when using multiple wands or quick-switch systems.
Select Pressure-Actuated for Multiple Wands
Pressure-actuated unloaders handle rapid pressure transitions better than flow models.
* Benefit: Provides superior flow division between wands.
* Result: Prevents surging when switching between operators.
* Cost: Generally less expensive for commercial fleets.
Upgrade for Extreme Duty Cycles
For operations exceeding 4,000 PSI or requiring long runtimes, specialized flow-sensitive valves offer better durability.
* Recommended Models: Pulsar VB 80/280, CAT FlowSense.
* Performance: Proven to run at 4,300 PSI and 8 GPM for extended periods.
* Advantage: Reduced spike stress extends pump life in harsh conditions.
Frequently Asked Questions About Adjusting Unloader Valves
How often should I adjust my pressure washer unloader valve?
You typically only need to adjust the valve when changing nozzles, replacing parts, or if pressure performance drifts. Regular monthly checks are recommended to ensure settings have not loosened due to vibration.
What causes a pressure washer to overheat when the trigger is released?
Overheating usually occurs when bypass flow is insufficient or blocked. If the unloader fails to redirect water back to the tank properly, the pump recirculates hot water internally, causing rapid temperature spikes.
Can I use a higher pressure spring to increase cleaning power?
No, you should never exceed the rated pressure of your pump. Using a stronger spring or over-tightening the valve stresses seals and plungers, leading to premature failure and voided warranties.
Why does my pressure gauge spike so high when I let go of the trigger?
A spike indicates a pressure-actuated valve shifting to bypass. If the spike exceeds 500 PSI above operating pressure, it suggests air in the system, worn valve components, or incorrect adjustment.
Do I need different tools to adjust flow vs pressure unloader valves?
Most valves require only a wrench or screwdriver for the adjustment nut. However, flow-actuated models require closer monitoring of bypass flow rates, while pressure models need careful observation of the pressure spike on a gauge.
Key Takeaways for Adjusting Your Pressure Washer Unloader Valve
Mastering how to adjust pressure washer unloader valve settings protects your investment and ensures consistent cleaning power. Always measure pressure at the pump head rather than the gun to account for hose loss, and keep pressure spikes within 10% of your operating pressure. Monitor your bypass flow constantly to prevent overheating, and never force higher pressure to compensate for worn nozzles.
Take action today by checking your current pressure spike and bypass flow. If your spike exceeds 500 PSI or your return flow is weak, shut down the machine and inspect your unloader immediately to prevent costly pump damage.