How to Change a Pressure Washer Pump
If your machine suddenly loses power or leaks fluid, you likely need to learn how to change a pressure washer pump. These symptoms often signal internal wear or structural cracks that simple fixes cannot resolve. Replacing the unit restores full cleaning capability and prevents further damage to your engine.
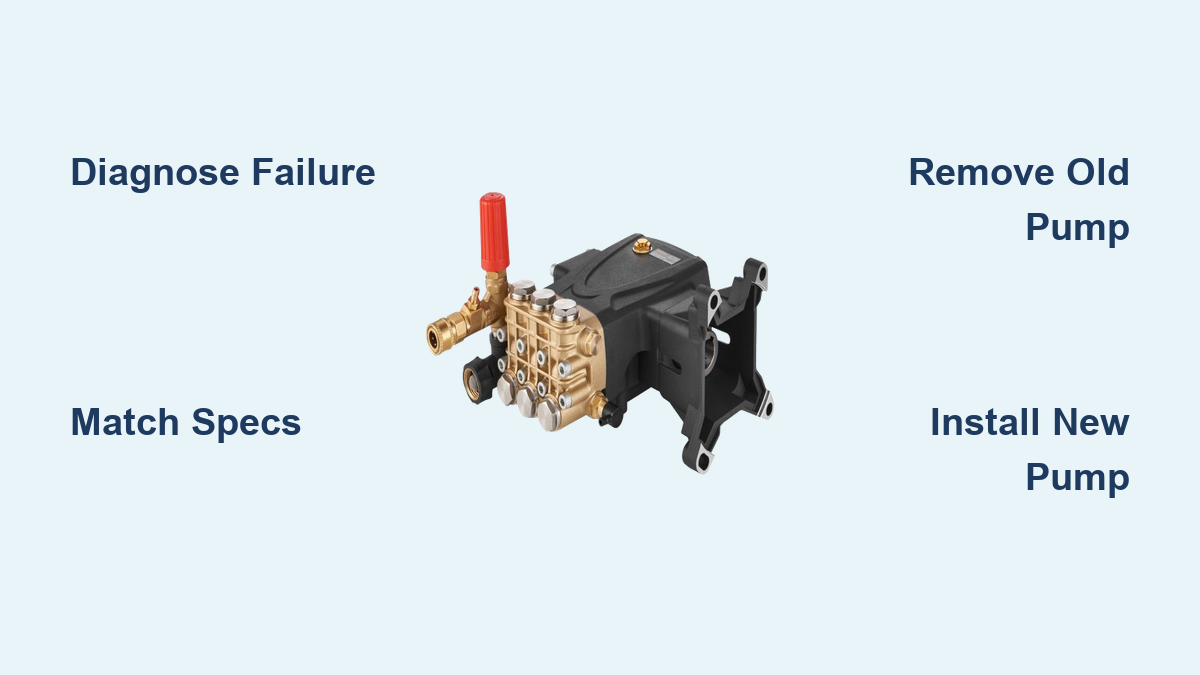
This guide walks you through diagnosing failure, selecting the correct replacement model, and installing the new pump safely. You will gain the confidence to complete this repair on Simpson, Generac, or Honda-powered units without professional help.
Confirm Your Pump Requires Replacement
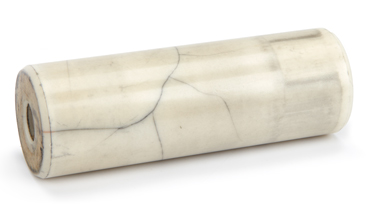
Many users replace pumps unnecessarily because they mistake simple clogs for major failures. You must verify the specific symptoms before buying parts or removing bolts. Accurate diagnosis saves money and ensures you address the root cause effectively.
Rule Out Common Misdiagnoses
A drop in performance does not always mean the pump is dead. Check these accessible components first to avoid unnecessary work.
- Clogged inlet filter: Debris often traps at the water supply screen. Remove and rinse this filter under clean water to restore flow.
- Air lock: Trapped air blocks water movement. Prime the system by running water through the gun for two to three minutes before starting the engine.
- Stuck unloader valve: This part redirects water when you release the trigger. If it sticks, pressure builds excessively and causes overheating.
- Worn seals: Minor leaks around the housing often stem from dried rubber. You can sometimes replace just the O-rings instead of the whole unit.
Identify Irreversible Pump Damage
Certain signs indicate that repair is impossible and replacement is mandatory. Look for these definitive indicators of total failure.
- Visible housing crack: Freezing water expands and splits the metal base. Never attempt to weld or epoxy a cracked pump housing as high pressure makes this dangerous.
- Oil leakage from the body: Fluid escaping the main body suggests degraded internal seals due to heat or age.
- Complete loss of pressure: If hoses are clear but output remains zero, internal pistons or valves have likely failed.
- Persistent overheating: Excessive heat during normal use points to poor circulation or a failed unloader valve.
Match the Correct Replacement Pump Specifications
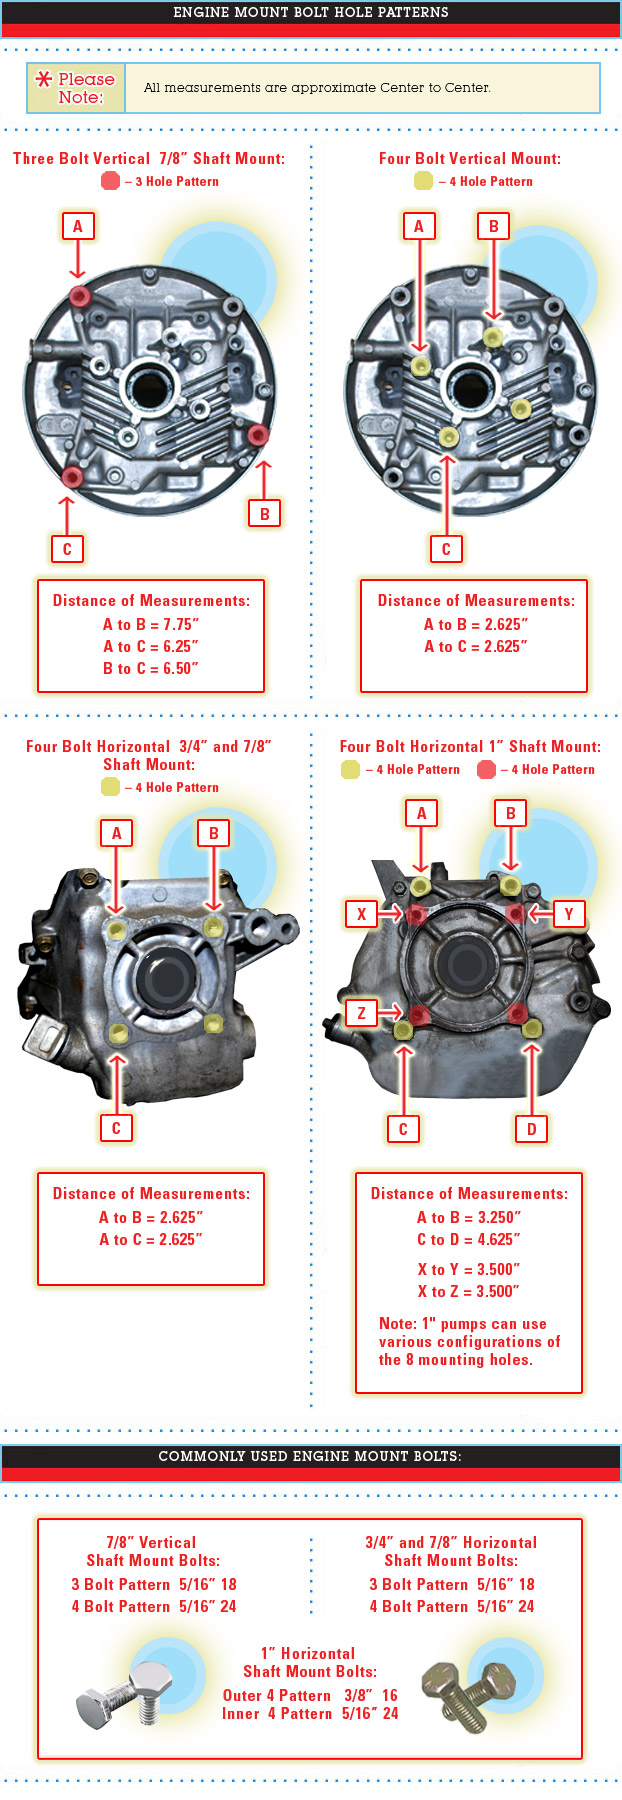
Installing an incompatible pump leads to misalignment, vibration, and rapid failure. You must verify mechanical specifications against your existing engine before purchasing a new unit. Compatibility is the single most important factor for long-term success.
Verify Bolt Hole Pattern Dimensions
The four mounting holes on the new pump must align perfectly with your engine crankcase. Measure the center-to-center distance on your current unit using calipers or a ruler. Common patterns include 3.5 inches by 3.5 inches or 4 inches by 4 inches. Even an eighth-inch mismatch prevents secure mounting.
Determine Shaft Drive System Type
Two primary systems connect the pump to the engine, and they are not interchangeable without specific adapters.
Keyway Drive Systems
Most modern units use a square or rectangular slot on the engine shaft. A small metal key, typically 3/16 inch by 1/4 inch, locks the pump in place. You will find this on newer Honda-powered and Simpson models.
Sprocket Drive Systems
Older models often utilize a chain-and-sprocket setup between the engine and pump. This requires matching the sprocket size and center distance exactly. While less common today, some industrial units still rely on this configuration.
Pro Tip: Rotate the engine via the recoil starter to inspect the shaft type visually. Look for a set screw or a distinct keyway groove.
Match Flow and Pressure Ratings
Ensure the new pump matches your machine’s original specifications. For example, a Honda GX200 engine typically supports up to 3,300 PSI and 2.4 GPM. Installing an oversized pump strains the engine, while undersized units waste potential power.
Consider Brand-Specific Requirements
Different manufacturers have unique compatibility needs you must address.
- Simpson: Often uses OEM pumps compatible with Honda engines. Check part numbers on the existing unit.
- Generac: Some models require exact bolt spacing. Vevor pumps are popular upgrades if dimensions match.
- Mi-T-M: May allow internal rebuilds via seal kits unless the housing is cracked.
- General/Cat Pumps: These are often interchangeable if shaft and mount specs align.
Gather Essential Tools and Prepare Safely
Having the right equipment streamlines the job and prevents damage to components. Safety preparation is equally critical to avoid injury during the repair process.
Required Tools List
- 9/16 inch wrench or socket for mounting bolts
- 1/2 inch wrench for secondary bolt sizes
- 8 mm Allen key for shaft set screws
- Adjustable wrench for standoff pipes
-
8 screwdriver for protective covers
- Dual-length Allen key for tight spaces
Necessary Supplies and Materials
- Anti-seize lubricant: High-temperature grade prevents corrosion on the shaft.
- Penetrating oil: Useful for loosening stuck set screws or sprockets.
- Clean rag: Essential for wiping the shaft and inspecting components.
- New shaft key: Usually 3/16 inch by 1/4 inch. Keep a spare even if reusing the old one.
- Quick-connect fittings: Required if the new pump has a different discharge style.
Execute Safety Protocols
- Disconnect power: Unplug electric models or remove the spark plug wire on gas units.
- Release pressure: Pull the spray gun trigger until no hiss remains.
- Drain water: Disconnect hoses to empty the pump and lines completely.
- Cool the unit: Wait 30 minutes if the machine was recently used to avoid burns.
Remove the Old Pump Assembly
Disassembly requires careful handling to avoid damaging the engine shaft or surrounding components. Follow this sequence to extract the old unit safely.
Disconnect Hoses and Protective Covers
- Remove the shroud: Unscrew retaining screws, usually #8 Phillips head, and set the cover aside carefully.
- Detach main hoses: Use an adjustable wrench on fittings if they are stuck. Plug open ends to prevent debris entry.
- Remove auxiliary lines: Gently pull the small detergent or thermal relief hose from its rubber mount. Do not cut this line.
Unfasten Mounting Hardware
- Locate mounting bolts: Find the four bolts arranged in a square pattern on the pump base.
- Break loose all bolts: Loosen each slightly before removing any fully to prevent binding.
- Remove standoff pipe: Some units have a threaded pipe running through the base for motor support. Remove this with an adjustable wrench before pulling the pump.
Free the Pump from the Shaft
- Check for set screws: Shine a light into the shaft hole while slowly rotating the engine. Remove the 8 mm Allen screw if present.
- Pull pump straight off: Apply even pressure without twisting or prying. Catch falling parts like the shaft key and set screw.
- Inspect removed components: Examine the crankshaft for rust. Check old seals for melting, which indicates overheating.
Success Signal: The pump slides off smoothly with the key and set screw retrieved intact.
Install the New Pressure Washer Pump
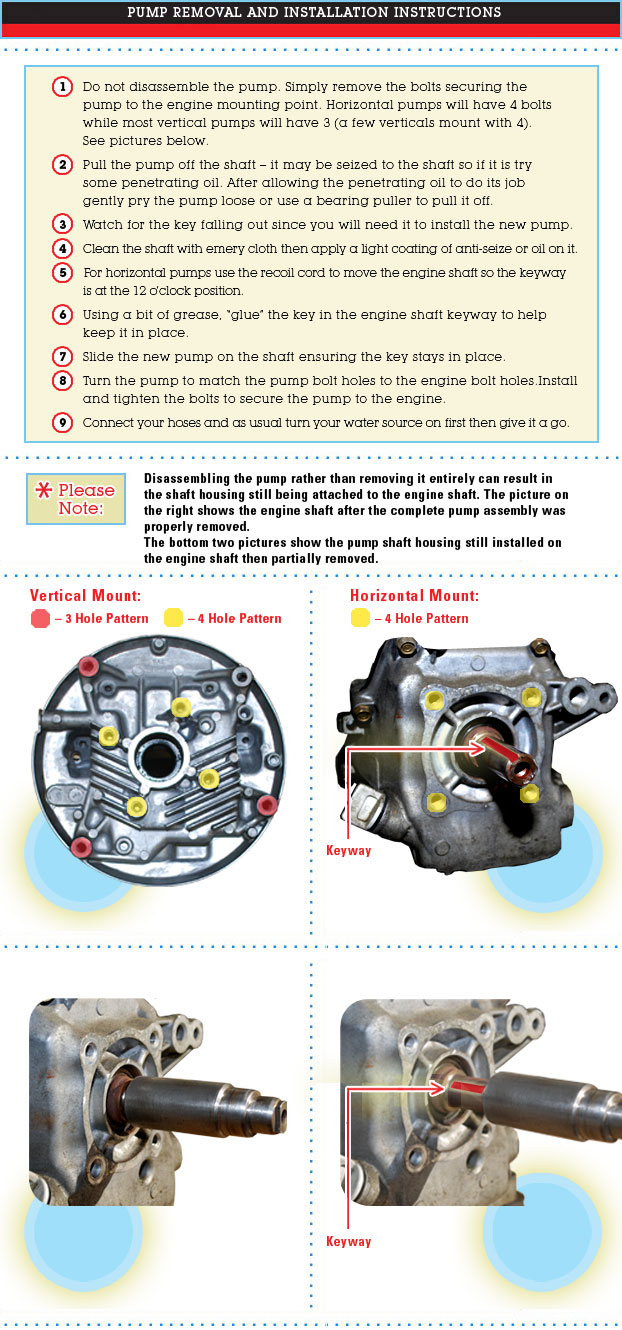
Precision alignment ensures long life and smooth operation. Rushing this step often leads to vibration and premature failure.
Prepare the Engine Shaft
- Clean the shaft: Wipe thoroughly to remove dirt, old grease, or corrosion.
- Align the keyway groove: Rotate the engine via the recoil rope until the groove faces upward.
- Apply anti-seize lubricant: Coat the shaft generously, especially inside the keyway, to prevent future galling.
- Insert the shaft key: Slide the key into the groove, leaving it slightly protruding for easier alignment.
Mount the New Pump
Choose the method that best suits your access and fit.
Method 1: Direct Push-On
Align the pump’s internal slot with the protruding key. Push straight on with firm hand pressure. Rotate slightly while pushing until fully seated. Confirm there is no resistance.
Method 2: Engine Crank Assist
Partially seat the pump onto the shaft. Gently pull the recoil starter to rotate the engine. Let the shaft rotation align the key with the pump slot. Push the pump fully on once aligned.
Caution: Keep fingers clear of moving parts. Only use light pulls on the recoil cord.
Secure the Assembly
- Reinstall standoff pipe: Thread it through the base and tighten with an adjustable wrench.
- Insert mounting bolts: Use washers to distribute load. Tighten in a crisscross pattern for even clamping.
- Final torque: Snug all bolts, then give each an extra quarter to half turn. Avoid over-tightening to prevent cracking the aluminum housing.
- Reinstall set screw: Thread the 8 mm Allen screw into the shaft collar and tighten securely.
Reconnect Hoses and Fittings
- Reattach the inlet hose to your garden water source.
- Connect the high-pressure hose to the discharge port.
- Replace the quick-connect fitting if the new pump uses a different type.
- Reconnect the small auxiliary hose to its rubber mount or frame.
Prime and Test the System Properly
Never start the pump dry, as this destroys seals instantly. Proper priming is essential for the longevity of your new investment.
Prime Before Starting the Engine
- Turn on water supply: Ensure a steady flow before proceeding.
- Pull spray gun trigger: Hold for two to three minutes to fill pump chambers and purge air. Listen for gurgling to stop.
- Keep trigger pulled: Maintain this position until the engine starts.
Start and Monitor Performance
- Start engine: Keep the trigger pulled during startup.
- Let run at idle: Allow two to five minutes of operation with the trigger released to circulate oil.
- Inspect for leaks: Check housing, hose connections, and shaft seal. Any drip requires shutdown and re-tightening.
- Engage full pressure: Squeeze the trigger and observe the spray pattern. It should be strong, steady, and consistent.
Listen and Feel for Issues
Normal operation produces a smooth hum with slight vibration. Warning signs include knocking, which suggests a sheared key, or surging pressure, indicating air in the system. Overheating points to unloader valve dysfunction.
Final Check: Ensure the recoil starter pulls smoothly to confirm no binding exists.
Prevent Future Pump Failures
A new pump lasts longer with smart maintenance habits and proper storage techniques.
Winterize to Avoid Cracks
Freezing water is the number one killer of pumps. At the season’s end, inject Pump Saver or RV antifreeze into the inlet. Run until fluid exits the discharge hose. Store indoors in a dry, temperature-controlled space.
Never Run Dry
Even 30 seconds without water can ruin seals. Always connect the water source before starting. Shut off the engine immediately if flow stops during operation.
Use Clean Water Sources
Debris clogs valves and scores pistons. Avoid drawing from buckets with sediment. Use an inline filter if your water source is questionable.
Manage Heat and Sun Exposure
Prolonged sun exposure degrades seals. Take breaks during long jobs and store the unit in shade when possible.
Lubricate When Needed
Some pumps require oil changes every 50 to 100 hours. Others are sealed for life. Check your manual. Anti-seize on the shaft reduces future removal difficulty.
Inspect Regularly
Check mounting bolts monthly since vibration loosens them. Look for early leaks or oil seepage. Replace seal kits at the first sign of minor leakage.
Frequently Asked Questions About Changing Pressure Washer Pumps
Can I repair a cracked pressure washer pump housing?
No, you cannot safely repair a cracked housing. High-pressure operation makes welding or epoxy repairs dangerous and unreliable. You must replace the entire pump unit if the housing is cracked.
How do I know if my pressure washer pump is bad?
Signs include visible cracks, oil leaking from the body, complete loss of pressure, or persistent overheating. Rule out clogged filters or air locks before concluding the pump is failed.
Are all pressure washer pumps interchangeable?
No, pumps are not universal. You must match the bolt hole pattern, shaft type (keyway vs. sprocket), and flow ratings. Brand-specific models like Simpson or Generac often have unique requirements.
How long does it take to change a pressure washer pump?
Most DIYers can complete the replacement in one to two hours. This includes diagnosis, removal of the old unit, installation of the new pump, and system testing.
Why does my new pump leak oil after installation?
Oil leakage often indicates degraded internal seals due to heat or age. Ensure you applied anti-seize to the shaft and tightened mounting bolts in a crisscross pattern to prevent misalignment.
Key Takeaways for Replacing Your Pressure Washer Pump
Successfully changing a pressure washer pump requires accurate diagnosis, precise part matching, and careful installation. By verifying bolt patterns, shaft types, and flow ratings, you ensure compatibility and prevent immediate failure. Proper priming and regular maintenance further extend the life of your new investment.
Take time to align the shaft key correctly and avoid running the pump dry to protect your new unit. With the right tools and this step-by-step approach, you can restore your machine’s power and avoid costly professional repairs. Keep this guide handy for your next maintenance task.