How to Install Washing Machine Water Valve
If your washing machine won’t fill with water or you notice a slow drip behind the unit, the culprit might be a faulty water shut-off valve. Knowing how to install a washing machine water valve is a crucial DIY plumbing skill that can prevent costly water damage and keep your appliance running smoothly. Whether you’re replacing a leaky valve or upgrading to an automatic shut-off system, this guide walks you through every step safely and efficiently. You’ll learn how to remove an old valve, prepare the pipes, install the new one correctly, and test for leaks like a pro.
With the right tools and a methodical approach, most homeowners can complete this job in under two hours. Let’s get started.
Shut Off Water Supply Before Starting
Before touching any plumbing, you must cut the water supply. Locate the main shutoff valve, which is usually near the water meter or where the main water line enters your home, and turn it clockwise until it’s tight. If you’re in a multi-unit building, notify your neighbors in advance since this may affect their water supply.
Next, open the nearest faucet such as a bathroom sink to drain residual pressure from the lines. Do the same with the washing machine valves if they’re still functional. This step ensures no surprise gushes of water when you start disconnecting lines.
Keep the washing machine hoses disconnected until the new valve is installed to avoid accidental spills.
Prepare the Work Area
Clear space around the washing machine area. Pull the unit away from the wall carefully, protecting your floor with cardboard or towels. Place a bucket or rag beneath the valves to catch any leftover water.
Remove any protective caps from the existing valves. If you’re working with a dual-valve unit mounted to the wall, unscrew the mounting brackets. Take note of how the old valve is connected, especially the pipe type such as copper, PEX, or CPVC and the fitting style including compression, push-fit, or threaded connections.
Remove the Old Water Valve
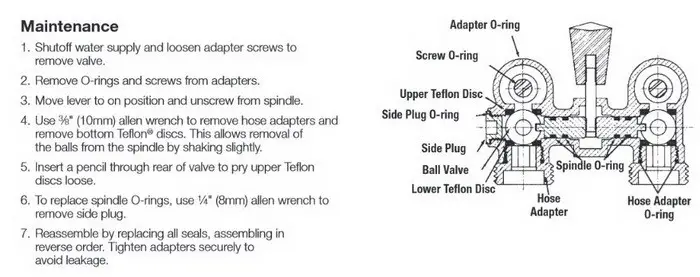
Disconnect Hoses and Fittings
Use an adjustable wrench to disconnect the washing machine hoses from the old valve. Turn the fittings counterclockwise, but avoid twisting the valve body itself or you could damage the supply pipe.
For compression valves, use two wrenches: one to hold the valve body and one to loosen the compression nut. Break any sealant gently by applying opposite pressure. Once loose, finish unscrewing by hand.
For push-fit valves, press the release collar upward while pulling the pipe straight out. If the connection is stuck, twist slightly or use a tool like Nipex pliers for grip. Avoid yanking the pipe forcefully.
Unmount and Extract the Valve
Remove wall-mounting screws if present. Some valve covers snap off for better access, so check for hidden clips. If you’re reusing parts like screws with O-rings, set them aside for reference.
Inspect the exposed pipe end carefully. Look for signs of corrosion, cracks, or deformation. If the pipe is damaged, you may need to cut back and re-pipe before installing the new valve.
Cut and Prepare Copper Pipe Properly
Make a Clean Pipe Cut
If you’re replacing a section of copper pipe, use a clam-shell pipe cutter. Rotate it around the pipe, tightening slightly with each turn. Follow the cutter’s arrow direction for a smooth, square cut.
Cut only what’s necessary, typically 1 to 2 inches beyond the old valve connection point.
Deburr the Pipe Thoroughly
Use a deburring tool to clean both ends of the cut pipe. Remove sharp burrs from the internal edge that could restrict flow or damage seals. Smooth rough edges on the external edge so the pipe fits snugly into fittings.
Wipe the pipe with a dry cloth. Any debris left behind can compromise the seal and cause leaks.
Never install a valve on a pipe with burrs or flat spots, as this leads to leaks.
Install the New Water Valve
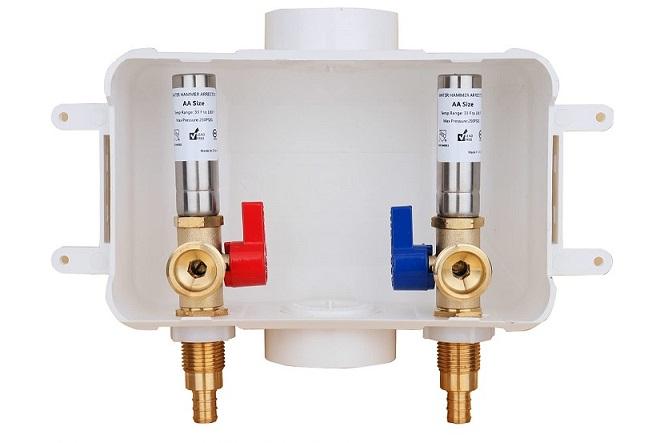
Compression Valve Installation Steps
Slide the compression nut, then the brass olive onto the pipe. Insert the pipe fully into the valve inlet. Hand-tighten the nut, then back off slightly.
Apply compression fitting compound to the olive for a better seal. Re-tighten with a wrench, making it firm but avoiding over-tightening. Typically, this means 1/4 to 1/2 turn past hand-tight.
Hold the valve body steady with a second wrench to avoid stress on internal components.
Push-Fit Valve Quick Installation
Ensure the pipe is cleanly cut and deburred. Push the pipe into the fitting until you hear or feel a thump, which means the locking collar has engaged. Tighten the retaining collar with an adjustable spanner.
No sealant is needed for push-fit connections, but make sure the pipe is fully seated. Pull gently to test the connection.
Mount Dual or Wall-Valve Units
For dual hot and cold assemblies, align the unit and thread mounting screws by hand first to avoid cross-threading. Use a stubby screwdriver or ratcheting tool to tighten evenly.
If installing into drywall, drill pilot holes and use hollow-wall anchors for secure mounting.
Reuse original screws if the new O-rings don’t fit the thread pitch. Mix and match for a secure seal.
Connect Hoses and Accessories
Manual Valve Hookup
Reconnect the hot and cold washing machine hoses. Attach the blue hose to the cold valve and the red hose to the hot valve, or follow labeled connections. Hand-tighten first, then give a quarter-turn with a wrench.
Avoid over-tightening, which can crush rubber washers and cause leaks.
Automatic Shut-Off Valve Setup
If installing a smart valve, connect CPVC or PEX tubing from the supply lines using PVC primer and cement. Thread adapters onto the automatic valve. Reconnect washing machine hoses.
Place the leak sensor pad on the floor near the machine. Plug the washing machine into the valve’s power outlet, then plug the valve into the wall.
Many modern automatic valves are retrofit-friendly, requiring no wall cutting.
Test for Leaks and Function
Restore Water and Inspect
Slowly turn the main water supply back on. Let pressure build gradually. Open both hot and cold valves fully.
Watch every connection carefully. Check compression nuts, threaded joints, push-fit collars, and valve bodies. Look for drips, misting, or pooling water. Even a small leak can worsen over time.
Run a Test Cycle
Let the washing machine run a short cycle. Check connections again under full pressure. For automatic valves, pour a small amount of water on the sensor to test auto-shutoff. The water and power should cut off immediately.
Leave the system running for 1 to 2 hours, then re-inspect. Hidden leaks often appear after initial pressurization.
Label and Maintain Your Valves
Mark Hot and Cold Clearly
If both new valves are blue, which is common in modern kits, label them properly. Use red tape for hot and blue tape for cold, or attach small tags.
This prevents future connection errors, which is especially important for renters or service technicians.
Annual Maintenance Tips
Inspect the valves every 12 months for moisture, corrosion, or handle stiffness. Replace the valves every 8 to 10 years, even if no issues appear.
Wipe down valves with a damp cloth, avoiding abrasive cleaners.
A failed valve can release hundreds of gallons in hours, so don’t skip maintenance.
Fix Common Installation Issues
Valve Leaks After Installation
Most post-install leaks come from missing or misaligned olives, insufficient thread tape, or improperly seated push-fit pipes.
Fix this by shutting off the water, disassembling the connection, and reapplying sealant. Ensure the olive is snug and the pipe is fully inserted.
Low Water Pressure
Low water pressure can be caused by a partially closed valve, kinked hose, or debris in the line.
Fix by opening valves fully, straightening hoses, and flushing the system by briefly opening the washing machine connections.
Cross-Threading Screws
If mounting screws won’t turn, start by hand and align holes carefully. Use a smaller pilot hole if needed.
Forcing screws strips threads and weakens the mount.
Incompatible O-Rings
New valve kits may include O-rings that don’t fit old screw holes. The solution is to reuse original screws with new O-rings from the kit.
Upgrade to Automatic Shut-Off Valves
Why Install a Smart Valve
Automatic shut-off valves offer leak detection via floor sensor, automatic water and power cutoff, remote alerts in smart models, and peace of mind when away from home.
These valves are especially valuable in basements, upstairs laundry rooms, or rental units.
Retrofit Without Renovation
Modern kits connect to existing plumbing using adapters, so there’s no need to open walls. You can install in under 90 minutes with basic tools.
At $150 to $225, an automatic valve is cheaper than a single water damage repair.
Tools and Materials Checklist
Must-Have Tools
Gather these essential tools before starting:
Two adjustable wrenches for tightening and loosening nuts and fittings. A pipe cutter, specifically a clam-shell type for copper cuts. A deburring tool for internal and external pipe edges. A stubby screwdriver for tight spaces. A ratcheting multi-bit driver for mounting screws. A drill for wall mounting.
Key Materials Needed
New water valve, either manual or automatic. Compression nut and olive if not included with the valve. PTFE thread tape. Compression fitting compound. Copper pipe if extending. Hollow-wall anchors for drywall. Leak sensor pad for smart valves.
Keep the old valve for reference, especially thread size and pipe diameter.
Safety and Best Practices
Do’s and Don’ts
Always shut off the main water first. Use two wrenches on joints. Deburr pipe after cutting. Apply sealant to threads. Label hot and cold valves clearly.
Never work on live lines. Over-tighten fittings. Reuse damaged olives. Skip leak testing. Assume blue means cold without labeling.
Prevent Costly Mistakes
Never reuse old olives because they deform during removal. Don’t force stuck parts; use penetrating oil instead. Always test under full pressure before calling the job done.
Key Takeaways for Installing Your Washing Machine Water Valve
Installing a washing machine water valve is a smart, cost-effective upgrade that boosts safety and reliability in your home. Whether you choose a basic dual-valve or a high-tech automatic system, proper installation ensures years of trouble-free operation. The most critical steps are shutting off the water supply, preparing pipes correctly, sealing joints with thread tape or compression compound, and testing thoroughly under full pressure before finishing.
By following these steps carefully, you’ll avoid common pitfalls like leaks from improper sealing, cross-threaded screws, or forgotten labels. Take time to inspect all connections after pressurization, as hidden leaks often appear after initial testing. Once complete, label your hot and cold valves clearly and add annual inspection to your home maintenance routine.
Now that it’s done, enjoy the peace of mind that comes with a secure, leak-free connection.
Frequently Asked Questions About Installing Washing Machine Water Valves
How long does it take to install a washing machine water valve?
Most homeowners can complete this project in 1 to 2 hours. The time varies depending on whether you need to cut and prepare new pipe sections or if you’re simply replacing an existing valve. Professional plumbers typically charge $100 to $150 per hour for this service.
Can I install a washing machine water valve myself, or do I need a plumber?
If you have basic plumbing knowledge and the right tools, this is a manageable DIY project. However, if your home has older galvanized pipes or if you’re not comfortable working with water supply lines, hiring a plumber is advisable. The job requires shutting off the main water supply, so confidence in your skills is important.
What type of valve should I choose, manual or automatic shut-off?
Manual valves cost $25 to $60 and provide basic on-off control. Automatic shut-off valves cost $150 to $225 and include leak detection sensors that cut both water and power to the machine. If your laundry area is in a basement or upstairs, the automatic system offers valuable protection against water damage.
Why is my new valve leaking after installation?
Leaks after installation usually result from missing or misaligned olives in compression fittings, insufficient thread tape on threaded connections, or push-fit pipes that weren’t fully seated. Turn off the water, disassemble the leaking connection, reapply the appropriate sealant, and ensure all components are properly aligned before reconnecting.
How often should washing machine shut-off valves be replaced?
Inspect your valves annually for signs of corrosion, stiffness, or moisture. Even with no visible issues, replace valves every 8 to 10 years as a preventive measure. Older valves are more likely to fail suddenly and cause significant water damage.