How to Plumb a Washing Machine: Easy Steps
Plumbing a washing machine correctly is essential for safe, efficient, and code-compliant operation. A poorly installed unit can lead to leaks, flooding, siphoning, or even structural damage over time. Most modern washing machines only require a cold water supply, as they heat water internally, simplifying the plumbing process. This guide walks you through every step, from selecting valves and pipes to connecting hoses and ensuring proper drainage using best practices and up-to-date plumbing codes.
Whether you’re replacing an old unit or installing one for the first time, this guide covers all critical aspects: water supply connections, 2-inch drain line requirements, P-trap placement, standpipe height, venting rules, and final testing. With clear, actionable steps and expert-backed recommendations, you’ll complete a durable, professional-grade installation that lasts for years.
Install Cold Water Supply Valve

Modern washing machines use cold water only, so installing a dedicated cold supply line is sufficient. The shut-off valve must be accessible, durable, and properly positioned for easy hose connection.
Choose Lever-Handle Shut-Off Valves
Avoid old-style round-handled valves that seize over time. Instead, use lever-handled ball valves. They are easier to operate and less likely to fail during emergencies. For best results, install a single-lever dual valve (even if only using the cold side) or a washer box with long-shanked lever valves. These extend through the wall box and allow secure hose attachment.
• Use lever-handle ball valves instead of round-handled valves
• Consider single-lever dual valves for hot and cold capability
• Order long-shanked valves separately if not included with washer box
Pro Tip: Standard washer-box-only kits often lack long-shanked valves. Order them separately to ensure compatibility.
Mount Valve on Drop-Ear Elbow
Secure the valve using a drop-ear elbow, which anchors the fitting to wall studs. Match the material to your piping system: copper, CPVC, or PEX. Attach the drop-ear to the stud with screws, then connect the valve to the elbow. This prevents stress on pipes when connecting or disconnecting hoses.
Position Valve at Correct Height
Set the center of the valve outlet 42 to 48 inches above the floor, aligned with the washing machine’s inlet. Keep it near the machine to minimize hose strain and reduce the risk of kinks or leaks.
Run CPVC or PEX Supply Line
Use either CPVC or PEX piping to route the cold water line from the main supply to the washing machine valve. Both materials are reliable, code-compliant, and suitable for indoor use.
Cut and Prepare CPVC Pipe
Use a pipe cutter or hacksaw to make clean cuts. Remove burrs with sandpaper. Add one-half inch to the measured length for each fitting to account for insertion depth. For example, a 13 3/8 inch run requires a 14 3/8 inch pipe.
Prime and Cement CPVC Fittings
Apply CPVC primer to both the pipe end and inside of the fitting. Then apply a thin layer of CPVC cement. Insert the pipe fully, give it a one-quarter turn, and hold for 15 to 30 seconds to set. Wipe away excess cement.
Use Push-Fit Fittings for Easy Installation
In retrofit situations, push-fit connectors simplify installation. No glue or special tools are needed: just insert the pipe until it clicks. Ensure the insertion depth matches across fittings. Dry-fit the entire system first to confirm alignment.
• SpeedFit fittings require 1 inch 1/8 inch insertion depth
• Tektite fittings require 1 inch 5/8 inch insertion depth
• Always dry-fit before final assembly
Route Pipe Away from Obstacles
Avoid running supply lines near electrical wiring, HVAC ducts, or drain traps. Drill 3/4 inch to 7/8 inch holes in stud centers to allow for thermal expansion. Use a loop-around pattern to navigate around obstructions like P-traps.
Set Up 2-Inch Drain Standpipe
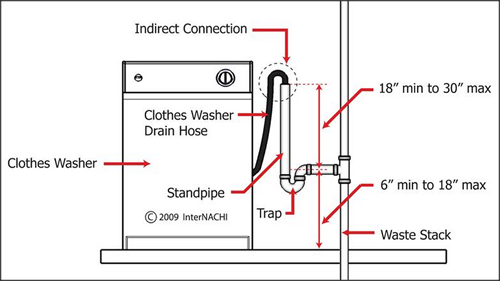
A properly configured drain system prevents overflow, siphoning, and sewer gas infiltration. The minimum drain pipe size is 2 inches. Never use 1.5-inch pipe for modern high-efficiency washers.
Install P-Trap Near Floor Level
Mount the P-trap close to the floor, not below a concrete slab. It must include a horizontal run of at least 4 inches (some codes require 6 inches) after the trap weir before the vertical drop. This prevents formation of an illegal S-trap, which can siphon water due to negative pressure.
Code Violation Alert: An inspector rejected one installation because the horizontal run was too short. Adding a 6-inch section fixed the issue.
Build Standpipe 43 Inches High
The standpipe must be at least 43 inches tall from the finished floor. This height ensures adequate air gap, prevention of backflow, and protection against siphoning. Even though the washer pumps water out, a tall standpipe gives the drainage system room to handle rapid discharge without overflowing.
Support Drain Hose Properly
Drop the washing machine’s drain hose into the top of the standpipe. Secure it with a jubilee clip or hose clamp to prevent dislodging. Keep the hose between 30 and 43 inches high. Never lower than the flood rim of the standpipe.
Warning: A loose hose can cause overflow or poor drainage.
Connect Water Inlet Hose
Use the hose provided with the machine or upgrade to a stainless-steel braided hose rated for 1,000-plus psi burst pressure. Standard rubber hoses degrade over time and can burst unexpectedly.
Attach 90-Degree End to Machine
Screw the 90-degree connector into the washer’s inlet by hand-tightening only. Over-tightening can crush the rubber O-ring and cause leaks. Inspect the O-ring for nicks or debris before installation.
Fasten Straight End to Wall Valve
Connect the straight end of the hose to the wall valve. Keep the blue (cold) lever closed until both ends are secured. Once connected, slowly open the valve and check for leaks by feeling the joints. Do not rely on sight alone.
Clean Inlet Filter Regularly
The machine has a built-in water inlet filter that catches sediment. Remove and rinse it under running water every 6 to 12 months to maintain water pressure and prevent clogs.
User Tip: If water does not fill, check if the filter is blocked or the valve is fully open.
Prevent Siphoning and Backflow

Even with a pump, improper drain setup can cause wastewater to siphon back into the machine or overflow during discharge.
Avoid S-Traps with Proper Venting
An S-trap lacks proper venting and creates negative pressure that pulls water out of the trap. Always use a P-trap with a vented system. Vents equalize pressure and maintain the water seal.
Use Correct Vent Fittings
Install a Y-fitting with a 45-degree elbow for horizontal-to-vertical transitions. Only use sanitary T-fittings when a lateral connects directly to a vertical stack. The vent should rise within 5 to 6 feet of the trap, per local code.
Throttle Drain Hose if Overflow Occurs
If the machine discharges too quickly and overflows the standpipe, slightly tighten a hose clamp around the drain hose to reduce flow. Do not kink the hose. This can damage the pump.
Expert Insight: “The outlet of the washer is not the factor. The discharge is pumped. The trap stays near the floor so there is enough standpipe to handle the surge.” – Cameron Wood
Level and Secure the Washer
An unlevel machine vibrates excessively and may walk across the floor during spin cycles, damaging floors and connections.
Adjust Leveling Feet
Use a spirit level on top of the washer. If one corner is low, lift slightly with a wooden block and turn the threaded leveling foot clockwise to extend it. Adjust all four corners until the machine is perfectly level.
Tighten Lock Nuts
Once leveled, tighten the lock nuts against the base to prevent movement. Rock the machine gently. Any shifting means rechecking the leveling.
Troubleshooting Tip: If vibration persists, confirm transportation bolts are removed. Leaving them in destroys the suspension.
Test for Leaks and Performance
Before routine use, run a test cycle to verify all connections are secure and the system functions correctly.
Run Short Spin Cycle
Start a cold wash or spin-only cycle. Watch for leaks at water and drain connections, excessive vibration or noise, and slow drainage or backup. Shut off water immediately if leaks appear. Re-tighten fittings or replace damaged O-rings.
Verify Cold Water Entry
Set the machine to a cold cycle and confirm cold water fills the tub. If hot water enters, swap the hose orientation at the valve.
Check Drain Flow
Ensure wastewater exits quickly without gurgling or bubbling. These are signs of poor venting or partial blockage. Listen for siphoning sounds after the cycle ends.
Upgrade with Raised Platform (Optional)
Installing the washer on a 12 to 15 inch platform improves ergonomics and reduces back strain during loading.
Build Stable Support Structure
Use plywood and 2×4 framing anchored to floor joists. Ensure the platform supports the machine’s full weight (up to 200-plus pounds when loaded).
Confirm Hose Compatibility
Verify that supply and drain hoses are long enough to reach without stretching. Extend drain hose if needed, but avoid kinks.
User Example: One homeowner built a 15-inch platform that also aligned the drain hose with the standpipe, eliminating previous kinking issues.
Follow Local Plumbing Codes
Plumbing regulations vary by region. Always comply with UPC (Uniform Plumbing Code) or IPC (International Plumbing Code) standards in your area.
Key Code Requirements
• Drain pipe: Minimum 2-inch diameter
• Standpipe height: At least 43 inches
• Horizontal run after trap: Minimum 4 to 6 inches
• Venting: Y plus 45-degree elbow or sanitary T at junctions
• Prohibited: S-traps, 1.5-inch pipes, undersized vents
Note: Even if not enforced, upgrading old 1.5-inch lines to 2-inch future-proofs your system.
Maintain System Long-Term
Regular maintenance prevents sudden failures and extends the life of your plumbing setup.
Replace Hoses Every 5 Years
Inspect inlet hoses annually for bulges, cracks, or corrosion. Replace every 5 years, regardless of appearance. Never use standard rubber hoses. Choose stainless-steel braided versions instead.
Inspect Trap and Vent
Check for gurgling sounds after draining. This indicates siphoning due to poor venting. Clear any blockages in the vent stack if needed.
Test Shut-Off Valves Annually
Turn valves off and on to ensure they operate smoothly. Stuck valves are useless in emergencies.
Water Hammer Fix: If pipes bang when the machine starts or stops, install external water hammer arrestors or use a washer box with integrated anti-shock valves.
Frequently Asked Questions About How to Plumb a Washing Machine
What pipes do I need to connect for a washing machine?
You need two connections: a cold water inlet hose (supplies water) and a waste water drain hose (removes used water). Modern machines heat water internally, so no hot water supply is required.
Can I plumb a washing machine into a kitchen sink drain?
You can do this temporarily using a sink adapter. For permanent use, ensure the drain is 2 inches in diameter, properly vented, and not prone to clogs. However, a dedicated standpipe is strongly recommended for best performance.
What size drain pipe is required for a washing machine?
The minimum drain pipe size is 2 inches in diameter. Never use 1.5-inch pipe for modern high-efficiency washers, as it cannot handle the rapid discharge volume and may cause overflow.
How high should the washing machine standpipe be?
The standpipe must be at least 43 inches tall from the finished floor. This height ensures adequate air gap, prevents backflow, and protects against siphoning during high-volume discharge.
Do I need to vent the washing machine drain?
Yes, proper venting is required to prevent siphoning and maintain the P-trap seal. Use a Y-fitting with a 45-degree elbow for horizontal-to-vertical transitions, or a sanitary T-fitting where a lateral connects to a vertical stack.
How often should I replace washing machine hoses?
Replace inlet hoses every 5 years, regardless of appearance. Inspect them annually for bulges, cracks, or corrosion. Always use stainless-steel braided hoses rated for 1,000-plus psi burst pressure.
Key Takeaways for Plumbing Your Washing Machine
Plumbing a washing machine is a manageable DIY project with the right tools and knowledge. The most critical requirements include using 2-inch drain lines (never 1.5-inch), installing a P-trap with at least 4 to 6 inches of horizontal run, positioning the standpipe at least 43 inches high, and using lever-handled shut-off valves for easy operation. Always avoid S-traps, which can siphon water from the trap and allow sewer gases into your home.
When connecting water supply hoses, hand-tighten only to avoid crushing O-rings, and consider upgrading to stainless-steel braided hoses for durability. Finally, test your installation with a short cycle before regular use, checking all connections for leaks and ensuring the machine is level to prevent excessive vibration. With proper setup and annual maintenance, your washing machine will operate quietly and efficiently for years.