How to Stop Washing Machine Vibration: Quick Fixes
Is your washing machine shaking violently during the spin cycle? Excessive vibration is not just annoying noise. It can damage your appliance, scratch your floors, and even loosen plumbing connections over time. The good news: most causes are fixable with simple adjustments. Whether you have just installed a new washer or your trusted machine has started wobbling, this guide shows you exactly how to stop a washing machine from vibrating. You will learn how to level the unit, remove shipping bolts, balance loads, and know when it is time to call a professional.
Check for Shipping Bolts on New Front-Load Models

If your washer is new and shaking badly, shipping bolts may still be in place. Front-loading washers come with metal bolts that secure the drum during transport. If left in, the drum cannot move freely, causing intense vibration.
Remove Back Panel Bolts
Locate three to five bolts on the back panel of your front-loading washer. Use a wrench to remove each bolt. Once removed, plug the holes with the included plastic caps to keep dust out. This simple step takes about fifteen minutes and can eliminate most vibration in new machines.
Confirm Drum Movement
After removal, open the door and gently push the drum. It should shift slightly in all directions. If it does not move, double-check for missed bolts or packaging debris. Never run the machine with shipping bolts installed. This can destroy shock absorbers and void your warranty.
Level the Washing Machine

An unlevel washer is the number one cause of vibration. Even a slight tilt causes the drum to wobble during high-speed spin cycles, leading to violent shaking.
Adjust Front and Rear Feet
Place a spirit level on top of the machine, checking front to back and side to side. If the bubble is off-center, adjust the leveling feet. Turn the foot clockwise to raise a corner. Turn counterclockwise to lower. Lift the machine slightly to rotate stiff feet. On solid floors, extend the back legs fully and fine-tune with the front feet.
Lock the Leveling Nuts
Once level, secure the position by tightening the lock nuts under each foot. Push down on each corner. If the machine rocks, re-adjust and tighten again. Samsung models have two foot types. Type one uses a screwdriver to tighten the lock nut. Type two requires a spanner to loosen and tighten the lock nut.
Balance the Laundry Load
An uneven load throws the drum off balance at high speeds. This is one of the most common causes of vibration during the spin cycle.
Distribute Clothes Evenly
Load items loosely and spread them around the drum. Mix heavy and light pieces. Pair a bath towel with a bed sheet. Avoid washing a single pair of jeans or one bulky comforter alone. If the machine starts thumping, pause and rearrange the load before continuing.
Avoid Overloading and Underloading
Overpacking strains the motor and prevents proper spinning. Underloading, such as one to two items, lets the drum swing wildly. Stick to the seven to nine kilogram capacity limit. A full drum should feel full but not stuffed. Leave room for clothes to shift during the cycle.
Run Calibration Mode on Samsung Models
Samsung washers need manual calibration after installation or moving. This ensures accurate load sensing and optimal spin performance.
Access Calibration Settings
For models without a dial, hold Temp plus Delay End plus for three seconds until CB appears. Press Start/Pause. The drum spins for up to three minutes. Wait for zero to confirm completion. For models with a dial, hold Additional Function for three seconds. Turn the dial to Calibration. Press Select. The door must be closed for calibration to start.
Clean the Pump Filter
A clogged filter disrupts water flow and can cause imbalance. This is an often-overlooked cause of vibration.
Remove Debris Regularly
Unplug the washer. Place towels under the front-bottom right panel. Open the filter cover slowly, as water may spill. Pull out the filter and clear lint, coins, or hair. Reinstall and tighten securely. Perform this task every one to three months. A clean filter prevents error codes and improves drum stability.
Inspect for Trapped Packaging Under New Machines
New machines sometimes vibrate due to leftover foam or polystyrene trapped beneath the drum.
Check Under the Drum
Unplug and move the washer to an open area. Carefully tilt it backward, getting help since the machine is heavy. Look under the base for white foam blocks or plastic packaging. Remove any material found. This often happens when the unit is slid off the pallet instead of lifted properly.
Replace Worn Internal Components
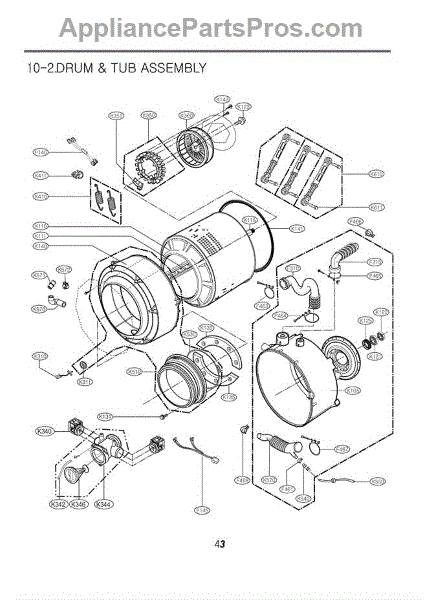
Persistent shaking may mean damaged suspension components. These parts wear after five to seven years of heavy use.
Diagnose Shock Absorbers
If the machine bounces or jumps during spin, check the shock absorbers. These dampen drum motion. Signs of failure include loud banging, visible oil leaks, and uneven drum position. Most models have two to four shocks. Replace in pairs if worn.
Test Suspension Springs and Snubber Ring
Springs support the drum. If stretched or broken, the tub sags. The snubber ring, also called a damper pad, reduces oscillation. If cracked or missing, vibration increases. These parts require disassembly to replace. Call a technician if you are not experienced with appliance repair.
Listen for Bearing or Spider Damage
Grinding noise during spin could indicate serious mechanical failure. Do not ignore these sounds.
Identify Bearing Failure
Worn drum bearings cause a low rumbling or grinding sound, especially during high-speed spins. Water may leak from the tub seal. Bearings fail due to moisture exposure or age. This requires professional replacement.
Inspect the Spider Assembly
The spider is a metal bracket behind the drum. In humid environments, it can crack or corrode, leading to dangerous imbalance. This requires full drum removal. This is best handled by a technician. Warning: Running the machine with a broken spider risks complete drum collapse.
Stabilize the Floor
Soft or uneven flooring amplifies vibration. Wooden subfloors flex under the weight of a spinning washer.
Use Anti-Vibration Pads
Place rubber or gel pads under each foot. These absorb movement and reduce noise, especially on tile or hardwood. Brands like Vibrapad or IsoMat work well. This is a simple solution that takes minutes to install.
Install a Plywood Base
For wooden subfloors or second-story laundry rooms, build a three-quarter-inch plywood platform under the washer. This spreads weight and prevents flex. Cut to fit, sand edges, and place directly on the floor. Avoid carpet, as it acts like a trampoline. If carpet is unavoidable, use a rigid platform on top of it.
Secure Pedestal or Stacking Kit
Washers on pedestals or stacked with dryers need firm mounting. Loose hardware causes the entire unit to shake.
Tighten All Mounting Bolts
Check the brackets and screws connecting the washer to the pedestal. Use a wrench to tighten any loose hardware. For stacked units, ensure the dryer is locked in place with anti-tip brackets. Re-level the machine after securing. A loose pedestal can cause the entire unit to shake even if the washer itself is stable.
Prevent Future Vibration
Stop problems before they start with routine care and smart loading habits.
Follow a Maintenance Schedule
Level the washer every six months or after moving. Clean the filter every one to three months. Run calibration after relocation on Samsung models. Inspect pedestal bolts annually. Avoid overloading every wash. Keep the area clean and dry to prevent corrosion and slipping.
Load Smart, Wash Quiet
Mix fabric types and weights in each load. Do not wash heavy rugs alone. Use high-efficiency detergent to reduce sloshing. Pause and re-balance if thumping starts. Small habits make a big difference in machine longevity.
Know When to Call a Technician
Some issues require expert help. Do not attempt repairs beyond your skill level.
Seek Professional Repair If
Vibration continues after all fixes. You hear grinding, clanging, or metal-on-metal noise. The machine walks across the floor during spin. There is a burning smell or error codes beyond UB. Water leaks from the tub area. These signs point to failed bearings, broken shocks, or structural damage. Do not risk further harm by continuing to use the machine.
Second-Floor Installations Need Extra Support
If the whole house shakes when the washer runs, the subfloor may be too weak. A contractor may need to add joist supports or reinforce the floor. Never install a washer on a visibly sagging floor. This can cause structural damage to your home.
Frequently Asked Questions About Washing Machine Vibration
Why does my washing machine vibrate only during the spin cycle?
The spin cycle reaches high speeds, typically one thousand to fourteen hundred RPM. Any imbalance, unlevel surface, or worn component is amplified at these speeds. This is when vibration becomes most noticeable.
Can shipping bolts really cause that much damage?
Yes. Leaving shipping bolts in place prevents the drum from moving freely. This forces the entire machine to shake violently. It can permanently damage shock absorbers, suspension springs, and other components. Always remove them before first use.
How do I know if my washing machine is level?
Place a spirit level on top of the machine, checking front to back and side to side. The bubble should be perfectly centered. Also, push down on each corner. The machine should not rock or wobble.
Is vibration normal for older washing machines?
Some vibration is normal, but excessive shaking indicates a problem. Older machines are more likely to have worn shock absorbers, springs, or bearings. Regular maintenance helps extend their lifespan, but internal parts will eventually need replacement.
Can I fix vibration caused by bad bearings myself?
Replacing drum bearings requires disassembly of the washing machine. This is a complex repair that requires special tools and experience. It is best left to a licensed technician. Attempting this yourself may void your warranty or cause further damage.
Key Takeaways for Stopping Washing Machine Vibration
Most washing machine vibration is preventable and fixable. Start by removing shipping bolts on new front-loaders. Level the machine using a spirit level and lock the feet securely. Balance your loads by mixing heavy and light items. Clean the pump filter every one to three months. Use anti-vibration pads on soft floors and consider a plywood base for second-story installations. For Samsung models, run calibration after moving the machine. For older machines, worn shock absorbers, springs, or bearings may require professional replacement. With regular care and proper installation, your washer can run smoothly and quietly for years.